Showing posts with label tags. Show all posts

Thursday, May 26, 2016

Inspirational Tag Set with Technique Junkies

Hello Dreamers,
Today, I have a set of fun tags with an inspirational sentiment.  This fun stamp is from the May New Releases from Technique Junkies.  I also stamped flowers onto pretty DP.


Materials List:
Stamps: Measure Herself and Falling Flowers both from Technique Junkies
Ink: Regal Rose (Stampin' Up)  and Jet Black Archival
Markers - Memento
CS: pale green
Decorative paper
Corner and Edge Punch


Make It:

  • Cut tags from the pale green CS 
  • Stamp the Falling Flowers stamp with rose ink on DP
  • Cut the DP to fit onto the tags
  • Stamp Measure Herself image onto DP
  • Color the dress with markers


  • Punch the corners and edges of the DP and add to the tags
  • Punch holes in the tops of the tags and add the ribbons
  • Glue a piece of lace to the side edge of one of the tags


Aren't these fun!!  Love the falling flowers in the background too.  The tags would be cute on a gift bag or tucked inside an envelope with a little note on the back.  Would be a cute bookmark too.  Okay, see again soon.  Have a great day!
Karen

Tuesday, April 21, 2015

Medallion Heart Tag

Hello Everyone,
Been super busy, but thought I would pop in  and share this pretty heart tag.   I used Stampin' Up stamps and dies to make this fun tag.


I stamped the Daydream Medallion stamps (Stampin' Up) with Crisp Cantaloupe ink on white CS.  Then die cut the heart.   I added lots of wide ribbon and some lace trim.


I would like to enter my Medallion Heart Tag in:
Love to Scrap Challenge: Anything goes

I will use this on a gift package or, it would be super sweet on a gift bag.   See you soon.  Love ya.
Karen

Thursday, November 6, 2014

Throwback Thursday with Bibiana

Hello Everyone,.
My blogging buddy, Bibiana is hosting Challenge #4 in her Throwback Thursday Linky Party posts.  See all the details on her blog, Stamping with Bibiana.


The idea is to revive an older project and link up on Bibiana's blog.

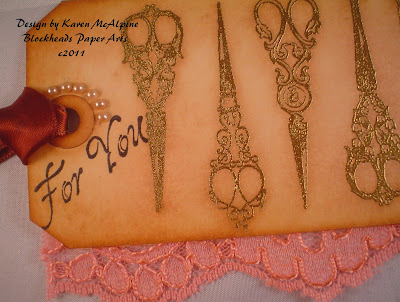
I am going all the way back to August of 2011 for this throwback.  I made a set of tags using vintage scissors stamps.  Take a look.


You can see the original post here.  I stamped with pigment ink and heat embossed the scissors.  I added distress inks around the embossed images.  Finished each tag with some fun embellishments.


Head over and check out the post on Bibiana's blog and link up your throwback!!  There are prizes too!!!  See you soon.  Love ya.
Karen

Saturday, October 11, 2014

Lovely Tag

Hello Dreamers!
Last month for my birthday, I ordered some stamps from Stampin' Up.  I just had to get them out and play around with them.  This tag is one of the projects I made.  I will, of course, share them all with you over the next two months.  (I made quite a few---are you surprised??!!)  


Materials List:
Stamps: Daydream Medallions, Background Builders, Fabulous Work of Art - all from Stampin' Up
CS: White, Crisp Cantaloupe from SU
Ink: Crisp Cantaloupe, Chocolate Chip from SU
Sheer Coral Ribbon


Instructions:

  • Make two tags: from white and Crisp Cantaloupe CS
  • Stamp the Background Builder and Sentiment in Chocolate Chip
  • Stamp Medallions in Crisp Cantaloupe ink
  • Distress edges with both colors of ink
  • Wrap the ribbon around the white tag
  • Glue the white tag to the Crisp Cantaloupe tag


This tag would be just perfect for a package, gift bag, or even to write a little note on the back.

************Challenges for my Work of Art tag
Mod Squad: tags
Card Makin Mamas: tags or mini cards
Dream Valley: anything but a card

Well, I better really get going now.  See you soon!  Love ya.
Karen

Monday, August 19, 2013

Dress Form Tag Set

Hi Dreamers!
Happy Monday!  I picked up a set of Tim Holtz stamps the other day and had time over  the weekend to get some stamping done.  I made a set of gift tags with a sewing theme.  I made five in total and will be showing you two today and the other three in the next post.

 I started with one of the backgrounds I made the other day and just started stamping.  ( See how versatile the stamped backgrounds are!?  I always like to keep a stack of them handy.  Click here to see the whole stack.)

I used cream, kraft, and white CS for all the tags. Here is a photo of the whole group after the stamping part, but before any trimming or cutting into tag shape.


Here is the group all finished with lots of ribbons, fabric scraps, feathers, pearls, and rick rack!


We will be taking a closer look at the Red tag with Feathers and the Green tag today.

Materials:
Stamps: Seamless Experience - Tim Holtz Stampers Anonymous
Rose Lace Cover-a-Card-Impression Obsession
Inks: Black Archival,  Pink Pigment, Mushroom Adirondack, Antique Linen Distress Ink
Various CS's 
Embellishments:Ribbons, fabric scraps, feathers, pearls, flower, twine, rick rack


 The first gift tag is on a folded card.  This can be attached to a gift bag or package and the To and From written on the inside.  Size is 3.25"  x 5.34"

  • Stamp the Rose Lace Cover-a-Card with pink pigment ink on cream CS
  • Cut to size
  • Stamp the dress form with black Archival ink


  • To add the cording punch two holes through all layers (see photo below)
  • Tie cording through holes
  • Add the embellishments

 Back of gift tag card


Green Tag


Size: 3.50" x 6.25"


  • Stamp the dress form with Mushroom Adirondack ink on Cream CS
  • Stamp the zig zag stitch and thread spool top with other shades of green inks
  • Distress with Antique Linen DI
  • Layer with two shades of green CS
  • Punch a hole in the upper left corner through all layers


  • Tie a piece of wide striped ribbon through hole leaving some slack
  • Tie pieces of fabric and ribbons onto the wide striped ribbon

Think how fun these tags would be on a special gift package!!  Or, you could just write a note on the back and send as a card!  Such fun.  These were so fun to make that I could not stop!!  I will share the other three in detail in my next post.


**********Challenges for my Dress Form tag Set:
Avenue 613:stitching faux or real
That Craft Place: stitching
Pile it On: no DP
Cheerful Stamp pad: Your choice
Paper Playtime: pearls
Simon's Wednesday Challenge: monochromatic---Green tag
Rhedd and Rosies: use red

So, I hope you are having a great Monday.  Had the official inspection on the new air conditioning unit this morning.   See, I told you I am catching up on all those little things that did not get done while my husband was off sick for 10 weeks.  Dentist on Thursday.  Not sure what I will set up for the week after.  Maybe a hair cut.    See you soon with the other tags.  Love ya.
Karen

Tuesday, April 9, 2013

Grungeboard Rusty Flowers with Blockhead Sentiments

Hi Dreamers,
I am back after a nice weekend.  The weather was nice and had a nice visit with my brother.  I also spent quite a few hours working on a group of cards for submission.  Those went out in the mail today!  Yeah.  Now, I have four custom order cards for my BF to work on this week.  Now, for today, I have some fun projects made with Grungeboard.  The designers on the Blockheads Design blog, have been showcasing grungeboard this month.
I used a technique in the Tim Holtz's book Compendium of Curiosities- Rusted Grunge.   I thought it would be fun to make some rusty flowers.  LOL.  The flowers are pre-cut Ranger Grungeboard.  You could use any shape for this technique.  I made a Birthday card with matching tag, and another tag.  Let's look at the card first.


Materials List:
Stamps: 
Happy Birthday (Verses Full Sheet or as a single) and For You (Daisies Half Sheet) both from Blockheads.
Ink:
Shabby Shutters, Vintage Photo, Spiced Marmalade, Barn Door, Tumbled Glass Distress Inks -Ranger
Sienna Archival
Embossing Ink ( I used Emboss It)
Other:
Vintage Photo Distress Embossing Powder
Manila Pre-Cut Tag
Ribbons
Pearls
Rust, orange, and black CS


Instructions:

  • Rusty Flowers (per Compendium of Curiosities): Cover grungeboard with embossing ink and heat emboss with Vintage Photo Distress embossing powder.
  • When cool, rub off some of the unmelted crystals. 
  • Apply Barn Door and Spiced Marmalade ink over the embossing powder on the flowers. Use Shabby Shutters on the stem.  This just adds a bit more color.  You could do this before the embossing too.  I did not think of it until after the embossing was done.  


  • Make a card from orange CS layered with black CS.  Glue flowers to the CS.  
  • Add ribbon
  • Stamp the sentiment with Sienna ink and add to card.


Matching Tag for a gift bag or wrapped package.

  • Cut a tag from black CS.
  • Add the flowers and sentiment.
  • Cover a grungeboard butterfly with Spiced Marmalade ink and add to tag. 


  • Stamp sentiment with Sienna
  • Tie the ribbons through the hole
  • Knot a piece of ribbon and wrap around.


 A closer look at the rust.


I used three more of the rusty flowers on another tag.  I made a garden-like background on this pre-cut manila tag.


  • Apply Tumbled Glass and Shabby Shutters ink to the tag.  Apply a little bit of Vintage Photo to simulate a horizon type line.
  • Glue the flowers to tag.
  • Tie the ribbons.
  • Add a few tiny pearls.


Super close look at Garden Tag.


So, another fun way to use Grungeboard.  How do you like to use grungeboard?  If you missed my Grungeboard Pins, take a look here.


Challenges for my Rusty Flowers:
Simon Says Stamp: birthday
City Crafter: birthday
Tuesday Alchemy: garden and gold---my gold is rusty.  LOL
Make My Monday: create your own background--my garden tag
Unstampables: no stamping and anything but a card
Stamping for the weekend: anything but a card


Oh, guess that is it for me today.  I will be back tomorrow with a pretty folded tag card with ribbon tie.  Sound good??.. Hope you are having a great day!  Love ya.
Karen

Tuesday, March 5, 2013

Dreamy Tags with Paper Artsy Stamps

Hi Dreamers!
This month the Designers for Blockheads stamps will be showing fun ways to use your travel themed stamps.   That would include stamps with transportation images, far away places, luggage, tickets, that sort of thing.  I have named my projects for today Dream Travel.  I used stamps by Paper Artsy available in the USA from Blockheads Stamps.


Materials List:
Stamps: Paper Artsy by Lynne Perrella LPC013-Maria and LPC010-Nina from Blockheads Stamps
Inks: Onyx Black Versa Fine; Pistachio Memento; Forest Moss Distress Ink Ranger
Inks for the Background: Shabby Shutters and Forest Moss Reinkers; Antique Bronze Metallic Distress Stain from Ranger
White CS 
Ribbon, Lace, pearls


Instructions:

  • Make the background by placing the reinkers and metallic stain on a Craft sheet.  
  • Spray a little water onto the inks
  • Press White CS into the inks
  • When dry cut into a tag--5 1/2" x 2 1/2"


  • Stamp the Paper Artsy images onto the tags with Onyx Black ink
  • Stamp the circle stamp with Pistachio ink


I wanted some kind of a border on the edge of the tags.  So, I partially stamped the keys from LPC010-Nina stamp set along the edges.  Here is the second tag.


Love the dreamy images!  When I look at the images, I think that the person is dreaming of being in this far away exotic place.  Hence the title "Dream Travel"


A few Super fun Challenges for my Dream Travel tags

Quirky Crafts: no dp, make your own backgrounds
Sandy's Crafty Creations: green
Really Reasonable Ribbon: ribbon + green
Simon Says stamp: anything goes
Loves Rubber Stamps: anything goes

Stayed tuned this week for some projects made with Lost Coast Design Stamps , The Stampsmith, and lots more fun!!  LOL.  I hope you have a great day!  Love ya
Karen

Tuesday, January 22, 2013

Blockheads Stamps with Distressed Embossing

Hi Dreamers!
We are experiencing very cold temperatures here in good old Michigan.  Sooo, I wanted to make something sun shiny and warm.  And, I am in a "tag" making mood lately.   I made these three using Blockhead stamps and Distress Embossing Powder.  Actual size of the tag is 2 1/2" x 5".


Materials List:
Stamps: Whimsical- Take Flight Set from Blockheads
Inks:Embossing ink
Distress Ink: Frayed Burlap and Crushed Olive
Distress Embossing Powder
#5 Size Manila Tags -Inksentials
Fabric Scraps
Jewelry Pieces
Brad


Instructions:
  • Stamp the Moth and script stamps  on the tags with Embossing ink
  • Heat Emboss with Distress Embossing powder.  It will turn a lighter color when it is heated.


  • Let the powder cool
  • When cool, brush off the pieces of the powder that don't melt.  The Distress powder is designed to do this.
  • I used two colors of embossing powder on the tag below


  •  Apply the Distress ink to the tag


  • Add strips of fabric to  the tags.  Tie them in knots or bows through the holes in the tags.
  • Add some jewelry pieces and a large brad


The Distress Embossing powder gives a really muted look.  The colors get lighter when heated so keep that in mind when selecting your colors. 


Here is a mega close up so you can see how the Distress embossing looks.   I love this look...it is just perfect for vintagey projects.


And, how about a few super fun Challenges!!
Simon Says Stamp and Show: what are you known for--I almost always add fibers/fabric/ribbon!
Anything but a Card: tie it up
365 Cards: skewed
Crafty Catz Weekly: anything but a card
Craft-room Challenge: monochromatic
Papertake Weekly:Tie up loose ends-a bow on card

Well, that's it for me today.  I will be back tomorrow with some cards that went to Operation Write Home.  See you then!!  Love ya.
Karen

Wednesday, November 7, 2012

Christmas Tags with Character Construction

Hi Dreamers!
Here I am back today, with the tags that you saw on my desk earlier.  I have them all finished and photographed.  I made this group of small tags ( 1 1/2 x 3 1/2 inches)  with Character Construction stamp sets-Vintage Christmas.  I stamped them all with Black Soot Distress Ink.  Have you tried stamping with Black Soot?  I love how it looks so really black and glossy.  Here are tags.


The small tags are great for small packages or bags.  On the box below, I tied the tag right on to the gift box.  Great for jewelry gift boxes.   This lovely lady is from Set # 1.


Here are some close ups of the other tags.  The Angel ( Set # 4) was stamped on a yellow/green and gold background.  I added a sheer wide ribbon tied into a bow.


I used the tree from Set #4 (it is on top of the car).  I just turned it so that it is right side up.  Added the bird from Set # 2.  The Postage Stamp tree is from Set # 3.


 The Santa is from Set # 2.


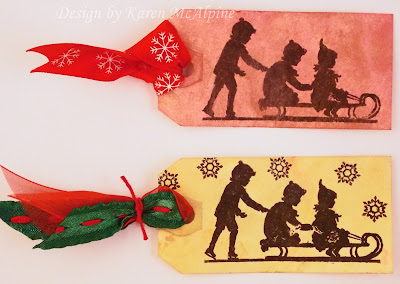
The Sledders are from Set # 3.


The tags were really fun to make!   I made the backgrounds and when they were dry; stamped away.  I will use the tags on my gift packaging.

A few Challenges for My Character Construction Christmas Tags:
Clear it Out: red and anything goes
Loves Rubber stamps: anything goes
Paper Take Weekly: anything goes
Tuesday Alchemy: anything but a card
365 Cards: variation on a theme
Crafty Bloggers Network: Christmas

That's it for me today.  I have lots of good stuff planned for this month and next month.  I just need about four more hours in each day.  LOL  Hope you are having a great day! Love ya.
Karen