Thursday, March 31, 2016

Flamingo with Chalk Technique with Technique Junkies

Hello Everyone.
Last day of March, already!  Wow.  The months are just flying by!  Getting ready to work on my huge landscaping project.  Just waiting for the ground to completely thaw and I can start digging.  But, in the meantime......
I have another fun project with Technique Junkies' stamps from the March Release group and a Chalk technique.


Materials List:
Stamps: Flamingo and Growing Wild both from Technique Junkies
Ink: Coffee Archival, Saddle Brown Stazon
CS:Cream, textured cream, yellow, brown, blue
Chalks
Glimmer Mist Spray
Brown and Cream Sheer Ribbon


Make It:

  • Make a card from blue CS
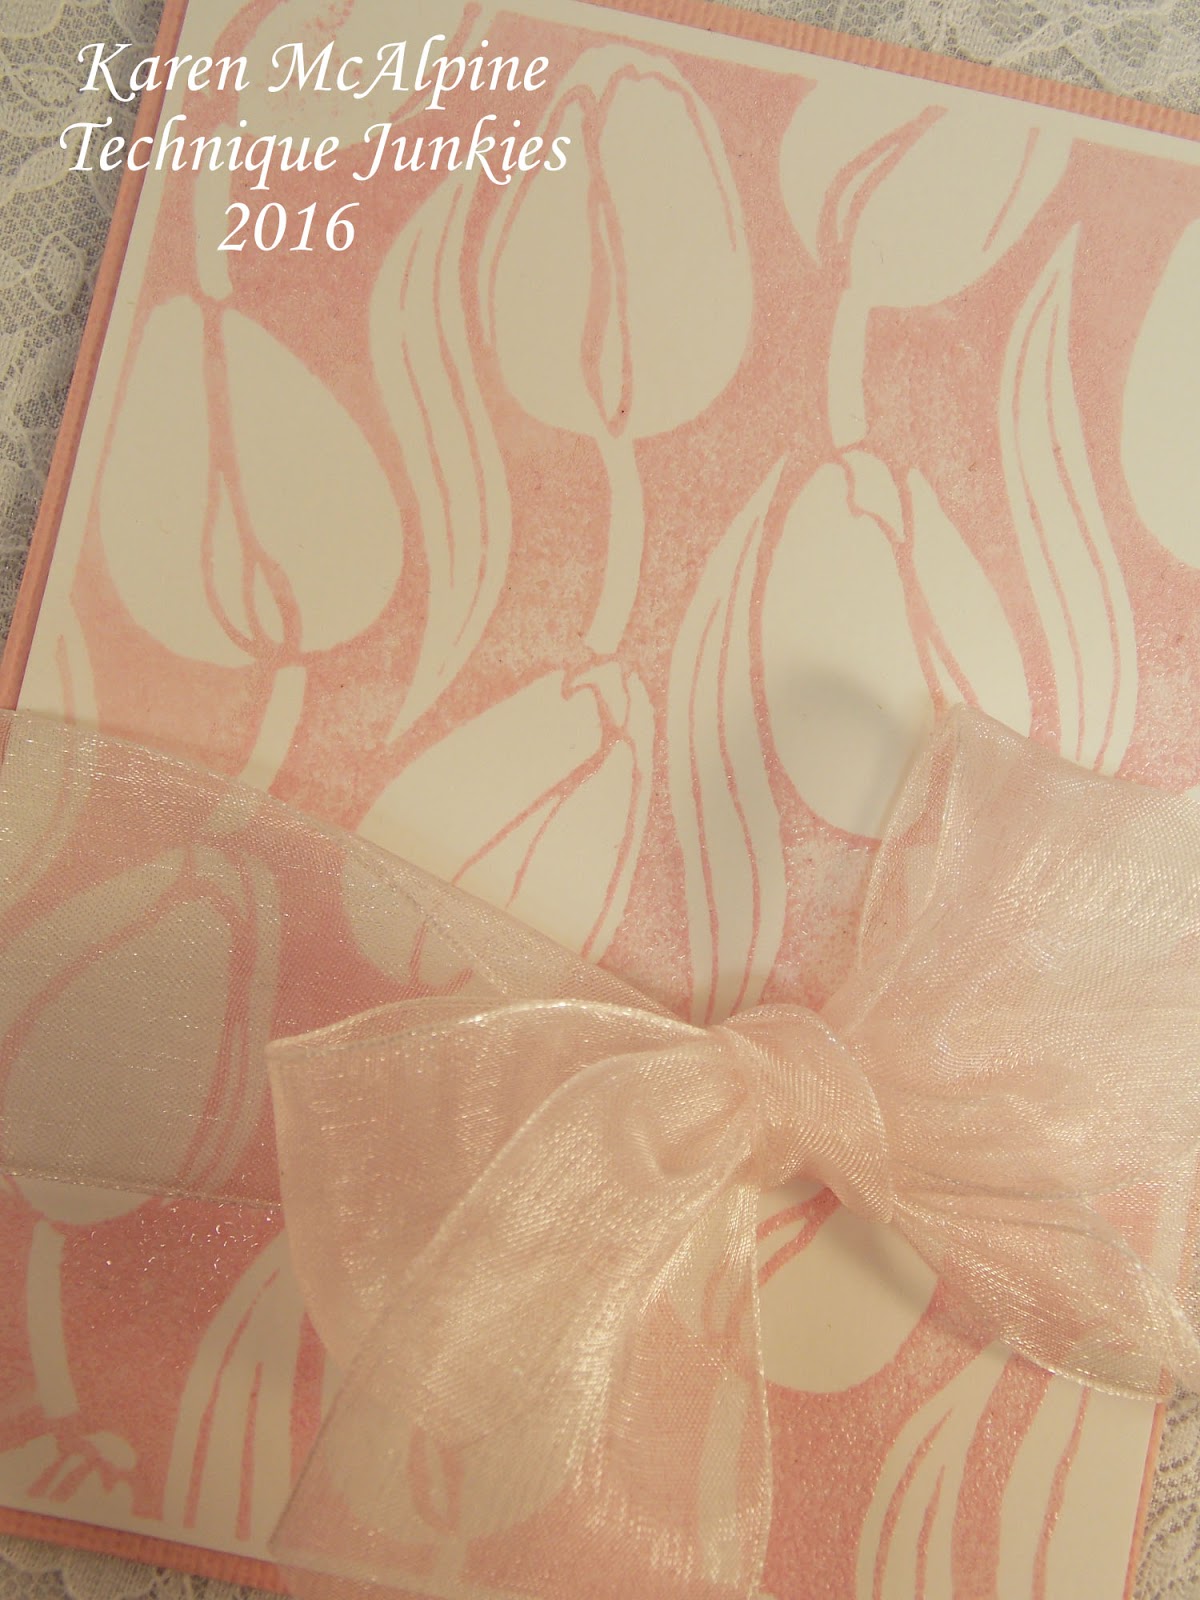
  • On cream textured CS stamp the Growing Wild stamp with Saddle brown ink
  • Using the Fantasy Chalk Technique color the background behind the stamp
  • Note: You may have this newsletter in your stash, if not here is how to do the background: Stamp with Stazon ink.  Rub three or four different colors of chalk across the textured stamped CS. Blend the chalk with a tissue or rag.
  • I also added a few spritzes of Glimmer mist to give it sparkle
  • Layer the stamped background with brown CS and add to card


  • Tie the two ribbons around the card
  • Stamp Flamingo on cream CS with Coffee ink and add some of the glimmer spray
  • Layer with brown and yellow CS and add to card


Love this cute Flamingo stamp!  Just a nice touch of humor for an all occasion card.  Stay tuned...tomorrow is the Technique Junkies April New Release blog hop!!
See you then!!  Love ya
Karen

Friday, March 25, 2016

Lost Coast Design Event: Flora and Fluffy Tails

Hello Everyone,
Welcome to Lost Coast Design and Carmen's Veranda Event: Flora and Fluffy Tails.  We are showcasing projects with Flowers and/or bunnies.  You may play along with us and link up your own project March 25 - April 3.  For all the details, check out the Lost Coast Portal to Creativity blog.
I incorporated both  flora and Fluffy Tails in my card using three stamps from Lost Coast Designs.


Materials List:
Stamps:Rabbit with Flowers, Daisy Flourish, and Misc Words set all from Lost Coast Design
Ink: Northern Pine Momento; Bundled Sage Distress; Key Lime Versa Magic; Magenta dye ink
CS: white, olive green
Glitter Pen
Rhinestone shape
Pink Tissue paper
White Paper Doily
Rick Rack 
Velvet Ribbon


Make It:

  • Make a card from olive green CS
  • On white CS, repeatedly stamp Daisy Flourish with Bundled Sage ink
  • Trim the stamped white CS to fit card base
  • Distress the edges with Key Lime ink
  • Add to card


  • Stamp Rabbit on white CS with Northern Pine ink; fussy cut and set aside
  • Glue a piece of ribbon and rick rack along bottom edge of card
  • Cut lower quarter off paper doily and place with cut edge along edge of ribbon
  • Add rhinestone shape


  • Glue a crumbled piece of tissue paper over doily
  • Add Rabbit with dimensional adhesive
  • Stamp "Sweet" with magenta ink; cut out and add to card
  • Apply glitter and rhinestones to flowers on background and rabbit
  • Tie bow with ribbon and glue to card


I hope you are enjoying our Flora and Fluffy Tails event and will play along!  I would really love to see what your creativity will come up with!!
See you next time!!
Karen

Monday, March 21, 2016

Tulips Spring Card with Technique Junkies

Hello Dreamers!
Time for a bit of Spring yumminess here in Dreamland today.  I stamped the large Tulips stamp from Technique Junkies and punched out squares...and then put it all back together again.  Oh so very fun!


Materials List:
Stamp: Tulips from Technique Junkies
Ink: Summer Sky Memento
CS:White; Marina Mist, Bashful Blue, and Pacific Point from Stampin' Up
Edge Punch
Ribbon
Pearls

 Make It:

  • Make a card from Marina Mist CS
  • Stamp the Tulip with Summer Sky ink on white CS
  • Use a punch to punch out squares


  • Layer each Tulip square on a rectangle of Pacific Point CS
  • Punch a strip of Bashful Blue CS along one edge and add to card base
  • Add the large rectangle with the Tulip squares to the card
  • Add ribbon and pearls


This could also be an Easter card, or a nice welcome spring, or spring Birthday card.  Check out all the March Releases here.  Check back next time for the Flamingo card.....It's pretty cute.  See you then.  Love ya
Karen

**************Challenges:
DL Art March Link: anything goes
Eclectic Ellapu: flora and fauna
My time to craft: flowers
Brown Sugar: Spring
Craft Your Passion: anything goes
Love to Scrap: anything goes
Our Crafty Corner: anything goes
**************************

Thursday, March 17, 2016

Technique Junkies Tulips Background

Hello Everyone,
Well, it really seems like Spring is here in good old Michigan, USA.  About 6 weeks early too.  Lots of rain and warmer temps.  A couple daffodils are poking through.  Today's project is all about Spring.  I used a March new release Technique Junkies stamp to make three cards. The stamp is so pretty on its own that I really wanted it to be the focal point.


Materials:
Stamp: Tulips from Technique Junkies
Ink: Sea Breeze Versa Magic; pink and taupe pigment 
CS: White; pink, aqua, taupe
Clear Embossing Powder
Extra Wide Ribbons


Make It:

  • Make a card from pink, aqua, and/or taupe CS
  • Stamp Tulips on white CS with pigment ink
  • Heat emboss with clear powder


  • Add the Tulip embossed piece to the card base 
  • Add a extra wide luscious bow


  •  I am using the cards for Easter and have added an Easter Sentiment on the inside.  Some good choices from Technique Junkies are: Simple Sentiments 1a and 1b


Here are the pieces before being made into cards.  Isn't that Tulip stamp awesome!!?  I could not stop stamping!!  I also made another card where I punched squares from the background of tulips.  I will share that card with you later.

Hope the projects brought a little Spring into your day.  Check back for the fourth tulip card and I also have a fun flamingo card coming up this month.  See you next time.  Have a super nice day! Love ya
Karen

*********************Challenges:
Love to scrap: bare necessities-no more than 2 embellishments
Crafty Creations: spring
Creative Moments; anything goes
Inspiration Destination: anything goes

Saturday, March 12, 2016

Lost Coast Designs' We're Not in Kansas Blog Hop


Hello Everyone,
Welcome to Dreaming and Creating with Karen.  We are not in Kansas today!!  If you are just popping in, we are having a Oz themed blog hop with Lost Coast Designs and Carmen's Veranda stamps.  The blog hop starts here.  You can check out all the details on the Portal to Creativity Blog.  Hop starts at 9:00 am pst.  You have until March 19 to link up your OZ project.  There is a $15 shopping spree for one lucky winner.
I was inspired by the theme to created two tags:


Materials List:
Ink: black dye; Butterscotch and Mushroom Adirondack
Distress Inks: Black Soot, Abandoned Coral, Mustard Seed, 
Distress Markers: Mustard Seed, Frayed Burlap, Pumice Stone, Old Paper
Silk fabric
Ribbon
Twine
Wire
Heart Charm
Ranger Kraft tag


 Make It:

  • Stamp Birds in Trees and Grunge Tree on Cream CS with Mushroom ink;trim and add to tag
  • Stamp Brick Wall on White CS with Butterscotch ink;  trim and add to tag
  • Distress tags with Distress inks


  • Stamp Scarecrow and Tin Woodsman on white CS with black ink
  • Color the Scarecrow with Mustard Seed ink and Mustard Seed, Old Paper, and Frayed Burlap markers
  • Color Tin Woodsman with Black Soot ink and Pumice Stone marker


  • Cut out both images and add to tags with dimensional adhesive
  • Stamp letters O and Z on White CS with black ink; cut out and add to tags
  • Add heart tag with glue and wire
  • Tie fibers in tag hole


Carry on hopping!   Thanks for stopping by!

Karen McAlpine


Thursday, March 10, 2016

Shabby Chic Bike on Fabric with Technique Junkies

Hello Dreamers!
I am having a shabby chic moment today with this card.  I stamped this lovely Technique Junkie March release image on fabric.  See my gift bag post for more ideas on fabric stamping here.


Materials List:
Stamp: French Bicycle Collage from Technique Junkies
Ink: black Memories
Blue 100% Cotton Fabric
CS: blue and light gray textured
Ribbons 
Lace
Paper Flower
Pinking Shears
Fabri-Tac Glue

 Make It:

  • Make card from blue CS 
  • Cut a piece of muslin fabric with Pinking Shears to desired size about 4.5" x 6"
  • Iron the fabric to remove all the wrinkles
  • Stamp the image on the fabric with the Memories ink---Note: this ink is good for fabric even though it is a dye ink.  
  • Protect ironing board with a press cloth, lay stamped fabric down and cover with a press cloth and iron (no steam) 
  • Pressing with the iron will heat set the ink.  I will not be washing this project obviously, but now the ink will not smear.


  • Wrap black lace around gray CS and add to card base
  • Add stamped fabric to card with Fabri-Tac glue
  • Add ribbons, lace, and paper flower


This is a nice way to introduce some fabric into your projects.  And, it is as easy as stamping on paper.  You have to get out the iron--not too big of a deal.
Thanks for stopping by.  See you on the weekend for a trip to OZ!  Love ya
Karen


*******************Challenges:
Crafting with Attitude: anything goes
Card and Scrap: shabby chic or vintage
Just Keep on creating: anything goes
***************************

Monday, March 7, 2016

Lots of Layers with Vintage Stamping Challenge

Hello Dreamers!
It is time for a new challenge over on the Vintage Stamping Challenge Blog!
The theme for the month of March is:

Lots of Layers  

At least 3 layers, please, on your project with stamping (no digis).  The challenge is sponsored by Flonz Craft Stamps and one lucky person will win a $15 gift certificate to the store.

I used a beautiful Flonz Craft stamp for my Lots of Layers project.


Materials List:
Stamp: Flowers Engraving from Flonz Craft stamps
Ink: Black Dye Memento
CS: Glossy White; Pink; Black; Peach
Hand made Background paper
Corner Punch from Martha Stewart
Paper Doily
Fabric Strips


Make It:

  • Make a card from pink CS
  • Wrap Fabric strip around a layer of background paper--this paper was made with a mono printing plate, stencils, embossing folder, and acrylic paints.  (Decorative paper could be substituted)
  • Tie fabric in a bow
  • Add the peach CS strip and paper doily


  • Stamp the Flower Engraving stamp on glossy CS with black ink
  • Add a layer of pink and black CS
  • Punch the corners on a rectangle of black CS
  • Glue the stamped piece to the black rectangle and add to the card


So, let's see, that would be eight layers for this card.  Oh, how I like to layer.  LOL.  Take our challenge!! Link your project up on the blog--- can't wait to see what you come up with!!  Have a super day!
Karen
***********************
Challenges:                                 Mojo Monday-
Our Crafty corner: anything goes
Creative Fingers: anything goes
Fussy and Fancy: bingo--Column one
Crafting with friends; anything goes
Crafting with Dragonflies: girly cards
****************************

Sunday, March 6, 2016

Whoo is Watching You?? With Lost Coast Designs

Hello Dreamers!
Whimsy is the word for today.  I have used one of the new releases from Lost Coast Designs and paired it with a fun Carmen's Veranda stamp to make this cute Owl project.


Isn't this guy adorable??!!  This is a fairly large stamp (4.75" x 3") --so it really takes center stage on the card.

Material List:
Stamps: Megan's Owl from Lost Coast Designs; Eyeglasses from Carmen's Veranda
Ink: Northern Pine and Black Memento
CS: White, dark green textured, lime green
Copic Markers


Make It:

  • Make a card from lime CS and add a layer of dark green textured CS
  • Stamp the owl on white CS with Northern Pine ink
  • Color the owl with Copic Markers and add a layer of lime CS; add to card
  • Stamp the glasses with black ink; fussy cut glasses and add to owl face with dimensional adhesives


LOL  Super fun!  Pair this with an owl "who" play on words pun and you have a great card for any occasion.
The Lost Coast Design  MARCH CHALLENGE is open!!  The new theme is  " Let's Party".  Pop over to the Portal to Creativity for all the DT projects and enter.
See you later in the week for more fun.  Up coming events from Lost Coast Design and Carmen's Veranda--Wizard of oz theme projects!!  So lots of fun ahead!!!

Karen

*****************
Challenges:
Mod Squad: feature a creature
Pile It On: green and two other colors
Left Of Center: big eyes
Craft Rocket: feathers or fur
****************

Saturday, March 5, 2016

DT Call -- Lost Coast And Carmen's Veranda

Hello Everyone,
Super cool announcement!!!
Lost Coast Designs and Carmen's Veranda stamps are looking for a few designers to join the team!!!


Come create with us!!  See all the details here.
Also check out the new Facebook Group:


See you next time for more crafty fun!!
Karen

Thursday, March 3, 2016

Technique Junkies Decorated Gift Bag - Stamping on Fabric

Hello Everyone!
Hope you are having a great week.  The weather here is crazy: spring one day; winter the next.  Spring is on the horizon.  The robins are here and that's a sure sign of Spring.
Today's post  showcases Technique Junkies March Releases.  I have used one of the new stamps from the Palettini Collection [Vintage/shabby chic lovers dream stamp collection--by the way!!] to decorated a simple gift bag.  I used lots of laces and trims from my stash to turn the plain bag into a shabby chic delight. LOL


Materials List:
Ink: Black from Memories
Kraft Gift Bag (I used a bag 8" x 10.5")
CS: dark brown
White Muslin (100% cotton)
Vintage Doily
Brown Lace
Burlap Trim
Leather shoe lace
Sheer Brown Ribbon
Paper Flowers
Fabri-Tac Glue
Iron


Make It:
Note: use Fabri-Tac glue through out to adhere all pieces

  • Tear or cut a piece of muslin fabric to desired size about 4.5" x 6"
  • Iron the fabric to remove all the wrinkles
  • Stamp the image on the fabric with the Memories ink---Note: this ink is good for fabric even though it is a dye ink.  
  • Protect ironing board with a press cloth, lay stamped fabric down and cover with a press cloth and iron (no steam) 
  • Pressing with the iron will heat set the ink.  I will not be washing this project obviously, but now the ink will not smear.


  • Glue the fabric piece to dark brown CS--set aside
  • Cut the corner off  a vintage doily.  Note:To keep the edges together, before cutting lay down a strip of tape in area where you want to cut; cut through the tape.  Now, each edge of the doily will not unravel.
  • Glue doily to bag   
  • Now add the stamped fabric piece


  • Glue all the laces and trims to the bag
  • Add the flowers and ribbon
  • Tie lengths of brown sheer ribbon to the handle

I can fill this bag with home baked goodies, a gift, or use to store stamp supplies. Thanks for stopping in today.  Check back later in the month for a second stamping on fabric project, Spring Tulip cards, and much more!!  Love ya.
Karen

**************Challenges:
Try It on Tuesday: feminine and fancy
Whimsy stamps Challenge:anything goes
Just keep on Creating: anything goes
***********************

Tuesday, March 1, 2016

Technique Junkies March New Release Blog Hop

Hello Everyone,
Welcome to Dreaming and Creating.  You probably are arriving here from Judy Jackson's blog.  If not, you may like to start at the beginning of the hop on the Technique Junkies Design Junkies blog here.  Wasn't Judy's project super!!  I am so loving all the March New Releases.

All of the March New Releases will be on sale --15% off thru March 8th--- so be sure to check them out!!  They are super fab!!

For my design team project, I am using two of the March New Release stamps and one previously release stamp on a fun fold card.  This one is for all those owl lovers (of course I am one too).


Materials List:
Stamps: New Releases---Owls (SD664), Lock Us Up (SDX068)
Technique CD: Side Step Card from Fancy Folds and Motion CD
Ink: Chocolate Chip Stampin' Up
CS: Cream, Olive, Dark Brown
DP: brown K & Company
Pearls
Spellbinder's dies


Make It:

  • Following the instructions on the Fancy Folds and Motion CD, make the side step card from olive CS
  • Add The dark brown CS and DP
  • Stamp the Owls, sentiment and Tree with Chocolate Chip ink on cream CS
  • Die cut the Owls and tree and add a die cut layer of dark brown CS
  • Add a layer of brown and green CS under the sentiment; add to the side of card


  •  Attach the die cut pieces to larger rectangles with dimensional adhesive and set on the steps ( can be glued to the steps)


  • Add small pearls


Don't you just love the Owls?? They are so whimsical.  And cute!  LOL
Thanks for stopping by!  Hope you enjoyed your visit.

AND NOW

Head over to Sally Lynn McDonald's blog to see her fab project!!!

See you later in the week for a decorated gift bag!  See you then.
Karen