Wednesday, December 25, 2019

Christmas Cheer Part Six and Merry Christmas

Merry Christmas, Everyone!!
Here are the rest of my cards made for family and friends.   I added paper doilies and used a bit of pink.


Merry Christmas!!!

See you after the Holidays with two masculine birthday cards.
Karen


Monday, December 23, 2019

Christmas Cheer Part Five

Hello!
Getting pretty close to Christmas now.  There is still time to make a few cards!! 
Here are a few more of the cards I made to send to friends and family.

 Used the gate fold base in the cards below.  On Part one, I have listed the cuts and score lines for the folds.  Check it out here.


This card is a standard card and I used the same mitten stamp on the cup.


One more post to go....check back for the last part ...part six.
See parts one thru five here.

See you next time!
Karen

Sunday, December 22, 2019

Christmas Cheer Part Four

Hello Again!
Part Four of Christmas Cheer, today!!  More of the gate folds.


I used a Poinsettia die on the first, and die cut the cup from a paper with the  cardinal.  The third card is stamped with a poinsettia and some holly leaves. 


I used some pastel colors for this card and paired it with a bright red background.


Hope you are having a lovely day.  See you next time for Part Five!!
Karen

Friday, December 20, 2019

Christmas Cheer Part Three

Hello Everyone,
Welcome to part three of Christmas Cheer.  I am sharing all the cards I made for Christmas.  I ended up making 35 cards.  I have them all in the mail and they are happily on the way to friends and family.

See part one here.  Part two here.

Let's get started!  I stamped snowman on the cups for the cards.


I used lots of bright and cheerful prints for the backgrounds.  Did a little coloring on the snowmen with markers.

See you next time for part four!!
Thanks for stopping by.
Karen

Wednesday, December 18, 2019

Christmas Cheer Part Two

Hello Friends,
Sharing more on my Christmas cards today with part two of Christmas Cheer.  I used the same stamp and die set throughout all the cards.  See part one here

The first two cards have lots of bling with gold metallic doilies, metallic paper, and gold glitter glue.


I made some woodsy cards here.  A little bunny and a moose. Pretty cute!??


Did a little bit of coloring on the bunny. 

Thanks for stopping by.  Part Three will up in a couple of days.  Hope your Holiday Season is going well.   See you soon.
Karen

Monday, December 16, 2019

Christmas Cheer Part One

Hello Everyone! 
Back today to share the cards I made for Christmas this year.  I used one stamp set and matching die set.  I think that was easier than having to pull out 10 stamp sets.  So, let's get started!


This group of cards use a gate fold pattern.  I added glitter paper to some, stamped the cups, or die cut the cups, and used a decorative paper background.


In this pic, you can see the folds and how the center piece overlaps the front edge of the card base.
This gate fold is quite easy:
Cut the cardstock at 5.5 x 8.5
Score at 2 1/8  and 6 3/8
Fold the side flaps into the center


I stamped this cute house (which was from another set...) on the cup and used the glitter paper.

I already sent all the cards out.  I have made a few masculine birthday cards as well.  And, I will share those after Christmas.
Thanks for stopping by.  Check back in a few days for Part Two of Christmas Cheer.
Karen

Friday, November 15, 2019

Thanksgiving Rocker Card

Hello Everyone!
Having unseasonably cold and snowy weather here in Michigan, USA.  We never have snow in November.  Had 10 inches on Monday! The leaves are still on half the trees.  No one was ready for snow... even the trees  LOL     Anyway....

I made some cards to send out for Thanksgiving.  I used a rocker type card base.  This is really quite an easy base to make.  The only difficulty was not having a die to cut a large enough circle.  So, I used the old fashioned compass  and cut two by hand.  I also used some purchased die cut scallop circles I had in my stash. 

I folded the circles in half and added the smaller circles and sentiment.  (The stamps are older Stampin Up stamps.) 

This green and brown version are made from  purchased die cut scallop circles


The orange card is made from one of the circles I hand cut. 


This is what the card looks like from the side.


So, pretty cute, I think.  I like this rocker base and will use it for other cards.  Would be really cute for birthday cards too. 

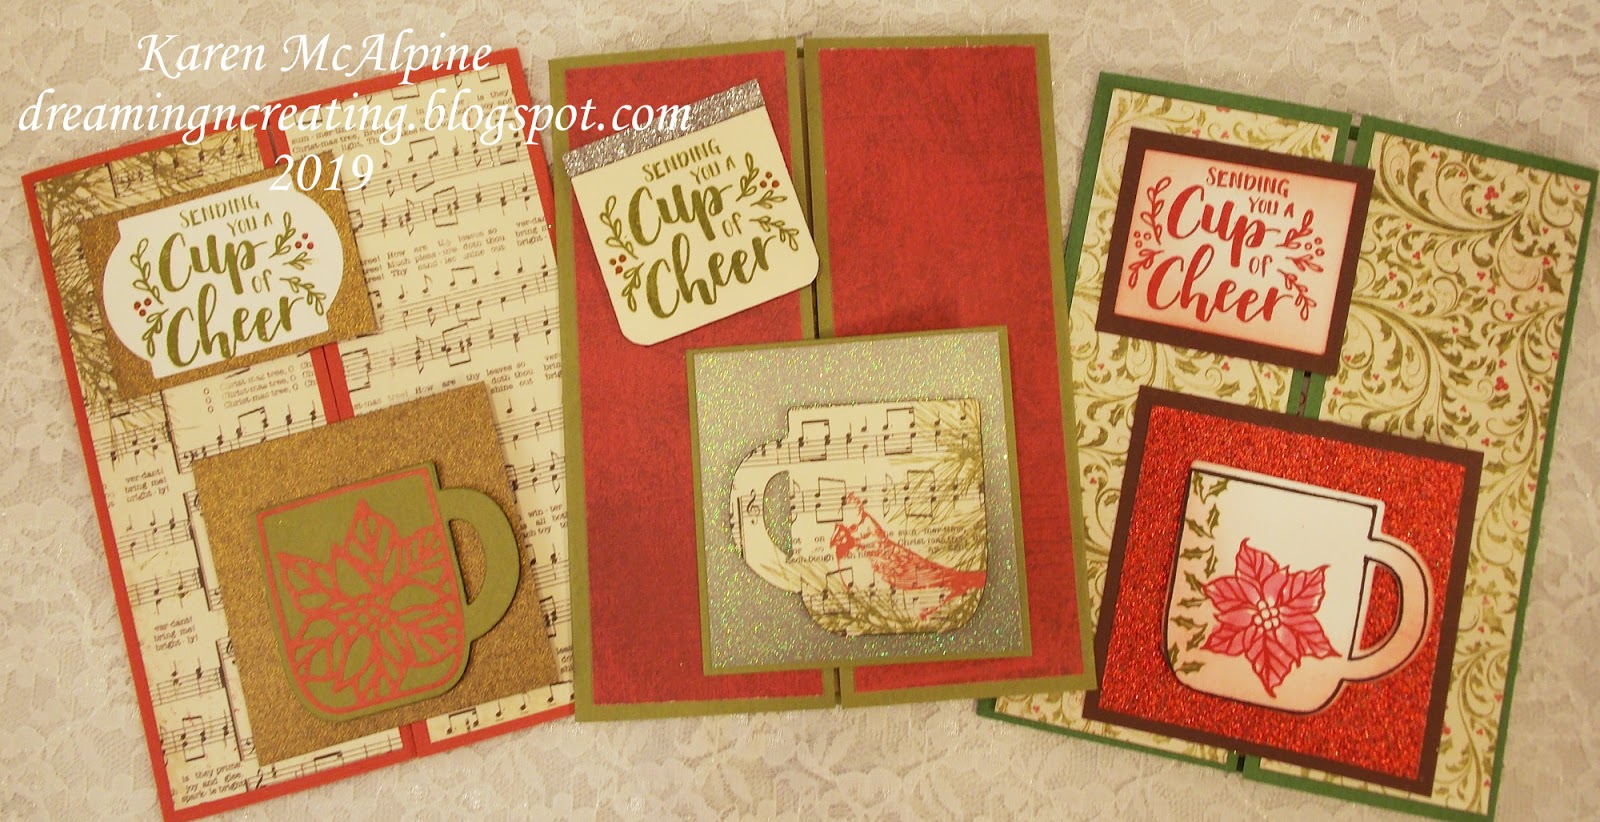
Still haven't started my Christmas cards.  Have you started yours yet??  I know what stamps and dies I am going to use: The Cup of Cheer set from Stampin Up.  I die cut a few of the mugs yesterday to see what they will look like and, that was as far as I got.  LOL.   I might spend some time on it today if my ankle is not throbbing too much  (broke my ankle in July and still having lots of problems...Going to physical therapy three times a week ).

Hope you are having a great day!  See you next time!
Karen

Friday, November 8, 2019

Floral with Soft Coloring Technique

Hello Everyone,
Today's project was an experiment in a coloring technique.  I stamped with a very light ink and then colored with copic markers.  I liked the results. I used the cards for birthdays and stamped sentiments on the inside.  


This is a second version.  Used the same coloring technique and used a different layout.

See you next time.
Karen

Wednesday, October 30, 2019

Halloween Scary Cute Cards Part 2

Hello!

HAPPY HALLOWEEN!

I am back today with the second part of my Scary Cute Halloween cards.  (See part one here.)  I used the same image, but each card is a bit different. 


Hope you have a spooky Halloween.

See you soon
Karen

Monday, October 28, 2019

Halloween Scary Cute Cards Part 1

Hello Everyone,
I am still dealing with broken ankle.  Going thru physical therapy now and doing much better.  Have been able to make some Fall Holiday cards.   I stamped the same image, but each card is slightly different.  I will write two posts to show all the photos.


I added lots of layers of decorative papers.


The layout is rotated on one of the cards and I added a big bow.  Also used a paper doily on the third card. 

Check back in a few days for the second part that will have the additional card photos.

See you soon.
Karen

Sunday, September 22, 2019

Dragonfly Glitters on Washi Tape Background

Hello Everyone,
Hope you have been enjoying my Month of Washi tape projects!  The projects for the finale of my month of Washi tape are two gorgeous cards with die cut dragonflies and washi tape backgrounds.


The background was created by wrapping washi tape around a piece of cream cardstock.  The background was added to a dark brown card base.  I added two die cut circles as a platform for the dragonfly which was cut from glitter paper.


The second card was made in the same way.  The dragonfly was cut from a shinny, textured paper on this card.


So glad you stopped by and I hope you enjoyed my month of washi tape.  And, I hope you have come up with some other ideas for your washi tape.  Let me know what you came up in a comment.  Would love to see your ideas.

All the posts are listed below:

Asian Inspired Watercolors

Washi Tape as Focal Point

Butterflies, Dragonflies, and Washi Tape - Oh My

See you soon!
Karen

Saturday, September 14, 2019

Butterflies, Dragonflies, and Washi Tape - Oh My!

Hello, Crafty Artisans!
Welcome!! So happy you stopped by today for my Month of Washi Tape to check out some cards with washi tape backgrounds!!  I also incorporated some of my favorite motifs: butterflies and dragonflies!


The washi tape was wrapped around a piece of lilac cardstock.  I picked colors from the tapes to select cardstock and embellishments.  I added a purchased paper butterfly embellishment.  Great birthday card!


The second card has a bold color pallet.  Again, the cardstock colors were chosen from the colors in the tapes.  A dragonfly die cut (Stampin' Up) was added.  I wrapped some more of the washi tapes around a scrap of cardstock and punched out a circle.  A dragonfly was placed on top to the circle and added to the card with dimensional adhesive.  Pearls were also used to embellish.


Just love these bold, graphic washi tapes!!  They really add some pizzazz to a card.


I have a few more washi tape cards to share and I will do that on the next post!  See you again soon.
Karen.

Friday, September 6, 2019

Washi Tape As Focal Point

Hello Everybody,
I am back today with my Month of Washi tape with a few projects using  washi tape as the focal point.  I had several tapes that had really cute designs.  Wondering how to use these tapes, I decided to make the tape the focal point!  Why not?!  Washi doesn't have to be just an embellishment.  I choose this cute city scape tape.  When choosing the cardstock colors,  I paired them back to  colors within the tape.  
Die cut sentiments, ribbon, and pearls were added to each card.


The projects are so cheerful and colorful!  Love how the cards turned out.  No sense letting that washi tape languish in a drawer.  I will share more washi tape cards with you next time!  So glad you stopped by!
Karen


Thursday, August 29, 2019

Asian Inspired Watercolors

Hello Everyone,
I am back after a little break.  Oh, how funny.... Pardon my pun...... I had a bad fall and broke my ankle---duh.  Sooo, I am not very mobile right now.  But, I am feeling a bit better now.  Thought I would get back to the blog and share some artwork I made before I fell.  Since I am stuck on the couch, I haven't been able to make anything lately.  Fortunately, I have plenty of cards to share!!

In fact, I decided to have a month of Washi tape!!   I will continue to post washi tape projects all thru September.

I wanted to start off with this Asian inspired stamped projects.  I used watercolor pencils on the projects.  I really liked the way the pencils blended.  I did not use any water on the coloring.   I concentrated on blending the colors just using the pencils.  I had picked up some Aqua Blend pencils by Spectrum Noir and wanted to see how they would blend.  Check it out.


I used blue and purple pencils to color the kimono on this project.  I also add some glitter.  The backgrounds are covered with strips of washi tape.


I also made a red version.  Red and orange pencils were used here.


I am happy to back and blogging!!  So glad you stopped by today.  See you soon with more projects.  Next time, I will share some washi tape cards.  See you then!!
Karen

Entered in the:
Simon Monday Challenge: S is for.......Silver

Saturday, June 29, 2019

Happy Hello

Hello Friends,
So glad you stopped by and I like to welcome you with a "Happy Hello".


This stamp is from Stampin Up (retired) and was stamped with blue ink.  I added lots of layers,  a ribbon embellishment and three metal dots.


To make this ribbon embellishment: Cut a length of ribbon and sew long stitches down the center.  Pull the stitches to pleat the ribbon.  Glue to the card with Fabri-tack glue.  Cut a second length of ribbon.  Sew long stitches along one edge of ribbon.  Pull the thread to tightly gather the ribbon into a round shape.  Knot the thread tightly.  Glue to the card and add a third piece of ribbon tied in a knot.

This card is now in my send out box.  So, it will go out to someone....

See you next time!!
Karen

Friday, June 21, 2019

Congratulations Graduate!

Hello Everyone!
Wanted to share this card I made for my niece, Christina.  She graduated with her Associates degree in Health Information Tech.  Her favorite color is Aqua....

The envelope was also decorated with Cardstock and ribbon.


Three different dry embossing folders were used on this card.
I started with a dark teal card base.  I dry embossed the stripes on a medium toned aqua cs.  The white cs was dry embossed with a graduation hat folder and layered onto the dark teal cs.


The sentiment was also dry embossed on gold paper.  I added a teal ribbon and some Liquid Pearls dots on the corners.


Here is a better look at the graduation hat dry embossing.


So, turned out pretty nice and a fun way to utilize all the embossing folders that we have in our stashes.....

So glad you stopped by today!  Hope you are having a sweet day.
Karen.