Friday, October 28, 2011

Vintage Framed Santa

Hi Everyone,
Changing things up a bit today.  I have a Christmas project to share.  I made a Vintage Framed Santa piece.  I will either put this up in my house or I may give it as a gift.  HMMM.  Who would like this?  I will have to think about this.  I used a plain frame I bought somewhere and jazzed it up a bit with paints, glimmer sprays,and glitter glue.


Here is a photo of the frame before alteration.  It is just a plain frame.    


For the "picture" inside the frame, I used a Santa Stamp from the newly released set: An Illustrated Christmas from Blockhead Stamps.  This is the whole set.


Materials List:
Santa Stamp from An Illustrated Christmas
Canvas Paper
Vintage Photo Distress Ink
Distress Tool
Cream Pigment Ink
Brown Embossing Powder
Acrylic Paints: Tan and Brown
Paint Brushes
Sand Paper
Satin and Sheer Ribbon
Glitter Glue
Glimmer Sprays
Smooch Spray

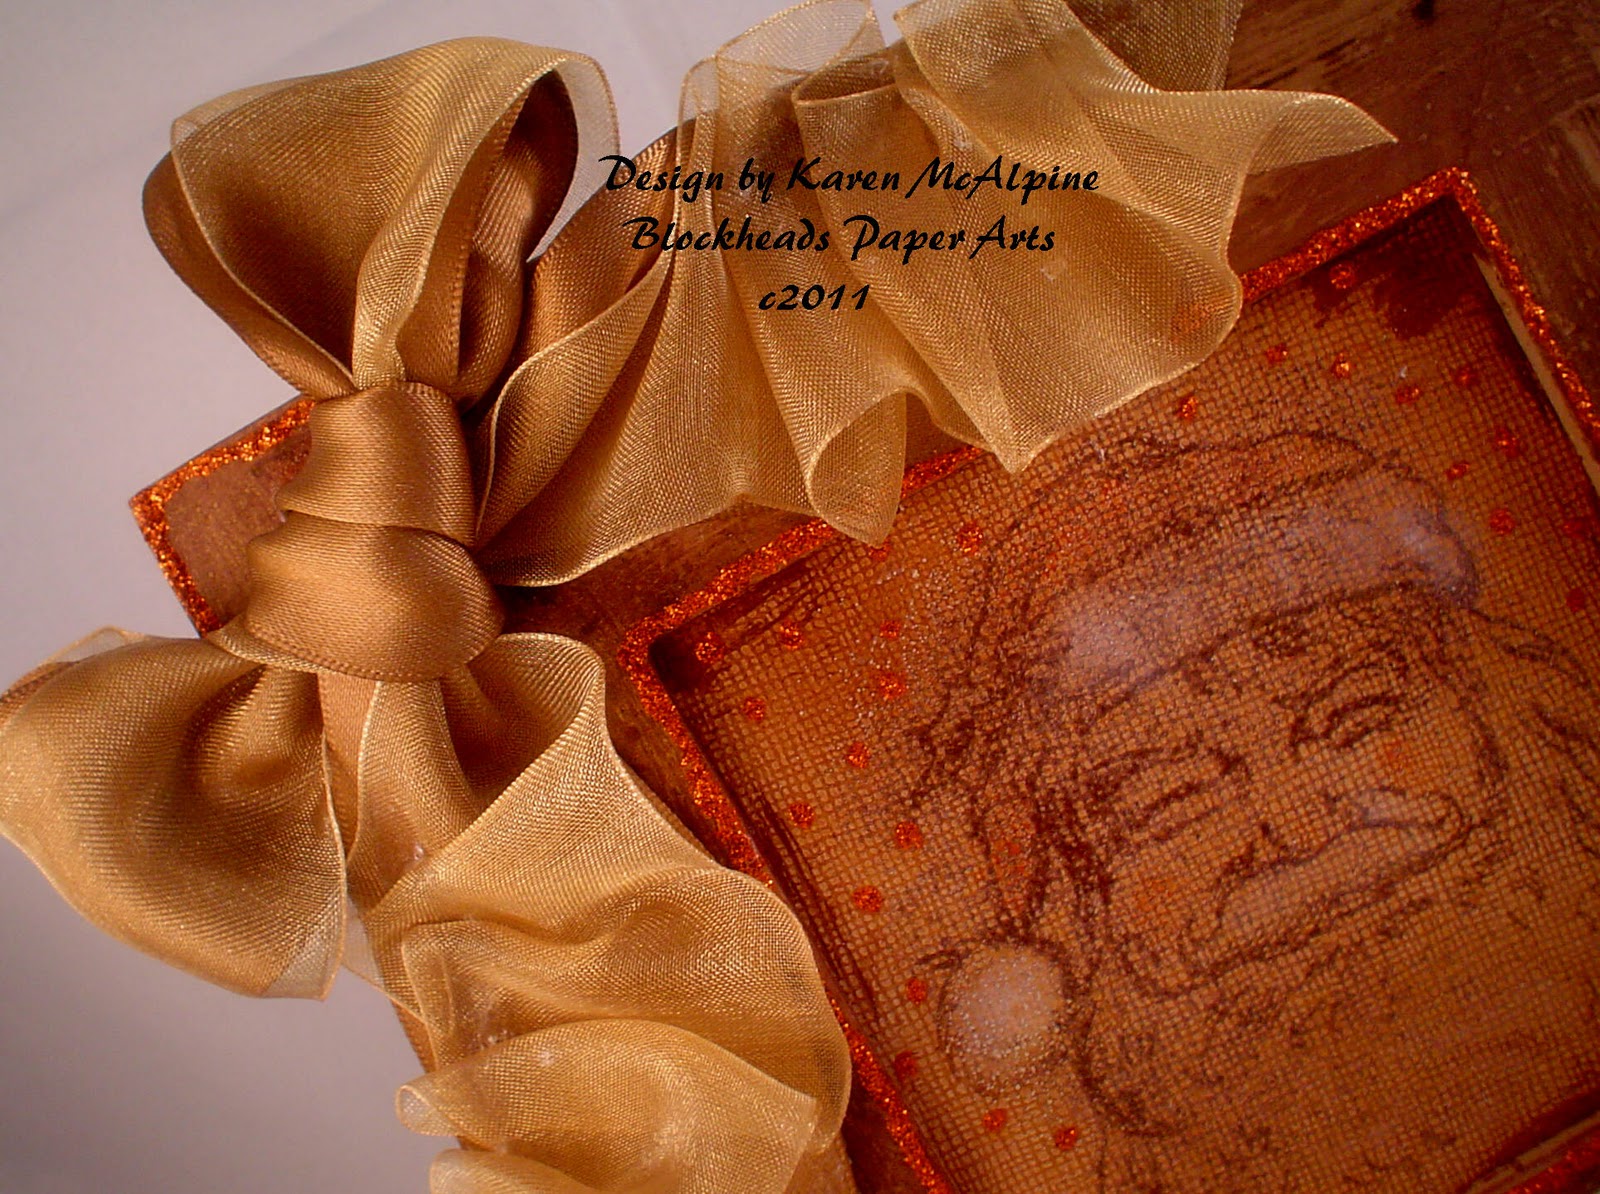
Paint the frame with Tan Acrylic paint.  Set with a heat gun or let dry.  Go over the Tan paint with Brown paint.  Set with a heat gun or let dry.  Sand off most of the Brown Paint to look aged.  Get it nice and scratchy looking.  Add lots of gold glimmer spray and Smooch Spray.  Let this dry.  And then add the Glitter Glue the the edges.  While the glitter glue is drying, make the Santa Picture.  


To make the Santa picture, stamp Santa on canvas paper with Vintage Photo ink and heat emboss with brown embossing powder.  Cover the paper with Vintage Photo ink using a distress tool.  Add a little white pigment ink to the hat with a Q-Tip and smudge it in with your finger. (Very technical, LOL)   Add some random dots of the glitter glue in the background.   Let dry.  When the glitter glue is dry, add the picture to the frame.  To make the bow, I layered a satin and a sheer ribbon.  Hold them together and tie in a bow and leave long tails - Do Not trim the ends yet.    Glue the bow to the frame.  Lay the satin ends flat (Satin ends should be under the sheer ribbon ends) and secure with some glue on their underside.  Trim the satin ribbon ends to about 4 inches.  Now, to gather the sheer ribbon, place a small line of glue on the right side of the satin ribbon on its top edge.  Gather the sheer ribbon and press it into the line of glue.  Trim the sheer ribbon ends.   Here is a close up of the ribbon.  Isn't that a fun ribbon treatment?!!  I love it.  


We have really got the Holiday feeling going on over on the Blockheads blog this weekend.  Stacie has a dazzling dimensional ornament using Spellbinders and Blockheads Stamps.  And Leigh continues to amaze us with her Halloween treats!


Now, I feel in the mood for a few fun challenges too.
I am entering Vintage Framed Santa in the following Challenges:
Fashionable Stampers: Colors- coffee to cream
Simon Says Stamp and Show: use one color- I used different shades of brown
Mark's Finest: Make an Altered image that has been showcased in their 12 days of Christmas- Altered frame
ABC Christmas: V is for Vintage

Okay, Phewww.  Lots of info.   I have been working like a busy bee all week and have tons of stuff to show you in the upcoming weeks.  I still have all the Operation Write Home Cards to show you too.  I will be back  with lots more fun.  Oh, and have a happy Friday!  Love ya.
Karen

Tuesday, October 25, 2011

Thanksgiving Digis from Blockheads Stamps

Hi Everyone!
Having a great day here!  I need to run out to the grocery store but, wanted to get some Thanksgiving cards posted first.  Now, these are nice and CAS (clean and simple).   Blockheads Stamps has decided to add digital stamps to their store.  And, today I have used three of the new images to create some fun Thanksgiving cards.  The digis come in sets.  There is a regular image and an image that has been Zentangled.  They Are Awesome.
Images used: Pumpkin Digi, Turkey Digi, and Thanksgiving Words.  Here is the first card.


Materials:
Blockheads Digi Images
Neenah Solar White
Copics
Orange, Green, Brown, and Cream CS

The  images were printed out from the computer using Neenah Solar White CS (works best with the Copic Markers).  I let the ink dry before coloring.  I used Copic Markers to color.  I adjusted the size of the sentiment to fit the card and colored with Copics.


The second card is made in the same way.  The colored image was layered with Fall colored CS's.


And, here a few close up views.  The cards are pretty quick and the process of coloring is relaxing.  Like coloring when you were a kid.  Remember how fun that was??


Again, I re-sized the Sentiment to fit the card.  It was added to the card with dimensional squares. 


I would like to enter my Thanksgiving cards in the following Challenges:
Victorine Originals: Fall
My Time To Craft: Quite white
Wee Memories: Free For all
Melgens Challenge: Red and Gold

Well, that's two Thanksgiving cards done.  Only 20 more to go.  LOL.  Have a super day!  Love ya.
Karen

Sunday, October 23, 2011

Gorgeous Cleopatra With The Stampsmith

Hello and Happy Sunday!
I am channeling Cleopatra today (LOL -just kidding).  I have made a fun Birthday card using the Cleopatra image from the Cleopatra and Friends Shakespeare Heroines Full Sheet. 


The image is stamped with black dye ink.  I colored the image by water coloring with markers.  I picked up the color from an acrylic block with a wet brush.  A green, peach, and tan marker were used.  I really like the soft shades that you can get with this coloring technique.  I tore the image and layered on a piece of DP from Imaginisce.  The card base is made from greenish/gray CS and layered with Glossy black CS.    I added a humorous sentiment on the outside from Victorine Originals.


On the inside, I stamped Happy Birthday.  I already know who is getting this card for their birthday.   I sure hope she will like it.  LOL.  I hope you are enjoying your weekend.  Take some time to stamp.  It is good for you.  LOL.  Love ya.
Karen

Friday, October 21, 2011

Cup of Tea in Purple

Hello and Welcome!
Hope you having a great day!  Today's card is in shades of purple which is the theme for the current Impression Obsession challenge.  I used two stamps from Impression Obsession:
CAC Vines    CC057
Rose Tea Cup     G6124


I also wanted to participate in the Mark's Finest challenge this week.  Theme is Seeing Double.  And that got me thinking.  Which is what a challenge is supposed to do, right?!  What stamp would look good stamped more than once?  I came up with this interesting background treatment by stamping the Cover a Card stamp (IO) twice.  Here is how I did it.  Stamp first with a lighter color pigment ink ( Lt Plum - Anna Griffin) and then quickly clean the stamp.  And, stamp with a darker pigment ink (Elegant Eggplant pigment -Stampin' Up).  Sprinkle on Clear embossing powder and heat emboss.  I love this effect.  While I was at it, I made several more in different colors.  I will share those with  you at a later date.   Just a hint: I did one in green and red for Christmas.  OHHHH.  
After creating the Background, I stamped the Rose Tea Cup (IO) on White CS and colored with Markers.  The image was cut out and added to the card front with dimensional squares.    I added some wide gingham ribbon.  Cardstock colors: Lavender Lace and Perfect Plum (Stampin' Up).  


I added an ultra close up so you can see how the image looks stamped twice.  I really like it.   I will use this technique again. 


I have been very busy lately and have lots of cards to show you.  I made a big bunch for Operation Write Home,   I will be posting those too.  Stay tuned for all the fun!  And, of course, I will be back with all my Design Team projects for Blockheads, The Stampsmith, and Third Coast Rubber Stamps.  Have a lovely day.  Take time to have a cup of tea and relax.  Love ya.
Karen

Thursday, October 20, 2011

Baby Bud Get Well and Publishing Update

Hello,
Another rainy day here in Michigan.  Today I  wanted to share a "Get Well" card  that was made for my dear friend,  Sharon.  I used a very cute digi image from Baby Bud Designs called Sweet Pea.   The sentiment is from My Sentiments Exactly.


The image is colored with Copic Markers.  I used a Spellbinders die  and a Stampin' Up Embossing folder on the Barely Banana CS.  The card is made from lavender CS.  


 I added some Stickles, 'cause Sharon loves glitter.  And a big bow.


Hope you are enjoying your day!   I have been busy with submissions all week.  I don't know why they all seem to be due at the same time.  LOL  

Publishing Update:

I do have four projects in the new Scrap and Stamp Arts (Dec 20011 issue).  Three Christmas Tags and an all occasion card.  Very Cool!

Love ya.
Karen

Tuesday, October 18, 2011

Wicked "Good" Witch with Third Coast Rubber Stamps

Hi Everyone,
Are you feeling the Halloween spirit yet?!  Well, I have one more Halloween card to get you in the mood.  (There is still plenty of time to get some cards made.)  For my card, I have used  Winter Walk -Large (VB-370-M)  from Third Coast Rubber Stamps.   This in not a typical Halloween image.  In fact, it is not a Halloween image at all.  But, I made it into an image for Halloween be using lots of oranges, black, and a spider.  Take a look.


 The image is paper pieced using three different orange DP's (Stampin' Up).  A witch's Hat and Wicked sentiment (Graphics 45-Hampton Arts), and a spider (SU) are added.  The CS is: Really Rust and Black (SU); Orange (Bazzill), Brown, gray.  The DP used in the background is from K & Company.


The image was stamped several times using Stazon Black ink.  Once on the base CS and three time on the DP.  Cut out the pieces of the garments and spray with Peach Delight Glimmer Mist; let dry.  When dry, glue to the base image. And, just layer away!  Add some fun Halloween ribbon.  Here is a look at the inside.


The sentiment is from Stampsmith Stamps, DP - K & Company.   Totally wicked!  That's all for me today!  Have a great day and thanks for stopping bye!  Love ya.
Karen

Monday, October 17, 2011

Cutesy Birthday Card

Hello and Happy Monday.
Mondays aren't so bad.   How about a cutesy Birthday card for this Monday?  I used a cute digi from Sweet N' Sassy Stamps.  She is called Cookie.  I was also inspired by the current sketch from The Dutch Dare Challenge site.

Gardening Cookie was printed and then colored with Copic markers.   
CS: Calypso Coral, Blushing Bride, black -Stampin' Up
DP: My Minds Eye
Pink Memento Marker
Metal Tag
Black ric rac
Sheer Coral Ribbon
Sentiments:  Happy Birthday-SU; On inside of   card- Victorian Originals


Here is Cookie Birthday


 The corners are rounded on the image and the black CS layer.  I colored the metal and paper tag with the Pink Marker and then stamped the sentiment.  I added a layer of black CS behind the tag.


The ric rac is glued to the CS and the ribbon is placed over top.   I added a nice Birthday sentiment on the inside from Victorine Originals.  Here is a peek at the inside.


A few Fun Challenges of Cookie Birthday:
Dutch Dare: Sketch
Sweet 'n Sassy Digi: Use black, 2 DP's, 3 embellishments (ric rac, ribbon, and metal and paper tag)
By the Cute and Girly: Anything Goes
Art Impressions: Tag
Critter Sketch: Use green, pink, and black
Prairie Fairy Fridays: Sugar And spice

Well, that's it for me today.  Check back tomorrow for one more Halloween card.  Have a great day!  Love ya.
Karen

Sunday, October 16, 2011

Clean and Simple Medallion Cards with Blockheads Stamps

Hi Everyone,
Hope you are having a great weekend!  I have four cards for you today!  I went pretty Clean and Simple (CAS) with this group of cards.  I used lots of pretty Cardstock, dry embossing folders, Spellbinders, and one stamp set.  The stamp set is Nature Medallions from Blockheads Paper Arts.  This is what the whole set looks like.  I used the three larger medallions for my projects.

Materials list needed to  make the projects:
Nature Medallion Stamp Set: Blockheads Paper Arts
Spellbinders dies: Standard Circles Small; Big Scalloped Circles small
Embossing Folders: Swiss Dots - Cuttlebug; Post Cards, Regal Flourishes, and Damask - Sizzix
Inks: Sweet Plum- Memento, pink,aqua, and plum
Various colors of Cardstock
Ribbons
Now, on to the first card.  I used a combo of pink and soft blue CS's, a Regal Flourishes-Tim Holtz embossing folder, and the Flower Medallion stamp.   The image is stamped on White CS and cut with the Spellbinders die.  A layer of pink is cut too.  Add a big bow and you are done.  


The next card is made in the same way, just vary the colors, embossing folder, and image.


This uses the Bee Postage Medallion, Sweet Plum Memento ink; and I chose Lavender and plum CS.  And, of course a big bow.  


Card number three uses the Butterfly Medallion image and is stamped in a dark plum ink.  I used Lavender and dark plum CS and a blue ribbon.


The Swiss Dot Cuttlebug embossing folder was used here.  


And the last card also uses the Flower Medallion image.  The Cardstock is in two shades of pink with of pop of dark cherry under the image.  Pink ink was used.  This embossing  folder is  Damask from Tim Holtz.  


The Flower Medallion was stamped in pink ink on white CS.  I added a dark cherry polka dot ribbon.


I did not use any other embellishment other than the ribbon.  I wanted the Clean and Simple look.   so, a great set of all occasion cards.  I will just add sentiments to the inside and the cards will be appropriate for any on my card giving needs.  The cards go together so quickly too.  I ended up making about ten altogether they were so easy.  And, they look great.
Have a great weekend.  Love ya.
Karen 

Tuesday, October 11, 2011

Pretty In Pink ATCs

Hi everyone,
Hope your weekend was great and the week is staring off nicely.  We are enjoying the most wonderful Indian summer weather here in Michigan.  Absolutely beautiful.   Today, I have two ATCs for you.  I made them with a stamp from Blockheads Stamps.  It is a dress form in the Vintage Travel Set.


Materials List:
Dress Form Stamp: Blockheads Rubber Stamps
Canvas Paper
Black Acrylic Paint
Brush
Pigment inks: Yellow and Black
Embossing Powders: Yellow and Black
Twinkling H2O's
CS: Magenta, Yellow, Black
Magenta Marker
Ribbon
Lace
Pearls
Twine
Shells

For the base of the ATCs, I used some canvas paper.  I was fooling around with it one day and decided to see if I could come up with something interesting by painting on the canvas paper.  I used black paint and just brushed on the paint in diagonal lines.


I cut the canvas paper to the right size for an ATC and Stamped and embossed the Dress Form image.   I added some pink Twinkling H2O's and some streaks using the magenta marker.


I added laces, twine,and some shells to finish off the ATC.  The second ATC was made in the same way, except that I varied the ink color and used different embellishments.


To make the ribbon embellishment, I ran a line of Fabri-Tac glue down the side of the card and pleated the ribbon and pressed it into the glue.  I trimmed the end when all the pleating was done.


Have a great day!  Love ya.
Karen

Saturday, October 8, 2011

Haunted Forest with Third Coast Rubber Stamps

Hi Everyone!
More spooky Halloween fun!  Today, I have a Haunted Forest Halloween card for you.  I have used Creepy Tree (DT-376-L)  from Third Coast Rubber Stamps. 


The stamping is done on a  5'" piece of Cream CS.  To make the moon, cut a piece of CS the same size as the cream CS and, using a Spellbinders die, cut a circle from this CS.  Don't throw any thing away.  Both pieces will be used.  Lay the CS with the circle cut into it over the Cream CS.  Fill the circle in with Distress Inks: Scattered Straw and Spiced Marmalade.  Remove this mask.  Take the die cut  circle ( circle mask) and put it over the moon.  Cover the Cream CS with Distress Inks: Stormy Sky and Soot Black.   Remove the circle mask.  Stamped the tree with Stazon Black ink and the bats (Stampin' Up) with black dye ink.


I used a brown marker to echo the stamped lines on the trees and to shade the eyes and mouth.  


Layer with Orange CS ( DCWV) and Mustard CS (The Paper Company).  I also decorated the inside and added a sentiment (Stampin' Up).


 Pretty Haunted, isn't it?!!   Hope you are having a great weekend and are able to make some time to stamp. Love ya.
Karen

Stampsmith Celebration With a Sale and Prizes

Hi There!
We are Celebrating Today!!!  What are we celebrating you ask?  We are celebrating the Launch of the new Stampsmith On-line store.  It is better than ever and redesigned.  You can browse, purchase stamps, create a wishlist, and view finished projects in the gallery.  And to celebrate, we are having a contest and a sale.  The Sale starts Saturday, October 8 at 6:00 am and ends  Sunday evening.   The discount code is TENOFF,  just put that in at checkout and get 10% off your purchase.


Now, the contest!  I will NOT be listing the stamps I have used in my project.  You will have to hunt them down on the newly designed On-line web site and find out their names.  DO NOT PUT THE NAMES ON MY BLOG.  GO OVER TO THE STAMPSMITH DESIGN BLOG AND LEAVE A COMMENT WITH THE STAMP NAMES.  Comment moderation will be turned on, so no one will see your answers.  The winner will receive  one Full Sheet and one single stamp of their choice.


That's a lot of info.  I hope I haven't lost you by now.  Okay, on with my project.  I made a large piece of wall art measuring 10" square.    I used two different Stampsmith Stamps.  Can you find them?  I tried not to be too sneaky.


 This is a large project and I wanted you to be able to see all the details.  Therefore, there are lots of photos. I won't "talk" too much and you can just look.  I started with a artist's canvas that I painted with acrylic paints.


For the center piece, the image was stamped on velum and layered over white CS and mounted on Navy CS.   The other image was stamped on glossy White CS and cut with a Sizzix die.   This whole piece was glued to the canvas using Fabri-Tac glue.


I will stop talking now and let you look.


So, now, pop over to the Stampsmith On line store and find the stamps I used.  Leave a comment on the Stampsmith Design blog with the stamp names to be eligible for the prize.  Good luck.  Hope you have enjoyed looking at my wall art.  I hung this on my living room wall.  Looks great. Have a fun weekend.  Love ya.
Karen

Thursday, October 6, 2011

Spa Day with DeNami

Hi Everyone,
Hope your week is going well.  Today's card is one of those just for fun cards.  I used an image from DeNami called Spa Girls.  DeNami is having a color challenge and I used those colors.


I stamped the image with black ink and colored with Copics.  The image was cut with Spellbinders and layered.


I used the challenge colors for all the papers and CS.  CS is from TPC (chocolate brown) and DCWV( orange and charcoal grey).  DP is from SEI.  The sentiment is from Gina K. Designs.


I added a great, big bow made from Lime green wide ribbon.  Orange gems were also added  for accents.


A Few other Super Fun challenges for Girls day at the Spa;
Cooking it up with Katie: something with  F:  My f word is friends.
Do You Stack Up: Brown
Simon Says Stamp: Sparkle and bling:
Paper Take Weekly: anything goes + punches
ABC Challenge: Anything goes
Paper Play: Autumnal colors

Well that's about it for me today.  Check back on Saturday.  We are having a Grand Opening Celebration at the Stampsmith to celebrate the launch of the new store.  They will be prizes and a coupon code to use on any purchases.  I will also have a project to show you.  How about a sneaky peek at my project? Well, okay, you talked me into it.  LOL......


See you on Saturday!  Have a great day.  Love ya.
Karen