Showing posts with label blog hop. Show all posts

Tuesday, November 1, 2016

Falling Snowflakes Holiday Card- Technique Junkies Blog Hop

Hello Everyone!
Welcome Hoppers!!  Today is the Technique Junkies November New Release Blog hop!!  Another fabulous release collection from Technique Junkies!!  All the new releases will be on sale thru Nov. 8, 2016 ----15% off!!

You have arrived here from Cheri's Blog.  Great project from Cheri!!

You may wish to start at the beginning of the hop with the Design Junkies blog
for more details and the blog hop role.

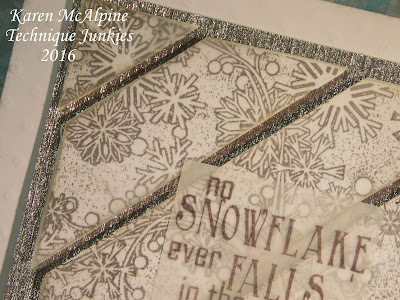
I used two of the November new releases to make a glittery winter card.  I will use this as a holiday card, but it could also be used as a winter thinking of you or birthday.  For the layout design, I used one of the Technique Tutorials from the Dec. 2014 Newsletter.  Take a look:


Materials List:
Stamps: Snow Swirls and Snowflakes Fall (sentiment) both from Technique Junkies
Ink: black dye; Platinum Color Box pigment
CS: White, silver and white dry embossed heavy paper - DCWV
Velum
White Tulle
Blue and Silver Ribbon
Dimensional adhesive


Make It:

  • Make a card base from white dry embossed heavy paper
  • Stamp the Snow Swirls with black die ink on white CS and trim to a 4" square
  • Cut the silver CS into a 4.25" square
  • Follow the tutorial for the Diagonal Pooped Strips to complete the center of the card----Note: I added a layer of velum to each strip


  •  Cut 4" square from Velum and cut into strips in the manner described in the tutorial
  • Distress the edges of the Snow Swirls stamped srips and the velum with platinum pigment ink
  • Glue the velum pieces to the top of each stamped strip
  • Add to the base with dimensional adhesive in the manner described in the tutorial


  • Stamp the sentiment on velum with black ink; cut to size and glue to the front of the card
  • Wrap tulle around the card and tie in a knot
  • Tie ribbon in knot around tulle


Super pretty!!  I think this would make a great holiday decoration too.  I am going to place it on an easel and set on an end table.  Oh so fun....

Now----
Your next step on the hop is Kathy, the Crafty Nurse!  And, you will enjoy checking out her super project!!  

Don't forget to pick out your favorites and grab them during the sale!!

***********
The Design Junkies also are having a Christmas Event starting Nov 11.  We are all making Holidays projects for the 30 Days of Christmas!!  There is a special sale involved too!!  Check back on Nov 11 for all the details!  I think you are going to enjoy all the holiday ideas and inspiration!! ************

Thanks for stopping by!  Enjoy the rest of the hop!!
Karen McAlpine

Saturday, March 12, 2016

Lost Coast Designs' We're Not in Kansas Blog Hop


Hello Everyone,
Welcome to Dreaming and Creating with Karen.  We are not in Kansas today!!  If you are just popping in, we are having a Oz themed blog hop with Lost Coast Designs and Carmen's Veranda stamps.  The blog hop starts here.  You can check out all the details on the Portal to Creativity Blog.  Hop starts at 9:00 am pst.  You have until March 19 to link up your OZ project.  There is a $15 shopping spree for one lucky winner.
I was inspired by the theme to created two tags:


Materials List:
Ink: black dye; Butterscotch and Mushroom Adirondack
Distress Inks: Black Soot, Abandoned Coral, Mustard Seed, 
Distress Markers: Mustard Seed, Frayed Burlap, Pumice Stone, Old Paper
Silk fabric
Ribbon
Twine
Wire
Heart Charm
Ranger Kraft tag


 Make It:

  • Stamp Birds in Trees and Grunge Tree on Cream CS with Mushroom ink;trim and add to tag
  • Stamp Brick Wall on White CS with Butterscotch ink;  trim and add to tag
  • Distress tags with Distress inks


  • Stamp Scarecrow and Tin Woodsman on white CS with black ink
  • Color the Scarecrow with Mustard Seed ink and Mustard Seed, Old Paper, and Frayed Burlap markers
  • Color Tin Woodsman with Black Soot ink and Pumice Stone marker


  • Cut out both images and add to tags with dimensional adhesive
  • Stamp letters O and Z on White CS with black ink; cut out and add to tags
  • Add heart tag with glue and wire
  • Tie fibers in tag hole


Carry on hopping!   Thanks for stopping by!

Karen McAlpine


Thursday, August 20, 2015

Vintage Stamping Challenge Anything Goes!!

Hello Everyone,
Time for a new challenge with  the Vintage Stamping Challenge .  The challenge is a bit late this month, but our DT leader was away on vacation.  She is now back and we are up and running.  Sorry for the delay.  Winners of past challenges should be posted shortly too.

Since this is a busy time of year and lots of folks are on vacation, we have decided to select everyone's favorite theme...... Anything Goes!!

For you to have a chance to win the $20 gift certificate from Flonzcraft Stamps, simply link up your project on the Vintage Stamping Challenge Blog.

For my Design Team project, I used a humorous image to create an "Over the Hill" Birthday card.


Materials List:
Stamp:Funny Farm Set - Flonzcraft Stamps
Ink: black dye
CS: White, Brown, Tweed
Copic Markers
Burlap Ribbon
Dimensional adhesive

 Instructions:

  • Make card from Tweed CS
  • Add a rectangle of Brown CS to left side
  • Add a square of White CS
  • Stamp the Horse on another piece of White CS and color with Copic Markers
  • Cut out the Horse and add to the card with dimensional adhesive


  • Tie a knot in the burlap ribbon and glue to the white CS
  • Stamp or print "over the hill"; cut out, and add to card


Well, I think this card will go to someone with a good sense of humor!  LOL  Love this humorous horse!  I think it is perfect for over the hill cards.  Oh, wouldn't it be funny for a retirement card too??!


Thanks for stopping by!!  Hope your day is filled with creativity.   Love ya
Karen

Wednesday, March 11, 2015

Lost Coast Design Blog Hop: 50 Shades of Green

Hello Everyone!
Today is the first day of the Lost Coast Designs Blog Hop!!  The hop starts March 11th at 11:am PST runs until  March 30th.  You can join in the fun and add your blog to the blog roll!!

The theme is 50 Shades of Green!  Make a project using shades of green and Lost Coast Design and/or Carmen's Veranda Stamps.
__________________________________
Read all the details:


How to Participate:
1.  Make a project using only Lost Coast Designs and/or Carmen's Veranda images with a green monochromatic colour scheme only!  White cardstock & black ink can be used but you must only use shades of green for your colour palette!

2.  Publish your projects on your own blogs any time between March 11 through to March 30 and provide your readers with all the details about our blog hop.   

3.  On March 11 you will be given an inlinkz code to embed into your post.
You embed the code by doing the following:
Draft up your new post like you always do and then switch your post draft to HTML view for Blogger or TEXT for Wordpress, insert the code, then switch back the view to compose mode & publish your post as normal.  Don't worry, it sounds complicated I know but it really is as easy as copying and pasting some text into your post to include our inlinkz blog hop collection and keep the blog hop rolling!

4.  Once you've published your project on your blog, copy your post URL and link it up to our blog hop by adding it to the inlinkz blog hop roll that is now included in your post, exactly the same way you join in on challenges!
Get the code here
5.  Enjoy hopping all the projects that will be added throughout March and leave a comment on each blog post as well as on the Lost Coaster's Review blog to qualify for the prize!


______________________________
I used  shades of green to make this Steampunk card.


Materials List:
Stamps: Steampunk Grasshopper Train and Travel Quotes both from Lost Coast Designs
Ink: Olive Grove Memento
CS: Dark Green, Very Vanilla, Sage Shadow, and Lucky Limeade- Stampin' Up
Copic Markers
Gelli Plate
Gears Embossing Folder
Dots Border Embossing Folder
Acrylic Paints
Wire
Ribbons
Large Brad


Instructions:

  • Make a folded card from Lucky Limeade CS and layer with dark green CS
  • Create the background paper by using a Gelli Plate, acrylic paint and the embossing folders
  • Cut background paper to size and add to card base


  • Stamp the Steampunk Grasshopper Train with Olive Grove ink on Very Vanilla CS
  • Color with Copic Markers
  • Sponge edges with Olive Grove ink
  • Layer with Sage Shadow and dark green CS
  • Add to card base
  • Stamp the sentiment 


  • Cut four pieces of ribbon and secure them together with the wire
  • Add the large brad with glue and glue to card front
  • Add the sentiment
  • Decorate the inside of the card with a left over piece of the Gelli Plate background

Inside of card


Monday, March 24, 2014

Blog Hop--Lost Coast Design Teams Up with Stencil Girl!!

April 2 update: The Blog Hop Winner is PK SEWS!  

Congrats, PK!!!!


Hello Everyone,
You have arrived at Karen's blog:

Welcome to the Lost Coast Design/Stencil Girl Blog Hop!!


The Design Teams of Lost Coast Design and Stencil Girl have joined forces to bring you lots of inspiration and project ideas!  
We have all made projects using Stamps from Lost Coast Designs and Stencils from Stencil Girl.
Visit all the blogs along the hop and leave a comment!  All commenters will be entered in a drawing and one lucky commenter will win: 


Two  9 x 12" Stencils from Stencil Girl And  $25 Gift Certificate from Lost Coast Designs


Hoppers will have one week to leave comments (Until Sunday, March 30).  The more comments--the better the chances of winning the prize package.  The winner will be announced April 2


*****For my project, I used a Stencil (Gigi D150) and a Gelli Plate to make backgrounds.  I then used the paper to make a cover for an accordion book which I decorated with lots of Lost Coast stamps.   I also made a tag incase I want to give this as a gift.  Take a look at the finished projects.


Materials List:
Stamps: All from Lost Coast Designs--
Stencil Girl Stencil --Gigi S150
Inks: Memento Rich Cocoa, Rhubarb Stalk, Toffee Crunch, Espresso Truffle
Archival Jet Black and Coffee
Acrylic Paints
CS: Cream and white
Other Tools:
Score Pad
mono printing Plate
Brayer
Martha Stewart Edge Punch
Ribbons, lace, bakers twine, gold elastic cording

Instructions:
I will start by showing how I made the background papers with the Gig Stencil and mono printing Plate
  • Brayer acrylic paints onto the mono printing Plate--I used red, white, and brown


  • Press the Stencil into the paint


  • Press a full sheet of White CS onto the mono printing Plate.  Run your hand across the entire surface to pick up all the paint


  • Lift the paper from the mono printing Plate


Look at the gorgeous papers!!  I usually make a stack since I have a big  mess anyway.  Be sure to wash the paint off the stencils!!


Select your favorite piece of the paper.   I found this book pattern in the, "Mini Books".  I changed the size a bit.  Here are the measurements I used.

  • Cut the paper 5.5" x 10"
  • Score the piece at 3",   3.25",   6.75",  7"


  • Cut the corners off one end


  • On the opposite end, cut a slit in the paper about 1.5" from the edge and  .75" from the top and bottom


  •  Fold on the score lines and it will look like this


  • When closed the cut end will slip inside the slit


  • Make the pages from Cream CS: Cut Two at 5.25" x 9.75"
  • Score each at 3.25"  and   6.5"
  • Fold like an accordion


  • Over lap the ends and glue securely


  • Decorate the cover and pages with stamping: use the Archival ink on the paint surfaces. 
  • Stamp The Divas with dye ink on Cream CS and cut out the images
  • Use smaller pieces of the background papers to decorate the pages
  • Let you imagination go!!


Cover
  

  • To keep a unified look use stamps with the same theme--like the Divas here
  • I stamped the same Mums border in the same color ink on all the pages to tie everything together


Pages


  • Add bits of ribbon and lace, some bakers twine too

Page


Page


  • When pages are all decorated, glue to the center of the cover and fold in the pages
  • Add some colored paper to inside of the cover if desired--Make sure to cut the slit in the colored paper too.


  • Fold the cover closed tucking in the flap.  I added a piece of gold elastic cord.

Now, continue on the hop by visiting Leslie Tucker Jenison's Blog  and checking out her great project!!

Don't forget to leave a comment!


Blog Hop Roll


  • StencilGirl Talk
  • LeighSBDesigns
  • Mary Beth Shaw
  • Mary Nasser
  • Cherri Robb
  • Judy Shea
  • Bibiana Martinez-Ziegler
  • Linda Kittmer
  • Carolyn Dube
  • Leslie Turner
  • Janet Joehlin
  • Karen McAlpine ---YOU ARE HERE
  • Leslie Tucker Jenison
  • DominoARTblog
  • Lindsay Weirich
  • Maria McGuire


  • Thanks for visiting!!  Hope you have fun looking at all the other fab projects!!!
    Karen