Showing posts with label Holiday Card. Show all posts

Thursday, January 25, 2024

Penguin Holiday cards

 Hello Everyone

Today I have some cute small cards (4 inches x 3 inches) I made for Christmas.  I used them to hold cash.  


They turned out so cute.  They would be good for a mid-winter hello type card too.  The Stamps and punch are from Stampin' Up.  I fussy cut the packages, antlers, scarves, and hats.  

Speaking of mid-winter cards...... My next post will be a few snowman cards I made to send out to friends and family.  

See you next time!!  So glad you stopped by today.

Karen

Saturday, July 18, 2020

Christmas in July with Technique Junkies Part 1

Hello Everyone,
Getting a few Christmas cards made -- early--  and having fun hanging out with the Technique Junkies for their Christmas in July challenge.  Check out all the projects on the Facebook page.  Must use Technique Junkie stamps only.

My card uses a background snowflake stamp.


Stamps:
Snow Swirls #S726
Snowflake Fall #SD760


  1. Make a card from white cs
  2. Cover with printed velum
  3. Stamp the Snow Swirls on blackboard cs with Aspen Mist Versa Magic ink
  4. Layer with blue cs and add to card base
  5. Stamp sentiment with Aspen Mist, layer, and add to card base
  6. Add a red bow


I have linked this up on the Technique Junkie Facebook page too.  I made two more cards for this event.  I will be posting them this week.  So glad you stopped by and see you next time for more Christmas cards.
Karen

Sunday, November 27, 2016

Day 13 - Thirty Days of Christmas Event with Technique Junkies

Hello Everyone!
Welcome back for day 13 of 

The Thirty Days of Christmas 

event with the Technique Junkies!!  

When: November 15 - December 15

The Design Team will be sharing Christmas/Holiday projects using Technique Junkie Stamps.  All Christmas stamps will be on sale during the event--
25% off!!

On my day 13 projects, I used one of the new Christmas Sentiment stamps (which is 25% off) and a non-holiday stamp.  See all The Christmas Sale stamps here.  


It looks like I used two different branch stamps, but I just angled the stamp in the opposite direction for the second card.  Doesn't this Whimsy Branch make a great Holiday card!!??---and just by stamping in red and green.


Materials List:
Stamps: Joyous Noel and Whimsy Branch both from Technique Junkies
Ink: Garden Green Stampin' Up
Red Marker
CS: white, green, and red
DP: MME Found Christmas Pack
Red Narrow ribbon


Make It:

  • Make two card bases from green CS
  • Add a layer of DP to each card
  • On white CS, stamp the Whimsy Branch with Garden Green ink 


  • Add a layer of red CS
  • Add to card base
  • Stamp the sentiment with Garden Green ink
  • Layer with green CS and add to card with dimensional adhesive
  • Tie bows in the ribbon and glue to the branch


Such a fun stamp and it really makes a great Holiday image.
Thanks for stopping by today.  Check out all the projects from the Design Junkies!!
See you again soon!
Karen

Thursday, November 24, 2016

Day 10- Thirty Days of Christmas with Technique Junkies

Hello Everyone!
Time for  a bit more Christmas inspiration!!  Are you making any holiday cards this year??  I have made all my cards --finally I got a bit ahead.  LOL
The Design Junkies have lots of ideas for holiday cards and to get you in the mood for the season,
The Technique Junkies will be celebrating the Holidays with ............

The Thirty Days of Christmas

When: November 15 - December 15

The Design Team will be sharing Christmas/Holiday projects using Technique Junkie Stamps.  All Christmas stamps will be on sale during the event--
25% off!!
On my day 10 project, I used two TJ stamps (which are both 25% off).  See all The Christmas Sale stamps here


Materials List:
Stamps: Whimsical Winter and All is Calm (sentiment)  both from Technique Junkies
Ink: Black dye
Markers
CS: cream, turquoise, dark green
DP: Authentique Tradition Stack
Green ribbon


Make It:
  • Make a card base from dark green CS
  • Add a layer of DP
  • Tie the ribbon around card
  • Ink the stamp with Markers and stamped on cream CS
  • Add a layer of turquoise CS and add to card
  • Stamp sentiment with black ink


More ways to use the Whimsical Winter stamp:


Hope you got your inspiration fix!!  Check out all the Holiday projects on the Design Junkie blog.  

Thanks for stopping by.  

Happy Thanksgiving!!!

Karen McAlpine

Tuesday, November 1, 2016

Falling Snowflakes Holiday Card- Technique Junkies Blog Hop

Hello Everyone!
Welcome Hoppers!!  Today is the Technique Junkies November New Release Blog hop!!  Another fabulous release collection from Technique Junkies!!  All the new releases will be on sale thru Nov. 8, 2016 ----15% off!!

You have arrived here from Cheri's Blog.  Great project from Cheri!!

You may wish to start at the beginning of the hop with the Design Junkies blog
for more details and the blog hop role.

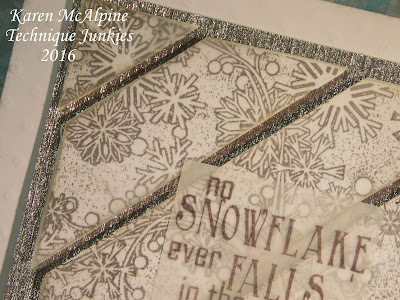
I used two of the November new releases to make a glittery winter card.  I will use this as a holiday card, but it could also be used as a winter thinking of you or birthday.  For the layout design, I used one of the Technique Tutorials from the Dec. 2014 Newsletter.  Take a look:


Materials List:
Stamps: Snow Swirls and Snowflakes Fall (sentiment) both from Technique Junkies
Ink: black dye; Platinum Color Box pigment
CS: White, silver and white dry embossed heavy paper - DCWV
Velum
White Tulle
Blue and Silver Ribbon
Dimensional adhesive


Make It:

  • Make a card base from white dry embossed heavy paper
  • Stamp the Snow Swirls with black die ink on white CS and trim to a 4" square
  • Cut the silver CS into a 4.25" square
  • Follow the tutorial for the Diagonal Pooped Strips to complete the center of the card----Note: I added a layer of velum to each strip


  •  Cut 4" square from Velum and cut into strips in the manner described in the tutorial
  • Distress the edges of the Snow Swirls stamped srips and the velum with platinum pigment ink
  • Glue the velum pieces to the top of each stamped strip
  • Add to the base with dimensional adhesive in the manner described in the tutorial


  • Stamp the sentiment on velum with black ink; cut to size and glue to the front of the card
  • Wrap tulle around the card and tie in a knot
  • Tie ribbon in knot around tulle


Super pretty!!  I think this would make a great holiday decoration too.  I am going to place it on an easel and set on an end table.  Oh so fun....

Now----
Your next step on the hop is Kathy, the Crafty Nurse!  And, you will enjoy checking out her super project!!  

Don't forget to pick out your favorites and grab them during the sale!!

***********
The Design Junkies also are having a Christmas Event starting Nov 11.  We are all making Holidays projects for the 30 Days of Christmas!!  There is a special sale involved too!!  Check back on Nov 11 for all the details!  I think you are going to enjoy all the holiday ideas and inspiration!! ************

Thanks for stopping by!  Enjoy the rest of the hop!!
Karen McAlpine

Thursday, October 17, 2013

Happy Holiday Birds

Hi Dreamers!

I am back today making a start on my Holiday cards with this Happy Holiday card.  This project is also the second post as Guest Designer on the 4 Krafty Girlz Challenge Blog.  Challenge #4 is Anything Goes with the following sponsors:
Meljens Designs
Sassy Studios
Glamoureyes

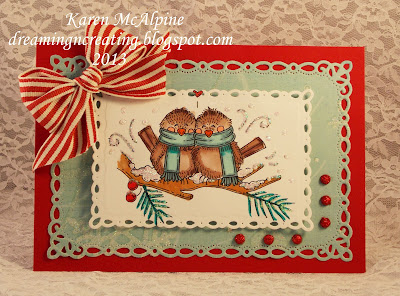
I used a digi stamp from Meljens Designs called Cozy Little Chickadees on my Holiday Card.  I wanted to go with a non-traditional color scheme for this Holiday card.  I found a piece of aqua with glitter decorative paper in a holiday stack.  And to make the aqua really stand out, I paired it with a cherry red CS.  Love the combo!  Take a peek!


Materials:
CS: White; Electric Red - My Favorite Things; Pool Party - Stampin' Up ( on the inside of card)
Decorative Paper: K & Company
Die Cut: Romantic Rectangles - Spellbinders
Copic Markers
White Marvy Pigmented Opaque Ink Marker 
Stickles Crystal Glitter Glue
Striped wide ribbon - Stampin' Up
Red Glitter dome embellishments


Instructions:

  • Make a top fold card from Electric Red CS
  • Use the die cut to cut out the decorative paper layer
  • Print the digi from computer on white CS


  • Die cut the image with the Spellbinders
  • Color the image with Copic alcohol ink markers
  • Color the snow with White Pigment Marker
  • Add to card with dimensional adhesive


  • Tie striped ribbon in a bow and glue to upper corner of card


  • Add the Glitter Dome embellishments to  lower corner


  • Add the Glitter Glue to the snow and swirls


Inside


  • On the inside die cut a piece of Pool Party Cardstock
  • Stamp Happy Holidays


**********A few fun Challenge for My Happy Holiday Birds*******
Simon's Wednesday: Holiday/Christmas
Addicted to Stamps and More: use Markers
The Crafter's Cafe: Cute
Crafting by Design: anything goes
Crafting With Dragonflies: trees, leaves, nature
Crimbo Crackers: Christmas Birds
Craft-Room: Feathered Friends
Crafting Musketeers: Christmas in October
Penny's Challenge: anything goes
Crafty Hazelnut's Christmas: anything goes as long as Christmas


Another busy week here!  Spent yesterday driving all over Southeastern Michigan visiting.  Spent half the day with Mom and Dad and the other half with my dear Friend, Laurie.  I did not get home until late, but had a great day.  I will have some Halloween cards for you later in the week.  The cards are not finished yet, but they soon will be!!  See you soon for more holiday fun!!  Love ya.
Karen

Monday, December 17, 2012

Coffee Gal Cup of Cheer with The Stampsmith

Hi Dreamers,
Hope you had a great weekend!  Ready for a bit of Christmas inspiration??!!  Today, I have a fun card that I made with one of my favorite stamps--Coffee Gal from The Stampsmith.


I stamped Coffee Gal on glossy white CS with black dye ink.  I cut a frame from red paper and gave it a coat of Crackle paint.


The card base is made from rusty red CS ans layered with flocked Christmas DP from Me and My big Ideas.  I added a bright ribbon.


The sentiments are from Mark's Finest/Heinrich stamps.  


I just love Coffee Gal.  I have used this stamp on everything from Christmas to birthday cards.   The current Stampsmith Challenge is currently running.   The theme for this month is Handmade Holiday.  Check it out.  There is a great prize involved too!!

A few Fun Challenges For my Coffee Gal:
Sunny Cards: Holiday Greetings
the Stamping Shack: Let the Holidays begin
365 Cards: hot and cold
Stamp Your Life: anything goes
Love to Create: Winter fun
Victorine Stamps: non traditional Christmas


Well, better get going and get some things done today.  Have a great Monday.  Love ya.
Karen

Monday, December 10, 2012

We Wish You A Merry Christmas with The Stampsmith

Hi Dreamers!
Hope you had a great weekend!  Guess What??  I addressed my Christmas Cards and have them ready to go out!  I will have to do a few more, of course.  I always think of a few more people I want to send to.

Funny Story about addressing cards: I had three cards in the envelopes all addressed and sealed up when I realized I had not written anything in the inside!!  Not even signed my name!!  Duh!!!  LOL.  Well, I am glad I caught it after wrecking only three envelopes.  Of course they were larger sized more expensive ones!!  Oh, boy!  I need a vacation!  Do you have a funny story?? I promise to laugh with you not at you!

Today, I have another Christmas card idea for you today.  This photo stamp is called "Banjo Singers" and is from The Stampsmith


The Banjo Singers are stamped on Glossy White CS with black dye ink layered onto black CS.  A strip of piping (form my sewing stuff) and ribbon are glued to the under side.  I wanted the colors to peek out from the edge.


The decorative paper has the lyrics to "we wish you a  Merry Christmas" and is from My Mind's Eye.  I added a printed ribbon and some glitter balls for a touch of red.


This was a really fun card to make.  The photo stamps pair so well with a piece of beautiful decorative paper.   And, results in a lovely one of a kind Holiday card that goes together quickly.  I love challenging myself to use non-holiday stamps to make holiday cards.  Makes your stamp dollars go a lot further too.

I hope you are not getting tired of Christmas cards.  LOL.
Tomorrow I will change it up with a set of mini note cards--not Christmas.  I also have  a wedding card to post on Wednesday.  So, a few non holiday projects for you.  See you then!  Love ya.
Karen

Monday, December 3, 2012

Santa I Can Explain! - Sassy Holiday Card

Hi Dreamers!
Happy Monday!  I think Monday is a good day for a sassy Holiday card.  Check out Marilyn Monroe!  This stamp is from The Stampsmith's Marilyn Monroe full sheet.  Oh dear, I think she has a lot of explaining to do!!


Stamp the image on white glossy CS with black dye ink.  Add a layer of red CS.  Make a card base from red CS and layer with DP (My Mind's Eye)  Die cut the diamonds (diamonds are a girl's best friend you konw) from DP.


Wrap the tulle around the card.  Wad up a strip of tulle and glue to card.  Punch the flowers and add to card.  Add pearl.


Stamp the sentiment (from Printworks) and add to card.  Punch another flower and glue to sentiment.


A Few Fun challenges for Marilyn:
Love to Create: Holiday cheer
Dream Valley: non traditional Christmas
the Artistic Stamper: Home for Christmas
Cards Galore: Christmas
Cup Cake Craft Room: anything goes for Christmas
Oozak Challenge: anything goes + red


Another cute card for my basket.  Now, I have to start sending them out!  I really must get busy.   I just need about 4 extra hours in a day and I can get everything done.   Hope you are having a super day!   Let's see what I have scheduled for tomorrow.  I am checking my schedule and it says that tomorrow is Paper Artsy day.  Ohh, you will like this...a decorated box and a card.  See you later alligator.   Love ya.
Karen