Showing posts with label Sewing. Show all posts

Sunday, April 11, 2021

Sewing Machine Card

 Hello Everyone,

Posting a fun sewing themed card today.  I used a digi image from some years ago.  But, it still makes a fun card!


Love this red, black, and white color combo.  I had the scissors charm in my stash and it was perfect to embellish this card.  I also used white lace, black lace, ribbon, and bakers twine.


On the inside, I stamped "Sew sweet".  Hope your day is sew sweet!!

See you next time.

Karen

Saturday, June 1, 2019

Refashioned Jackets

Hello Everyone!
I wanted to share two refashioning projects I made this Spring.  The projects refashioned two jackets that I had made years ago in the cropped length that  was popular at the time.  I loved the jackets, but found that I just did not wear them any more because of the length.  Take a look at the changes.


Project #1
Original jacket I made with vintage 1950 fabric. 


Purchased skirt (years ago) that I never wore because it was too see thru.  I cut the top of the skirt off and used the bottom of the skirt to add length to the jacket.


Finished Jacket refashion.  Now, this jacket has a nice length and I have to say I have been wearing this a lot.


Project #2
Original Jacket I made with a soft loosely woven cotton fabric.


Skirt I made years ago with a knit fabric.  I choose this skirt to re-purpose because it was too small, the fabric was of good quality, and the color was a near perfect match to the jacket.


I deconstructed the skirt, removed the top, and used the fabric to add length to the jacket.

Finished refashioned Jacket.


I changed the closure on the jacket to a loose tie by sewing a strip of left over fabric from the skirt.


Back view.


I have been wearing this "new" jacket a lot too.  It is light weight and goes with so many things in my wardrobe.  I have worn it with Khaki, white, and tan pants.  It also looks good with jeans.

I find that I have really been enjoying refashioning some of my clothing.  I have been using things that I already owned and haven't had to buy anything except thread.   Talk about recycling!! 

I will be back with the next post showcasing vintage chickens.  See you then!

Karen

Wednesday, April 24, 2019

Refashioned Denim project

Hello Everyone,
Changing things up a bit today with a sewing project.  I have jumped on the refashioning band wagon in a big way.  I find it  is so rewarding to take a garment that is never worn and changed into something really cool and fun to wear.  The project today is refashioned from a pair of denim shorts.  The shorts were never a favorite and did not fit well. 
This is a picture of the shorts.  I have already taken them apart at the crotch seam.


Here is my new warp denim skirt.  I added a second denim to the front and bottom edge.  I sewed an exposed  separating zipper onto both edges of the front.  This how I get in and out of the skirt.  I added some large snaps on the opposite edge of the front to keep the skirt closed and in place.


This is a view  of the back.  I did have to add a small godet in back to get everything to lay flat. 


This was such a fun project!  I enjoyed the process of working through the refashion step by step.  I liked the end results so much, I made a second skirt in white denim.  I will share the photos of that project later. 

Hope you enjoyed this interlude of sewing.  Next post will be about card making, but I will continue to show you my sewing projects too. 
Hope you are having a great day!!
Karen

Thursday, November 6, 2014

Throwback Thursday with Bibiana

Hello Everyone,.
My blogging buddy, Bibiana is hosting Challenge #4 in her Throwback Thursday Linky Party posts.  See all the details on her blog, Stamping with Bibiana.


The idea is to revive an older project and link up on Bibiana's blog.

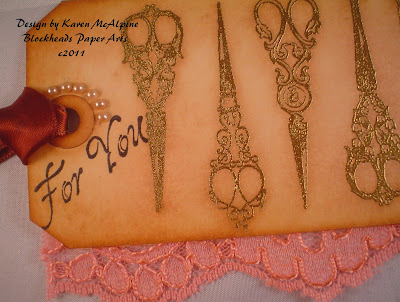
I am going all the way back to August of 2011 for this throwback.  I made a set of tags using vintage scissors stamps.  Take a look.


You can see the original post here.  I stamped with pigment ink and heat embossed the scissors.  I added distress inks around the embossed images.  Finished each tag with some fun embellishments.


Head over and check out the post on Bibiana's blog and link up your throwback!!  There are prizes too!!!  See you soon.  Love ya.
Karen

Tuesday, August 20, 2013

Part Two Dress Form Gift Tag Set

Hi Dreamers!
Welcome back to Dreamland!  Today, we will look at Part Two of the group of Gift tags with the Tim Holtz Dress Form Stamp.  I used lots of browns and yellows on this group.   Here is the photo of the entire set and you can see the Part One post here.  Take a look at the group photo.


Materials:
Stamps: Seamless Experience - Tim Holtz Stampers Anonymous
Happy Birthday -Lost Coast Designs
Hooks and Eyes - Blockheads Stamps
Sanded Background stamp - Stampin' Up
Inks: Black Archival,  Crushed Curry - Stampin' Up, Rich Cocoa and Espresso Truffle Memento,  Mushroom Adirondack, Antique Linen and Vintage Photo Distress Ink
Picket Fence Distress Marker
Various CS's
Sizzix Tag Die Cut
Corner rounder
Hole Punch
Glue Pen

Embellishments: Ribbons, fabric scraps, glitter, buttons, and rick rack


 Tag #1-Brown

  • Stamp the Dress form with Black Archival ink on Kraft CS
  • Distress with Distress inks
  • Cut the top into the shape of a tag
  • Layer with Black and Kraft
  • Color in some of the open spaces with the Picket Fence Distress Marker
  • Apply a small amount of glue with a glue pen to the white areas and sprinkle some glitter over the glue


  • Punch a hole in side of tag
  • Tie fabric and ribbon through hole
  • Stamp sentiment with Rich Cocoa ink


Tag #2- Yellow


  • Stamp Sanded Background stamp with Crushed Curry ink
  • Stamp Dress form and ruler with Rich Cocoa ink
  • Stamp hook and eyes with black
  • Glue a rectangle of Kraft CS to top of tag and punch hole in center
  • Tie fabric scrap through hole
  • Distress edges with Antique Linen DI


Tag #3-Yellow with buttons


  • Stamp the background elements with Crushed Curry and Mushroom inks
  • Stamp Dress form with Espresso Truffle ink
  • Distress with distress inks
  • Round corners
  • die cut a tag from dark brown CS and cut off the top
  • Glue the top of the die cut tag to top of dress form piece


  • Add rick rack, ribbon, and buttons


*******Challenges and Linky Parties for my Dress form Gift Tag set:
An Inky Situation Linky Party: brown and/or orange
Craft Room: something new---This stamp set is new to me
Cuttin and Stampin: monochromatic card

So, let me think.  What will I have next??  I have been working on some Stampsmith projects......  Hmmm.  I am trying to use my new stamps that I haven't gotten a chance to play with yet.  Well, maybe something in that category.  Stayed tuned!  I will have Something fun for you!   See you soon.  Love ya.
Karen

Monday, August 19, 2013

Dress Form Tag Set

Hi Dreamers!
Happy Monday!  I picked up a set of Tim Holtz stamps the other day and had time over  the weekend to get some stamping done.  I made a set of gift tags with a sewing theme.  I made five in total and will be showing you two today and the other three in the next post.

 I started with one of the backgrounds I made the other day and just started stamping.  ( See how versatile the stamped backgrounds are!?  I always like to keep a stack of them handy.  Click here to see the whole stack.)

I used cream, kraft, and white CS for all the tags. Here is a photo of the whole group after the stamping part, but before any trimming or cutting into tag shape.


Here is the group all finished with lots of ribbons, fabric scraps, feathers, pearls, and rick rack!


We will be taking a closer look at the Red tag with Feathers and the Green tag today.

Materials:
Stamps: Seamless Experience - Tim Holtz Stampers Anonymous
Rose Lace Cover-a-Card-Impression Obsession
Inks: Black Archival,  Pink Pigment, Mushroom Adirondack, Antique Linen Distress Ink
Various CS's 
Embellishments:Ribbons, fabric scraps, feathers, pearls, flower, twine, rick rack


 The first gift tag is on a folded card.  This can be attached to a gift bag or package and the To and From written on the inside.  Size is 3.25"  x 5.34"

  • Stamp the Rose Lace Cover-a-Card with pink pigment ink on cream CS
  • Cut to size
  • Stamp the dress form with black Archival ink


  • To add the cording punch two holes through all layers (see photo below)
  • Tie cording through holes
  • Add the embellishments

 Back of gift tag card


Green Tag


Size: 3.50" x 6.25"


  • Stamp the dress form with Mushroom Adirondack ink on Cream CS
  • Stamp the zig zag stitch and thread spool top with other shades of green inks
  • Distress with Antique Linen DI
  • Layer with two shades of green CS
  • Punch a hole in the upper left corner through all layers


  • Tie a piece of wide striped ribbon through hole leaving some slack
  • Tie pieces of fabric and ribbons onto the wide striped ribbon

Think how fun these tags would be on a special gift package!!  Or, you could just write a note on the back and send as a card!  Such fun.  These were so fun to make that I could not stop!!  I will share the other three in detail in my next post.


**********Challenges for my Dress Form tag Set:
Avenue 613:stitching faux or real
That Craft Place: stitching
Pile it On: no DP
Cheerful Stamp pad: Your choice
Paper Playtime: pearls
Simon's Wednesday Challenge: monochromatic---Green tag
Rhedd and Rosies: use red

So, I hope you are having a great Monday.  Had the official inspection on the new air conditioning unit this morning.   See, I told you I am catching up on all those little things that did not get done while my husband was off sick for 10 weeks.  Dentist on Thursday.  Not sure what I will set up for the week after.  Maybe a hair cut.    See you soon with the other tags.  Love ya.
Karen

Sunday, April 21, 2013

Bird in a Field of Flowers

Hi Dreamers!
I have a bit a free time this morning and thought you would like to see this cute card I made with a really cool stamp from Magenta called Bird in Flowers.  I used a couple different coloring techniques, some hand sewing, and fussy cutting on this project.  Take a look.


  • Cover the stamp with a green and rust ink.  Then Stamp on white CS.
  • Distress with Frayed Burlap and Spiced Marmalade ink.
  • Ink the stamp with markers and  stamp a second and third image on White CS.  


  • Fussy cut the bird from one of the stamped images and the wing from the third.  
  • Distress with distress inks (listed above)
  • Layer onto the first stamped image.


  • To make the ribbon sewn piece: pierce zig zag DP ( from My Mind's Eye) with a piercing tool
  • Thread 1/8" ribbon in a large eyed needle
  • Sew the ribbon into the holes one color at a time;  tie off the ends
  • Tie an extra bow for the corner of the card
  • Add a few rhinestones


  • Add a fussy cut flower from one of the marker stamped pieces.
  • Stamp a pretty sentiment (My Sentiments Exactly)

Isn't this sweet!?  I would like to enter my Bird in a field of flowers in
*****The Magenta Challenge: fussy cutting and sewing


Well, I think I will go and throw in another load of laundry.  My life is so exciting!  LOL  It is too cold to work in the yard today.  Tomorrow is supposed to be a really nice Spring day!  I need a tall shelf for my studio.  I think I will head out tomorrow and look around for something.   I hope your weekend is just lovely! 
 I will be working on something made with Grungeboard for Tuesday.  See you then!!! Love ya.
Karen

Tuesday, February 26, 2013

Vintage Dress Forms with Blockheads Stamps

Hi Dreamers!
I am back from a little blogging break.  I had a few days off and now I am ready to blog away.  Today, I would like to show you some vintage cards I have made using one of my favorite themes--the dress form.  The stamps are all from Blockheads Stamps and I added lots of simmer with Perfect Pearls powder.
I made a total of four samples.


Card #1


Materials List for all the Cards:
Stamps: Dress Form from Vintage Light and Form; Notions; Crackle Background
Inks: Rich Cocoa, Espresso Truffle,  and Toffee Crunch Memento;
Butterscotch Adirondack
Gingerbread, Malted Mauve, and Red Birch Versa Magic 
Perfect Pearls Powder
Dimensional Adhesive
Page from a Mixed Media Paper Pad (Strathmore)


Detail Card #1


Instructions:

  • Tear a page from the Mixed Media paper pad.  
  • Stamp the Notions Collage stamp on the paper with Toffee Crunch ink.
  • Tear the paper around the image.
  • On a second piece of paper, stamp the Dress Form with Rich Cocoa ink
  • Tear out the Dress Form


Detail Card #1


  • Distress the edges of both pieces with Gingerbread Versa Magic.  (Gives a nice dark opaque edge to paper)
  • While ink is still wet, sprinkle Perfect Pearls powder onto paper.
  • Brush excess powders off .  This adds lots of shimmer to the edges.
  • Layer onto tobacco colored CS. Add the Dress Form with dimensional adhesive
  • Wrap bakers twine around
  • Mount on Tan CS


Card  #2


Instructions:
Made the same way as Card #1 with these changes:

  • Stamp Notions Collage Stamp with Butterscotch ink and use Red Birch and Gingerbread Versa Magic ink on the edges


Detail Card #2


  • Stamp the button from Notions Stamp set with Rich Cocoa ink; sprinkle Perfect Pearls powder here too.


  • Add a scrap of sheer fabric that has been tied in a knot.


I made two other examples before I made the two above.  I thought it might be nice to put a sealer of some kind over the Perfect Pearls.   I put a coat of Royal Coat Decoupage Finish on them.  Well, it negated the shimmer.   I still like the cards and think they are cool, but you can't really see the shimmer.  So, I would not use the Decoupage finish on Perfect Pearls again, but would on a plain surface that I have not  planned as a  shimmery piece.   Here are the non-shimmery samples.


  •  I used the Crackle Background stamp here and also stamped the Hooks and Eyes (Notions set) with Espresso Truffle ink.
  • Use Malted Mauve and Gingerbread Versa Magic on the edges.


You can see that these two samples have a matte finish.


How about a few Challenges:
Simon Says Stamp and show: a favorite stamp---The Notions Collage
Love to Create: wrap it up-bakers twine
Flourishes Timeless Tuesday: glimmer and shine

We are supposed to get a winter storm here in Michigan later today.  I have all errands for the week done and don't have to worry about going out tomorrow if we get lots of snow.  Good excuse to make a few cards. LOL  I wish you a day full of joy.  Love ya
Karen

Tuesday, February 19, 2013

Vintage Scissors Note Card Set with Blockhead Stamps

Hi Dreamers,
How are you doing?  Hope your weekend was nice.  My weekend was good.  Got to spend some time relaxing and watching some DVD's.  I received the complete set of "All Creatures Great and Small"  and have been engrossed in watching that all weekend.  And, of course, watched "Downton Abbey".

I still had time to make a note card set with vintage scissors stamps from Blockheads.

The card size is 3 1/2 x 5 1/2".

I used the same CS on all the cards: white and a speckled pale green.  There are four different cards.


Materials List:
Stamps: Household-Sewing set from Blockheads
Ink: Oregano Adirondack and Frayed Burlap Distress ink from Ranger 
Cardstock: white and speckled pale green


Instructions:

  • Stamp the scissors on the pale green CS with Oregano ink.  
  • Distress the edges with Frayed Burlap Distress Ink.


And, here is a close up.


Isn't this a fun set of stamps??!!  I think  the cards would be a really nice gift wrapped up with some ribbon.
Have a super day!  Love ya.
Karen