Showing posts with label flowers. Show all posts

Thursday, May 9, 2019

Napkins on My Cards - Part Two

Hello Everyone,
This is Part two of the napkin cards using wax.  The napkin cards seen to be a favorite on Pinterest.  See the post for part one on my blog here.

The backgrounds and layered pieces are made from wax covered napkins.  I have an older post on my blog with a short tutorial here This is very messy, but a fun technique to try.

The cards are larger and square:  5.5 inches


I made this card into a sympathy card.


The second card is not layered.  I added rows of pearls and a pretty bow.


Here you can see the wax on the card below.  Love all that texture.


This floral card is a bit smaller.


Hope you enjoyed the napkin cards!!  The finished cards have lots of impact so much of that lovely texture.

See you next time!!
Karen

Tuesday, August 26, 2014

Dry Embossing Takes the Spotlight

Hello Dreamers!
How is your week going?  Keeping busy here.   Making a few cards.  Mowed the lawn today too.   Now that I have that out of the way, I have more time to make cards.....
The projects today, feature dry embossing.  The embossing really sets the tone for the card.  On the first card, I added some paper flowers and a little bee.  The second card is all dry embossing with a little bee.  


Materials:
Stamps: DRS Designs Sentiment on inside of card One-Not Some Junk
Inks: Vintage Photo, Forest Moss, and Mustard Seed Distress inks
CS: Cream, white, tan, brown,and yellow
Paper Flowers
3-D Bee stickers: K & Company
Ribbon
Embossing folders: Paisley - Cuttlebug; Flower - Darice


Instructions:

  • Make two A2 cards from tan and yellow CS
  • Layer the tan card with brown CS
  • Dry emboss  cream and white CS
  • Highlight the dry embossing with Distress ink
  • Add layers of paper flowers to the Paisley card and a bee to both cards
  • Stamp this fun sentiment on the inside of the cards


Inside


Card Two:


*********** Challenges for "Dry embossing take the spotlight":

DRS Designs: color challenge
Craft-Dee Bow: anything goes with a bow
Dream Valley Challenge: flowers
Through the purple haze: anything goes
Allsorts: bright sun shiny colors
Aloha Friday: in the garden

Well, I should go and finish up the soup I am making for dinner.   I have to add a few more things.   Enjoy your evening!!   See you next time.  Love ya.
Karen

Thursday, February 20, 2014

Peachy Celebrate Spring

Hi Dreamers!
Although it feels absolutely nothing like Spring here in Michigan, I wanted to make something to remind me of Spring.  I used a floral bouquet stamped on news print decorative paper to try to elicit memories of long ago Spring.  I am tired of snow.


Materials:
Stamps: Serendipity Stamps
Ink: Coffee Archival; Rusty Hinge Distress Ink
CS: Calypso Coral, Crisp Cantaloupe, Chocolate Chip -Stampin' Up
DP: Tell your Story stack - Teresa Collins
Distress Markers: Rusty Hinge, Dried Marigold, Spun Sugar, Worn Lipstick
Sheer Ribbon
Coral Satin Ribbon
Coral Fabric
3-D Zots
Candy dot embellishments
Stickles Glitter Glue


Instructions:

  • Make a card from  Calypso Coral CS and layer with Crisp Cantaloupe
  • Stamp the image on the DP with Coffee ink
  • Color the flowers with Rusty Hinge, Dried Marigold, and Spun Sugar markers
  • Color the Vase with Rusty Hinge and Worn Lipstick markers
  • Layer onto Chocolate Chip CS
  • Stamp Celebrate with Rusty Hinge ink


  • Add the embellishments: glue the color ribbon pieces folded in half and some doodad poofs made from fabric--cut a circle and run gathering stitches and pull up gathers; knot thread--makes a poof.
  • Glue a piece of the sheer ribbon behind letting it peek out from the edge
  • Glue the stamped piece to the card front with 3-D zots
  • Add Glitter Glue to the heads of the candy dot embellishments and to the centers of the flowers


*******************Challenge for my Peachy Celebrate Spring Card:
Serendipity Stamps: use newsprint or sheetmusic + Serendipity stamp
Paper Take Weekly: lovely layers
Crafting Desert Divas: glitter
Shopping Our Stash: make an embellishment
4 Krafty Girlz: anything goes
Divas by Design: use a rubber stamp
Penny's Challenge: lots of layers


Up next in Dreamland: A fun project made with Lost Coast Design Stamps!!  Fun!  See you then!  Love ya.
Karen

Wednesday, June 5, 2013

Ribbon Rosettes Tutorial and Card

Hi Everyone,
I am back today with the one of the ribbon ideas I have been promising!  I will show you how to make pretty ribbon rosettes that can be used in a variety of ways.  I added mine to a card, but they could be used on a headband, jewelry, a scrapbook page, alters items, etc....  Let's look at the finished card first.


Materials List:
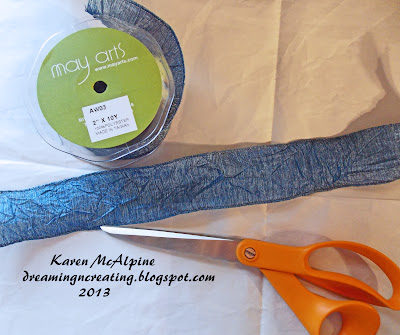
Blue Wired Crinkle Ribbon (AW03) May Arts
Stamp: Flower Text (S5506) Hero Arts
Ink: Onyx Black VersaFine
Ranger Distress Markers: Crushed Olive, Shabby Shutters, Mustard Seed, Weathered Wood, Faded Jeans
Cardstock: white, black, and Not Quite Navy (Stampin' Up)
Yellow Crystal Stickers 10 mm-Mark Richards
Fabri-Tac Glue
Sharp Scissors


Instructions:


  • Cut a length of the Blue Wired May Arts Ribbon   


  • An eleven inch piece of ribbon will  make  2 two inch rosettes


  • Cut the ribbon in half lengthwise with a sharp pair of dressmaking shears


  • Sew the two short ends together with needle and thread ( I used regular sewing thread)
  • Make a small knot on the top edge so that the stitches made on the short end don't gather up


  • Run gathering stitches down on long edge


  • Begin to pull the stitches to gather the ribbon


  • Pull the thread to tightly gather the ribbon 
  • Now your rosette has taken shape.


  • Take several more stitches across the center of the rosette to secure the ribbon 
  • Knot the thread and cut the thread


That's it!  Wasn't that easy!!  Now you are ready to decorate a project with your hand made embellishment.  ***If you use a narrower ribbon, skip the step of cutting the ribbon in half lengthwise.  


Here is how I completed my Card:
  • Make a card base with Not Quite Navy CS
  • Layer with Black CS
  • Stamp the Hero Arts stamp on white CS with Black Onyx ink


  • Color the flowers with Distress Markers with the colors listed on the Materials list
  • Add to the card base


  • Use Fabri-Tac glue (or another strong craft glue) to attached the rosettes to the card
  • Add the large Yellow gems in the center of the rosettes  ( I used the Fabri-Tac glue on the gems too)


Wouldn't you love to receive this card??  I think it would be great for a birthday, get well, or a thinking of you.  You could make a bunch of the rosettes ahead of time and keep them for future use.  I like to keep a few on hand.  But, sometimes I make them specifically for  a particular project. 
 I hope you will try to make these fun hand made embellishments.  

*****A Few fun Challenges for my Folk Art flowers
Challenges 4 Everybody: anything goes
Stamping Sensations: summer blooms
ABC Challenge: O is for open
Crafting Musketeers: use a stamp
Creative Moments: lots of layers
************

I will be back later with an idea that uses some of those ribbon scraps!!  Don't throw those away!!
I wish you a happy day.  Love ya.
Karen

Sunday, April 21, 2013

Bird in a Field of Flowers

Hi Dreamers!
I have a bit a free time this morning and thought you would like to see this cute card I made with a really cool stamp from Magenta called Bird in Flowers.  I used a couple different coloring techniques, some hand sewing, and fussy cutting on this project.  Take a look.


  • Cover the stamp with a green and rust ink.  Then Stamp on white CS.
  • Distress with Frayed Burlap and Spiced Marmalade ink.
  • Ink the stamp with markers and  stamp a second and third image on White CS.  


  • Fussy cut the bird from one of the stamped images and the wing from the third.  
  • Distress with distress inks (listed above)
  • Layer onto the first stamped image.


  • To make the ribbon sewn piece: pierce zig zag DP ( from My Mind's Eye) with a piercing tool
  • Thread 1/8" ribbon in a large eyed needle
  • Sew the ribbon into the holes one color at a time;  tie off the ends
  • Tie an extra bow for the corner of the card
  • Add a few rhinestones


  • Add a fussy cut flower from one of the marker stamped pieces.
  • Stamp a pretty sentiment (My Sentiments Exactly)

Isn't this sweet!?  I would like to enter my Bird in a field of flowers in
*****The Magenta Challenge: fussy cutting and sewing


Well, I think I will go and throw in another load of laundry.  My life is so exciting!  LOL  It is too cold to work in the yard today.  Tomorrow is supposed to be a really nice Spring day!  I need a tall shelf for my studio.  I think I will head out tomorrow and look around for something.   I hope your weekend is just lovely! 
 I will be working on something made with Grungeboard for Tuesday.  See you then!!! Love ya.
Karen

Tuesday, April 9, 2013

Grungeboard Rusty Flowers with Blockhead Sentiments

Hi Dreamers,
I am back after a nice weekend.  The weather was nice and had a nice visit with my brother.  I also spent quite a few hours working on a group of cards for submission.  Those went out in the mail today!  Yeah.  Now, I have four custom order cards for my BF to work on this week.  Now, for today, I have some fun projects made with Grungeboard.  The designers on the Blockheads Design blog, have been showcasing grungeboard this month.
I used a technique in the Tim Holtz's book Compendium of Curiosities- Rusted Grunge.   I thought it would be fun to make some rusty flowers.  LOL.  The flowers are pre-cut Ranger Grungeboard.  You could use any shape for this technique.  I made a Birthday card with matching tag, and another tag.  Let's look at the card first.


Materials List:
Stamps: 
Happy Birthday (Verses Full Sheet or as a single) and For You (Daisies Half Sheet) both from Blockheads.
Ink:
Shabby Shutters, Vintage Photo, Spiced Marmalade, Barn Door, Tumbled Glass Distress Inks -Ranger
Sienna Archival
Embossing Ink ( I used Emboss It)
Other:
Vintage Photo Distress Embossing Powder
Manila Pre-Cut Tag
Ribbons
Pearls
Rust, orange, and black CS


Instructions:

  • Rusty Flowers (per Compendium of Curiosities): Cover grungeboard with embossing ink and heat emboss with Vintage Photo Distress embossing powder.
  • When cool, rub off some of the unmelted crystals. 
  • Apply Barn Door and Spiced Marmalade ink over the embossing powder on the flowers. Use Shabby Shutters on the stem.  This just adds a bit more color.  You could do this before the embossing too.  I did not think of it until after the embossing was done.  


  • Make a card from orange CS layered with black CS.  Glue flowers to the CS.  
  • Add ribbon
  • Stamp the sentiment with Sienna ink and add to card.


Matching Tag for a gift bag or wrapped package.

  • Cut a tag from black CS.
  • Add the flowers and sentiment.
  • Cover a grungeboard butterfly with Spiced Marmalade ink and add to tag. 


  • Stamp sentiment with Sienna
  • Tie the ribbons through the hole
  • Knot a piece of ribbon and wrap around.


 A closer look at the rust.


I used three more of the rusty flowers on another tag.  I made a garden-like background on this pre-cut manila tag.


  • Apply Tumbled Glass and Shabby Shutters ink to the tag.  Apply a little bit of Vintage Photo to simulate a horizon type line.
  • Glue the flowers to tag.
  • Tie the ribbons.
  • Add a few tiny pearls.


Super close look at Garden Tag.


So, another fun way to use Grungeboard.  How do you like to use grungeboard?  If you missed my Grungeboard Pins, take a look here.


Challenges for my Rusty Flowers:
Simon Says Stamp: birthday
City Crafter: birthday
Tuesday Alchemy: garden and gold---my gold is rusty.  LOL
Make My Monday: create your own background--my garden tag
Unstampables: no stamping and anything but a card
Stamping for the weekend: anything but a card


Oh, guess that is it for me today.  I will be back tomorrow with a pretty folded tag card with ribbon tie.  Sound good??.. Hope you are having a great day!  Love ya.
Karen

Saturday, December 22, 2012

Embossed Flowers on Painted Background

Hi Dreamers!
Only a few days until Christmas.  I think I will be baking cookies tomorrow.  I have to make a list and head over to grocery store and pick up the baking items.  And, I need a few last minute gifts too.  Hope I can get it all done!  Well, today's post is very un-Christmasey.  I made a floral card with a painted background.  I used stamps from Blockheads Paper Arts.


Materials List:
Stamps: Flower Garden and Verses- Special Delivery both from Blockheads Stamps
Inks:
Cinnamon Versa Color Pigment 
Royal Satin Kaleidacolor Pad
Various Spray inks
Pine Needles Distress Marker
Orange Embossing Powder
Blank Canvas (White) Studio Paint
Cardstock: White, Peach and light pink
3D Zots


Instructions:

  • Make a card base from light pink CS
  • On the peach CS paint on the Blank Canvas paint in broad strokes and let dry
  • Spray the same piece with gold, red, and peach spray inks and let dry
  • Stamp the large Calendula flower with pigment ink and heat emboss with orange powder
  • Color the leaves with Pine Needles Marker
  • Sponge ink from the Royal Satin pad on the edges and arond the leaves
  • Add to card front


  • Stamp the image again on White CS with the Royal Satin Kaleidacolor pad
  • Cut out three flowers
  • Ink edges with the Royal Satin pad
  • Add to card front with 3D Zots
  • Add three Rhinestones


  • On the inside stamp a sentiment and the flowers with the Royal Satin Pad.


Challenges for my Warm and Sunny floral card:
365 Cards: color scheme
Sweet Stampin: seeing double
Crafts 4 Eternity: anything goes
Craft room door: anything goes
Lady Anne's: anything goes


Now we have a nice card for a special someone.  This would be great for a thank you card too.  And , will help us think of warmer days.  We have a light dusting of snow now and I wanted to make something warm and sunny.

See you tomorrow with a Christmas card.  Have a great day.  Love ya. Have to run and get busy on that shopping list.
Karen