Showing posts with label Sweet N' Sassy Stamps. Show all posts

Saturday, November 19, 2022

Winter White Wedding Card

 Hello Everyone,

Today I am showcasing a winter white wedding card.  Lots of details in this card to make it extra special.


A strip of the dry embossed background paper was added to the envelope. 

Supplies Used to make the card:
Bridal couple stamp from Sweet and Sassy Stamps
Gray and Black ink
Dry emboss folder
Silver glitter paper
Various die cuts
floral spray die cuts
Silver glitter glue
Silver ribbon
Lace trim
Flat lace


Die cut floral spray was accented with silver glitter glue.


Just a lovely card for a winter wedding or any time of the year.  

See you next time!

Karen

Saturday, May 23, 2020

Coffee Lovers

Hello Everyone,


Coffee Lovers Hop is going on May 22 thru May 29.  I am certainly a coffee lover.  So, I decided to make a coffee themed card and play along. 

This card is made with a Sweet N Sassy Cookie Mouse image and a My Favorite Things Sentiment from Sweater Weather In the Woods.


The image is colored with Copic markers and placed atop a floral decorative paper.  I added two ribbons to finish off the card. 


I am enjoying a cup of coffee and hopping along.  Hope your day is filled with delicious coffee and fun crafting.  See you next time with a French themed birthday card.

Karen

Wednesday, December 25, 2013

The Twenty-Five Days of Christmas Day Twenty-Five

A Big Happy Holiday Hello To Everyone!!

MERRY CHRISTMAS!!!!!!!!!

Peace on Earth and goodwill towards all men!!

Welcome to Day Twenty-Five of The Twenty Five Days of Christmas!!
                                    
And Blog Candy!!

Here we are at the end of the Twenty-Five Days of Christmas!!  I have really enjoyed bringing you all my Holiday cards.  It is as if I have been able to send a card to each and everyone of my blogger and crafting friends!!  I have three cards to share with you on this Christmas day.  I ended up with two extra, so I thought you would like to see a couple extras.  On the first card, I stamped a cardinal and colored with Copics.  The CAS reindeer cards are stamped with silver pigment ink and heat embossed.


Materials:
Stamp: Christmas Joy set from Sweet N Sassy Stamps


CS: Solar White Neenah; Poppy Parade  from Stampin' Up
DP: Green Flocked; Red with Dots - My Mind's Eye; Stripe - Fancy Pants Designs
Circle Punches, Spellbinders die
Green Rhinestones
Red Gingham Ribbon


Materials for Reindeer Cards:
 Stamp: Dasher -Stampin' Up 


CS: Real Red and Not Quite Navy from Stampin' Up
Ink: Silver Pigment
Silver Embossing Powder
Silver Ribbon
Rectangle die from Spellbinders


And, don't forget the blog candy!!!!!

The blog candy will remain open for comments until December 31, 2013


Ways to Win the Blog Candy:

  1. Leave a comment on any of the 25 Days of Christmas posts--each time you leave a comment your name goes in the drawing.  So the more you comment, the more chances of winning.
  2. Become a Follower--Leave a comment to let me know!
  3. Post about the 25 Days of Christmas on your Blog--Leave a comment to let me know!
  4. Post about the 25 Days of Christmas on Facebook--Leave a comment to let me know!
See all the details about the Blog Candy on Day One post here.


Don't forget to leave a comment for the blog candy.   I wish you and yours a Very Merry Christmas.  I will be back in January to announce the Blog Candy winner.  Again, I am so glad you have joined me for my Twenty-five Days of Christmas.  Look forward to sharing more projects with you in the new year!!  Love ya.
Karen

Monday, December 9, 2013

The Twenty-Five Days of Christmas Day Nine

Hello Everyone!!

Welcome to Day Nine of The Twenty Five Days of Christmas!!
                                    And Blog Candy!!

I will be showcasing a different Christmas card each day of December from the 1st through the 25th.  On Today's cards I used White on white layers with a stamped image colored with Copics.  There is lots of detail on this card, but it is still relatively flat for mailing ease--which is a good thing.


Materials:
Stamps:Christmas Joy-Sweet N Sassy Stamps
CS: White, Poppy Parade from Stampin' Up
Copic Markers
Red Rhinestones
Silver Ribbon
Oblong Doily Embossing Folder-Darice
Rosa embossing Folder- Cuttlebug
Spellbinders Labels 22


And, don't forget the blog candy!!!!!


Ways to Win the Blog Candy:

  1. Leave a comment on any of the 25 Days of Christmas posts--each time you leave a comment your name goes in the drawing.  So the more you comment, the more chances of winning.
  2. Become a Follower--Leave a comment to let me know!
  3. Post about the 25 Days of Christmas on your Blog--Leave a comment to let me know!
  4. Post about the 25 Days of Christmas on Facebook--Leave a comment to let me know!
See all the details about the Blog Candy on Day One post here.


See you tomorrow for Day Ten!!!  Hope you are having a great day and enjoying the Holiday inspiration. Love ya.
Karen

Saturday, December 7, 2013

The Twenty-Five Days of Christmas Day Seven

Hello All,

Welcome to Day Seven of The Twenty Five Days of Christmas!!
And Blog Candy!!

I will be sharing a different Christmas card every day from December 1st through December 25th.  On today's card, I stamped Cocoa Mouse and colored him with Copic Markers.  I added lots of die cuts pieces and pretty papers.  
 ****I am entering My Sweet Christmas Wishes into Lisa's Bloggers Challenge (Christmas)!
Crafty Calendar: Cold and Frosty
All that Stickles: Happy Holidays and Stickles  *******


Materials:
Stamps: Cup of Cocoa Stamp Set (SNS-10-049) from Sweet N Sassy Stamps.
Ink: Tuxedo Black (ME900) Memento.
Card Stock: Solar White Classic Crest from Neenah; Always Artichoke, Blushing Bride, and Pixie Pink from Stampin’ Up.
Decorative Paper: Peppermint Twist K & Company.
Embellishments: Stickles Glitter Glue in Diamond - Ranger; Pearls - Kaisercraft; Ribbon - Hobby Lobby.

Other: Copic Markers; Big Scallop Circle SM (S4-250) and Standard Circles Small (S4-116) Spellbinders; One inch Circle Punch - Fiskars; 1 3/8 inch Circle Punch - Marvy; 3D-Zots (17180) Therm-o-Web; Fabri-Tac glue - Beacon Industries.


Instructions:
  • Make top fold card from Pixie Pink CS.  Make a single layer of Always Artichoke CS slightly larger than the folded card and glue to the back of the card.  
  • Layer the folded card with Decorative Paper. 
  • Stamp image on Solar White CS.  Color the image with Copic Markers.  
  • Cut the image with the Circle die and layer onto a scallop circle die cut from Blushing Bride CS.  
  • Add the circle with dimensional adhesive.  Add to the card front.  
  • Stamp the sentiment with Tuxedo Black ink on White CS and punch circle.  Layer with a circle punched from Pixie Pink CS.   
  • Add the sentiment to card with dimensional adhesive.  
  • Tie ribbon in bow and glue to card with Fabri-Tac.  Add the pearls and glitter glue.


And, don't forget the blog candy!!!!!


Ways to Win the Blog Candy:

  1. Leave a comment on any of the 25 Days of Christmas posts--each time you leave a comment your name goes in the drawing.  So the more you comment, the more chances of winning.
  2. Become a Follower--Leave a comment to let me know!
  3. Post about the 25 Days of Christmas on your Blog--Leave a comment to let me know!
  4. Post about the 25 Days of Christmas on Facebook--Leave a comment to let me know!
See all the details about the Blog Candy on Day One post here.

See you next time for DAY EIGHT of THE 25 DAYS OF CHRISTMAS.  Hope you are having a great day.  And, that you are finding time to make a few Christmas cards!!  Love ya.
Karen

Tuesday, September 3, 2013

Masculine Cards with Trucks--Very Manly

Hi Dreamers,
As you know, I have been working on a card order.  The customer requested several masculine cards.  I wanted to try out a set from Sweet N Sassy stamps that was very masculine.   With manly colors, stamped backgrounds and some dry embossing, the masculine cards were a snap.   I  used the current sketch from Sweet Stop for inspiration on the first card.


Materials:
Black dye ink
Markers
Distress Inks
Brown and Gray CS
Decorative papers
Bakers Twine
Tag Die from Sizzix
Embossing folder


  • Stamp with black ink and color with markers.  Go over the image with Vintage Photo Distress ink.
  • Follow Sweet Stop sketch for layout.


 Card #2-Retirement Card


  • Color with a blue marker on this card.  
  • Computer generate the Cruising sentiment  (On the inside, I added a retirement sentiment)


Card #3


  • Create the background with the gears stamp and some other shapes
  • Stamp the truck with black ink and color with a yellow marker
  • Add twine


Card #4


  • Stamp and color with markers
  • Go over image with Distress inks
  • Dry emboss background


*******A few fun Challenges:
ABC challenges: color with a marker
Cards for Men: tag it---card #1
Cards in Envy: manly--all the cards are relatively flat.  Did not use any dimensional adhesive--easier for my customer to mail!
Love to Scrap: anything goes
Paper Playtime: use 3 different papers---card #1
Sweet Stop: sketch---card #1


Stayed this week for some pic's of my garden--getting towards the end of summer here.  I will also have some fun cards made with a Memory box tree die.  Very fun!  Hope your day is going well.  Love ya.
Karen

Thursday, January 31, 2013

Cute Cocoa Mouse on Valentine's Day Cards for Kids

Hi Dreamers,
I have a few more Valentine's Day cards to share with you.  The cards are part of the group of cards I made for the Cards For The Heart Card Drive hosted by Winter. Today is the last day of the drive.  I sent another group of cards in on Monday.  So that makes a total of 80 cards I made for the drive.  I will share more of the cards up till Valentine's day.   Today, we have  cute Cocoa Mouse from Sweet N Sassy.


I stamped with black dye ink and colored with Copics.  Oh, I think a few fun challenges are in order:

Simon Says Stamp: anything goes
Sweet N Sassy Digi: white

That's it for me today!  See you tomorrow!  Love ya.
Karen

Wednesday, December 12, 2012

Wedding Couple in Lavender

Hi Dreamers!
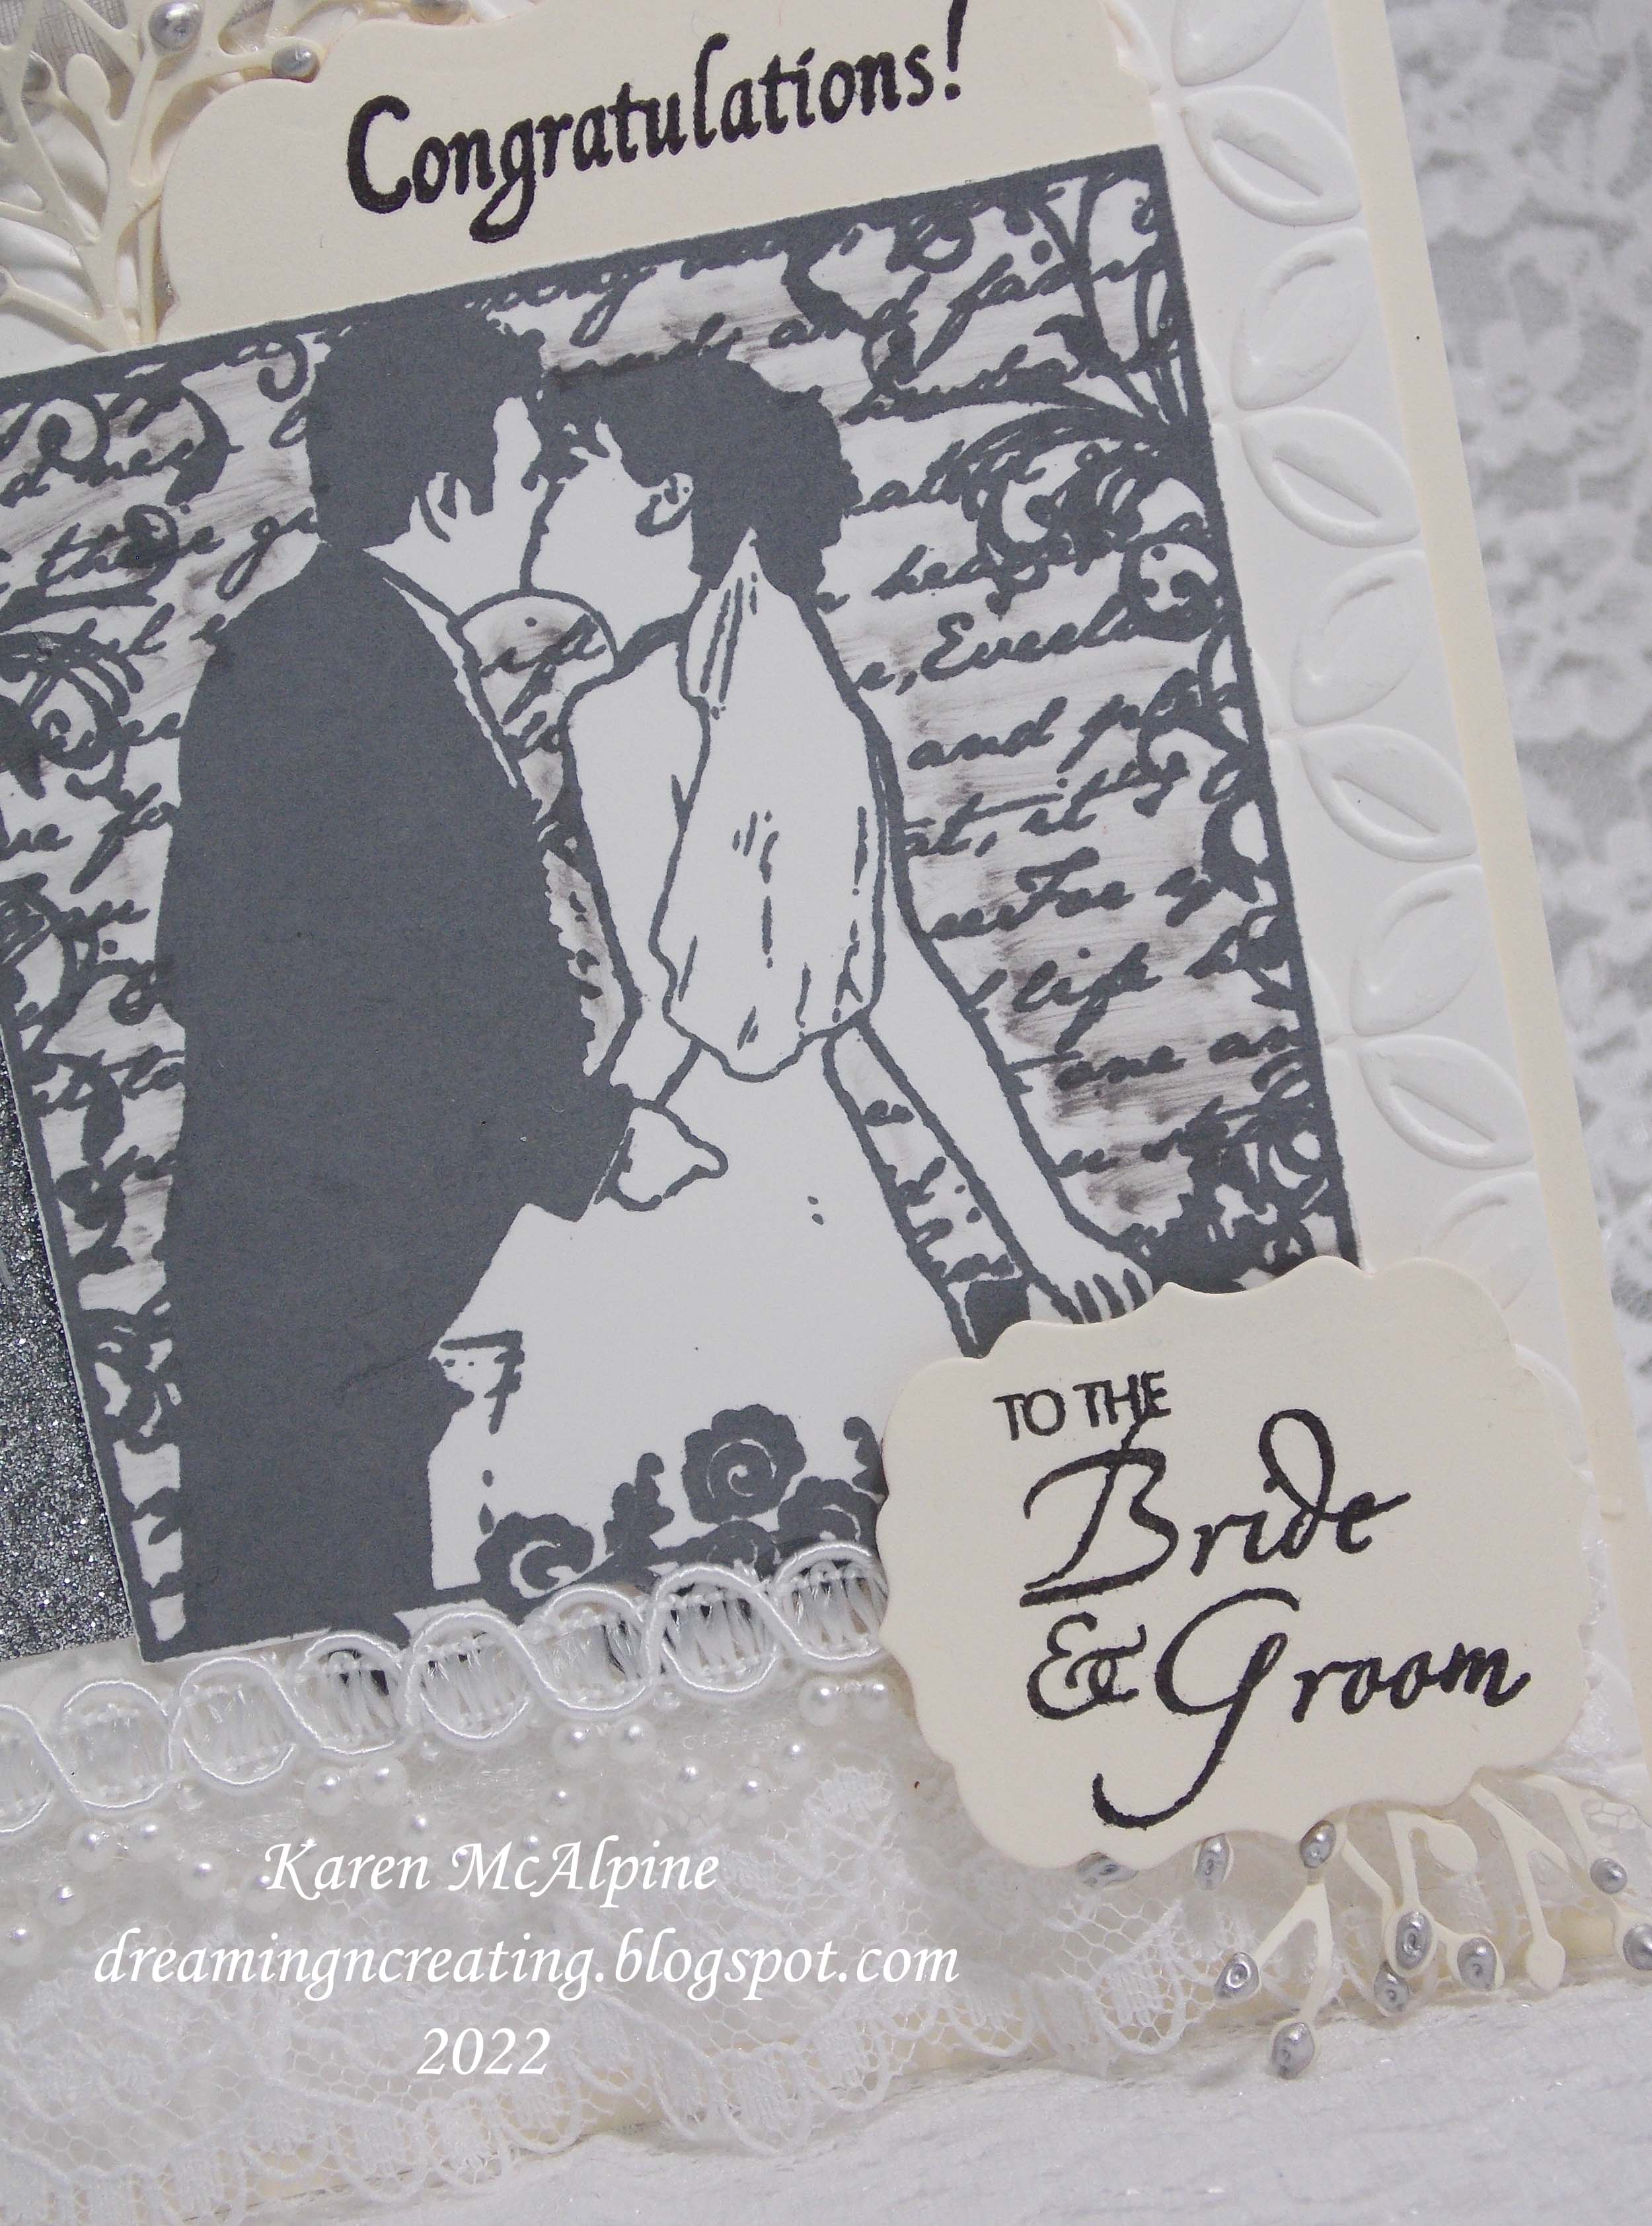
Finally getting a chance to post!  Yesterday and today, I have been busy running around to the dentist, visiting my parents, grocery shopping, post office.....  But, here I am, with a few minutes left in the day to post this wedding card.  I made this for my BF's son and his new wife.  I choose to use their wedding colors for the card--lavender, gray, and white.


  • Start with a harlequin background made with the Crafter's Workshop Template Mini Harlequin and spray inks.  
  • Once the background was dry, I stamped a large script stamp from Hero Arts -Wedding Word Print - over the background.
  • Wrap lace and tulle around the background.


  • Stamp the Couple-Wedding Collage Sweet N Sassy Stamp.  
  • Distress the edges with Pretty Petunia Versa Magic Chalk ink


  • Add ribbon and peals
  • On the inside is stamped this pretty sentiment that is also in the SNS stamp set.


I used Becky's pretty Sketch for my layout. 


Other Inspiring Challenges:
Word Art Wednesday: up lifting phrase
Simon Says Stamp: favorite---I love making background with the Crafters Workshop templates.
Craft door magazine: anything goes #48

I sent out 52 Christmas cards yesterday!   Now I have to start doing some Christmas shopping.  Well, perhaps I can get started this weekend.  Hope you are having a great week!  Love ya.
Karen

Saturday, October 20, 2012

Fall Quilt and Craft Show Card

Hi Dreamers!
Felling the Fall vibe yet?  The leaves are starting to change here in Michigan and have put me in the mood  to make Fall themed cards.  My project today is made with a Stampsmith Stamp Set called Country Landscape full sheet.  The quilt themed stamps on this set really made me think---Fall Quilt and craft show.  I made this card thinking that it was a poster to advertise a show in the country in Autumn.  Think rustling leaves, crisp air, and changing leaves.  Are you feeling it??!!  Here is the card.


I stamped the images with Sienna Archival ink on glossy white CS. Then cut them into squares and rectangles; and glued to a base.
I cut narrow ( 1/8") from decorative paper and used them to created a patchwork like border around the stamped images.  I let some of the borders hang off the edge of the base.


On the inside, I stamped a nice fall themed sentiment from Sweet N' Sassy stamps.  I will send this card out to a friend just to say Hi!


Just a reminder that The Stampsmith Grateful Challenge is still open and you have plenty of time to enter.  You could take home a $21 gift certificate to The Stampsmith store.
Hope you are having a lovely fall day!  Love ya.
Karen