Showing posts with label floral background. Show all posts

Thursday, September 16, 2021

Whole Page Stamping Part Two

Hello Everyone,

Back today with more of my whole page stamping cards.  

Stamps: Artistically Inked and A Touch of Ink from Stampin' Up

I stamped a whole page of white cardstock and cut into pieces.

Here is the whole sheet.


This is card number two.  The first card can be seen in the previous post.  Again, I made a larger card.  This one is 5 x 6.5.  


Inside of card.


I had so much fun with this technique that I stamped another sheet.  I made the card below with that.
I added some die cuts to this piece.  I did not add any sentiments.  I will decide on that later when I want to give the card to someone special.


So glad you stopped by today.  I always enjoy sharing my projects with other crafty persons.  

See you again soon!

Karen


Friday, September 10, 2021

Whole Page Stamping Part One

 Hello Everyone!

Back today with a series of cards I made from a whole page stamping.  I stamped a 8.5 x 11 piece of white cardstock and then cut it into smaller pieces for my cards.

I used the Stampin' Up stamp set called Artistically Inked.  Humming bird is from A Touch of Ink (Stampin' Up).  Inks are Ranger Adirondack.  

Below is the whole sheet of cardstock that I filled with stamped images.


I made two large cards from this sheet.  Below is the first card.  It is a 5.5 inch square.  I will share the second card in my next blog post.


The sentiment is stamped on velum and punched out. Humming Bird is fussy cut.


See another card I made with this set here.  I will be back with more of the cards made with the whole page stamping in the next post.  I found this technique very enjoyable.  Really lets you get  creative and the card comes together easily.

See you soon.

Karen


Sunday, June 3, 2018

More Possibilities - Post 3

Hello Dreamers!
Back with more possibilities using just the one stack of decorative paper (this is post 3).  All the cards below were made for the same stack.


Here is a close up look at one of the floral cards.  The design was completed by added a rectangle of coordinating cardstock, a stamped and punched sentiment, and ribbon.


FYI:  Here is another card I made with the same stack.  In fact, this was the card that inspired my idea to see what I could do using just one stack of decorative paper.  You may see the full post for this card here.


I hoped you enjoyed checking out all the cards I made with one stack.  It was a fun self challenge.  I will try this again.  It simplifies the design process (for each card) and helps to give your imagination a bit of a work out.  Hope you are having a really great day.
See you next time!!
Karen

Thursday, April 28, 2016

Elegant Floral Cards with Technique Junkies

Hello Everyone!
I have been having a busy week.  Working in the yard and crocheting more baby gifts.  Of course, I still made time to make a few cards for the ladies.  Today's cards were made with a stamp from the April New Release collection by Technique Junkies. This stamp is perfect for Mother's Day cards.  Take a look


Materials List:
Ink: Victorian Velvet, Spun Sugar, and Fired Brick Distress inks
CS: pink
Paper: Mixed Media pad from Strathmore
Sprial Punch
Label Punch
Ribbon
Lace
Pearl trim


Make It:

  • Punch the top edge of the pink CS with the spiral punch
  • Distress the pink CS with Spun Sugar and Fired Brick ink
  • Tear a sheet of the mixed media paper torn from the pad-keeping the spiral edge in tacked
  • Ink Elegant Mum with Victorian Velvet ink and stamp on a sheet of the mixed media paper torn for the pad--don't cut off the spiral edge
Note: don't clean your stamp!  The Distress ink is very wet!  So, I stamped a second image--you will see it on the second card later in this post.


  •  Add Spun Sugar ink to the stamped image using the direct to paper method ( no tool needed-just gently sweep the pad across the paper)
  • To the centers of the flowers, add Fired Brick ink with a stencil brush
  • Heavily distress the edges and add to the pink CS base
  • Stamp the Sentiment, punch, and distress 
  • Punch a second label from pink CS
  • Layer both labels over a piece of  lace, gathered ribbon and some pearl trim


Perfect for a Mother's Day Card!!  Just stamp a sentiment on the inside and you are good to go.  That is what I will be doing with both cards!!

Second Card:


This is the second stamp impression I made without reinking the stamp. I stamped on a soft cream CS and added a layer of white.  The card base is lavender CS

I layered some pretty fibers onto the card --a ruffled ribbon, burlap rick rack, and white tulle.  Another perfect card for Mother's Day!!


So glad you stopped by today!  Lots going on in Dreamland over the several days.  Technique Junkie New Release for May coming on Sunday!  What??!!  Where did April go, right?  Also a Lost Coast Design Event is going on too.  My post will be tomorrow (Friday).  And, I will have masculine birthday cards to share!!  So see you again tomorrow!!  Love ya
Karen

****************Challenges:
Craft Rocket: pink and pearls
Addicted to stamps and more: anything go
Simon Wednesday: anything goes
Retarte: anything goes
Pinspirational: photo inspired--I was inspired by the floral motif and the sentiments
Shopping our stash: ink but no coloring
*****************************************


Friday, March 20, 2015

Feeling Springy- Bright Colored Floral Cards

Hello Everyone,
I Thought some cheerful bright colors would be  nice for today's post.  Spring is trying to make an appearance here in Michigan, USA.  We can still get more really cold weather yet.....  No flowers up here yet.  So, lets have some paper flowers!


All stamps are from A Muse Studios.  I made the cards for an order and some for Operation Write Home.


See you soon for a cute welcome baby card.  Love ya.
Karen

Tuesday, September 9, 2014

Floral Stamped Background

Hi Dreamers!
I thought I would share a few more of the cards I sent to Operation Write Home. The cards feature a floral stamped background in shades of yellow, orange, and taupe.


Materials:
Stamps: Petal Parade from Stampin' Up
Inks: Adirondack inks
CS: white, brown, yellow, orange, Sahara Sand
Edge punch
Dots embossing folder
Ribbon


Instructions:

  • Stamp the floral stamps with 3 different inks staring with the larger images.  Fill in the blank spaces with the smaller images.  
  • Dry emboss the yellow CS with the dots folder
  • Edge punch a strip of brown CS
  • tie ribbon around card
  • Add sentiments


A few fun challenges for my Floral Background cards:
Stars and Stamps : ODB/Make your own background
Craft-Dee Bow: anything goes with a bow
Craft Creations: anything goes


See you next time for some cute birthday cards!!  Just right for the little darling in your life!  Love ya
Karen

Friday, May 30, 2014

Summer Florals

Hello Dreamers!
I have been sooo busy lately!!  I am hosting a Bridal shower for my future niece.  My brother's girlfriend, Anita, is co-hosting.  The shower is next weekend!  Should be lots of fun!  I have had a bit of time to make some fun cards.....  Must have time for card making (aka therapy).  LOL   I made a set of floral cards in several color ways with  stamp sets from A Muse Studios.  Take a look.


Materials List:
Stamps: Just Because, Beautiful Botanicals 1 and 2, Friend to Friend - A Muse Studios;
Blue Skies Sentiment -Inkadinkadoo
Inks: Neutrals- Sahara Sand, Basic Gray, Bordering Blue, and red -Stampin' Up
Pinks and reds/Oranges -  Distress Inks - Ranger
Various CS
Ribbons


Instructions:

  • Make A2 size cards from various CS
  • On white CS, start stamping the background with the leaf stamp and the lightest ink
  • Continue building the stamped scene by filling in around the leaves with the other floral stamps in the medium and dark intensity inks.


  • Add the stamped piece to the card base adding layers if desired
  • Add ribbons
  • Stamp sentiments


******************Challenges for my Summer Floral card set:
Stamped Blessings: anything goes
4 Crafty Chicks: anything goes
Crafters Cafe: use 3 flowers
Crafty Creations: It is all about S---spring, floral spray, stamped background, special sentiment
Simon's Wednesday: anything goes

I hope you have a great weekend.  I still have a few things to pick up for the Bridal shower.....
Weather is great here in Michigan. So, I am hoping to get some more work done in the garden.  I have two trays of annuals to get in!!  And, a gorgeous rose bush---I have to select the perfect spot for it!  Well, I will see you next time.  Love ya.
Karen

Wednesday, April 16, 2014

Spring Colors on Stamped Backgrounds

Hi Dreamers!
Well, we had Spring here in Michigan for a few days and then we had snow on Monday!!  Just can't believe that we had snow in the middle of April.   We are supposed to warm back up tomorrow.  Crazy weather.  And, that is why I haven't posted any pictures of the garden yet this year.  There is nothing to photograph except lots of dead stuff that I did not cut down in the Fall.  Well, enough of that---let's get to the cards!!

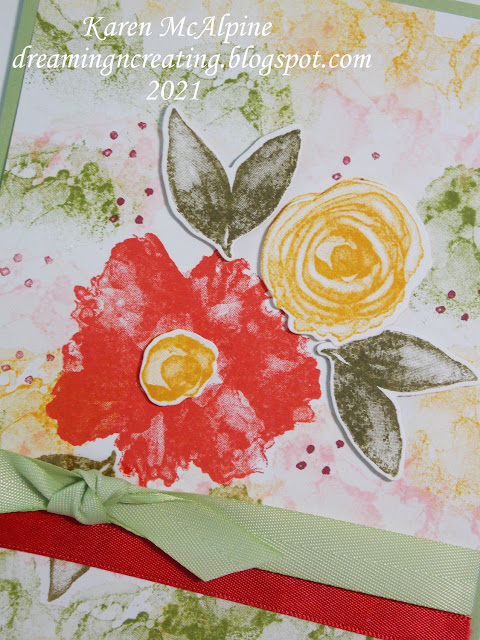
I picked up some new things from Stampin' Up this month.  The stamps I used to make the background are all in one set called Petal Parade.  This is a fun set -- once you get stamping you can't stop.  I couldn't anyway.   I made three cards with my stamped backgrounds.


Materials:
Stamps: Petal Parade and Banner Blast from Stampin' Up; Large Sentiment from A Muse Studios
Inks: Distress Inks - Aged Mahogany, Victorian Velvet, Tattered Roses
CS: cream, yellow, wine, light coral
Edge punch, Decorative Label Punch, and Banner Punch - Stampin' Up
Large Scallop edge die cut - My Favorite things
Ribbons
Dry Embossing Folders - Cuttlebug and Stampin' Up


  • I stamped the entire background on this card. 
  • Wrap the ribbon around the edge of the stamped background piece ( layer ribbon with a strip of wine CS) and then add Background to the card base


  • On this card, I added dry embossing, a punched edge and some banner flags.
  • Wrap the ribbon around flat and tie a separate bow.
  • Tuck the banner pieces up under the punched edge


  • On this card, I placed the banners in a shape that I thought resembled a flower. 


***********Challenges for my Spring Colors with Stamped Background cards:
My Craft Spot: banners and tags
Mod Squad: use at least three Spring Colors

I am still working on a large card order.  I am photographing the cards as I finish them.  I will be posting those through out the month.  ( Lots of cutesy cards!!)  I also have lots of the Operation Write Home cards to share.  I will post a few more of those in the next post.  There is a lot of them.  I sent out a total of 85 cards to OWH and Card Care Connection.  See you next time!  Love ya
Karen