Showing posts with label Masculine card. Show all posts

Saturday, January 4, 2025

Quiet Reflection Masculine Cards

 Hello Everyone

Hope you all had a great Holiday season.  I thought that this collection of cards was appropriate for the new year with a little "quiet reflection" which is also the name of the stamp set from Stampin Up. 

The first card has a stenciled background.


Great all occasion cards.  Some will become birthday card too.  I always need a few masculine cards.

So glad you stopped by today. See you again soon.

Karen

Tuesday, October 8, 2024

Masculine Mallard Cards

 Hello Everyone,

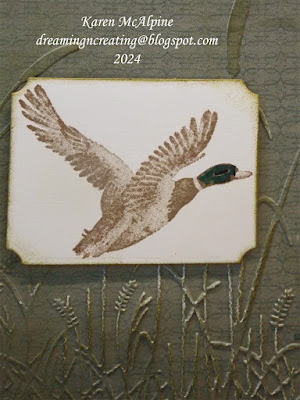
I used a stamp set called Feathered Flight to make this collection of masculine cards.  Dry embossing folders were used on some of the cards to make an interesting background.  I also fussy cut some of the ducks. I colored the mallard head two different ways. First was using a marker to color on the actual stamp before stamping. Second was to color the head after it was stamped. Worked pretty well either way. 


Nice set of cards to use for birthdays, thank you, and thinking of you. See you next time!!

Karen

Wednesday, February 9, 2022

Manly Valentine's Day Cards

 Hello everyone,

Back today with my manly (or masculine) Valentine's Day Cards.  The cards would be appropriate for adult or child.  I used a cute truck stamp from the Stampin Up set called "Best Delivery". The sentiments are also in this set. I personalized the cards by matching the truck color to the color of the truck owned by the recipient.  Trucks were colored with copic markers. And I used up all my red decorative papers making my Valentines this year.  LOL 


So, hope you have enjoyed all the Valentines this year.  I will have more cards in the next post.  Maybe something humorous.  We all need a reason to laugh these days.  

See you soon.

Karen

Wednesday, June 12, 2019

Father's Day and Birthday Card with Camping Theme

Hello!
I wanted to share this fun Father's Day Card I made for my brother.  I used some fun camping themed papers from We R Memory Keepers - Happy Campers pad.  I used die cut sentiments and added some metal dots.


I also used the same papers to make my brother's Birthday card.  The cards went together pretty quickly once I figured out  the layout.  And, my brother really liked his birthday card.  He enjoys the outdoors and has a travel trailer for camping.


So glad you stopped by today.  See again next time with a Graduation Card!!
Karen

Monday, July 23, 2018

Steampunk Graduation Card

Hello Everyone,
I wanted to share the graduation card I made for my nephew's college graduation.  (Yes, we are all soooo proud of him.)  His degree is in mechanical engineering.  He likes Steampunk designs, so this is what I came up with.  I used a teal and brown color combination (which I think worked really well with the theme and images).


On the inside, I stamped the sentiment once in each of the two colors, cut the sentences apart and layered each segment.


I also added some stamping to the envelope.


Okay, so I will see you soon for more crafty funness (don't think that is a word, but I am going to use it anyway.  LOL  Have a great day!
Karen

Friday, February 16, 2018

Masculine Birthday and Thank You Cards

Hello Everyone,
Hope all is well with you.  We finally had a bit of a warm up here in Michigan, USA.  Good thing too as my drive way was full of icy snow deposited by a snow plow.  I was hacking away at it for days and now it is finally all gone. 

Today I wanted to share a few of the cards I have been making lately.  I have been concentrating on making all occasion cards.  I have a nice collection of over 200 cards now.  Whenever anyone says, "Oh, I need some cards" I can just pull them out of my stash.  Works great for me too when I need a card.  I have also been trying to keep in mind that most of the cards will be mailed.  This requires a bit of restraint in the embellishment department.  LOL 

So, here are a few masculine card ideas.


Patterned Card Stock was used on these three cards.


Wolf was stamped on velum and colored on back.


Same paper was used on this card, but a Thanks sentiment was used instead.  Don't be afraid to used all that beautiful decorative paper you have!  Let is shine!  It is certainly worthy of being the focal point as you see here.


So glad you stopped by today.  What have you been up too??  I have also been sewing.  I made a hat and scarf with polar fleece yesterday.  Turned out great and I will probably make another set.  Yardage required is small and works great for my left over pieces of fabric.  Well, see you next time.  Have a super day!

Karen

Wednesday, March 25, 2015

Washi Tape Background with Lost Coast Design

Hello Everyone!
Today I would like to share a card I made with Lost Coast Design stamps and washi tape.  I used the washi tape to create a colorful and dynamic background.


Materials:
Stamp: Los Tres Caballeros from Lost Coast Design
Ink: Black dye
CS: Glossy White; Gray; and Black
Copic Markers
Washi Tape in three different designs
Bakers Twine


Instructions:

  • Make a card from black CS 
  • Cut a layer from gray CS
  • Cover the card base with washi tape placing the tape at an angle to the edge of the card---I used eleven strips on this 5.5 x 5.75 inch card
  • Wrap the ends of the washi tape to the back of the gray CS piece
  • Add the washi cover Gray CS layer to the card base


  •  Stamp the Los Tres Caballeros on glossy CS with black die ink twice
  • Color the background with Copic markers on one of the stamped images and tear the bottom edge
  • Layer with black CS


  • Fussy cut the Los Tres Caballeros from the second stamped image
  • Add the fussy cut images to the first image using dimensional adhesive under the faces and hats; glue the bottom edge flat
  • Wrap bakers twine around piece
  • Add to the card base with dimensional adhesive


This would make a fun birthday card.  I think that is what I will do with it.  Or, it would be a cute any occasion card too.

My card has a bit of red in it---for the March Lost Coast Design Challenge--there is still time to enter a card with Lost Coast Designs stamps and some red for the challenge.  See the details here.  The challenge ends March 26.


The  Shades of Green Blog hop is still open as well.   See the details for the blog hop here.   The blog hops ends March 30.


See you soon with more crafty fun!!  Hope you are having a great day!!  Love ya.
Karen

Saturday, January 10, 2015

Vintage Hardware with Lost Coast Designs

Hello Everyone!
We are experiencing super cold weather here in good old Michigan.  The temp is up to 13 degrees F.  Brrr.  And, there is snow to shovel.  I think I will share some vintage cards with you instead of shoveling the snow.   I will get to the snow later.  Today's projects were made with stamps from Lost Coast Designs.  ----My husband is doing the snow shoveling!  Yea!

Card One

Materials List:
Inks: Mossy, Pewter, and Patina Mixed Media; Faded Jeans Distress; Black
CS: White; Pacific Point - Stampin' Up
Piercing Tool
Glue Pad
Gold Leaf Foil


Instructions:

  • Make a card from Pacific Point CS
  • On White CS, stamp the Woodgrain background stamp with Mossy ink
  • Stamp the hardware elements with three Mixed Media inks and Black die ink
  • Distress with Faded Jeans


  • Pierce edges of the stamped piece
  • Add to the card base
  • Use a glue pad to apply glue to the edges
  • Press the gold leaf foil into the glue and brush away the excess


Card Two

Materials List:
Inks: Toffee Crunch, Black, Olive Grove, Rich Cocoa Memento inks
CS: White; Brown; and Green
Versa Mark pad
Clear Embossing Powder
Metallic Rubs
Heat Gun


Instructions:

  • Make a card from Green CS and layer with Brown
  • On White CS, stamp the Woodgrain Background with Toffee Crunch ink
  • Stamp the hardware with the Memento inks listed


  • Apply the Versa Mark ink to the entire surface
  • Add the Clear Embossing Powder and heat set
  • Add to card base
  • Apply the metallic rubs to the edges


Love that glossy look from the heat embossing.  I would use these cards for a masculine birthday.  Or just to send to someone special.


I would like to enter my Vintage hardware cards in:
Simon's Monday Challenge: new with the old---I used a new Woodgrain background stamp with two old favorites: gold leafing and heat embossing
Simon's Wednesday: new---I used my new Woodgrain Background stamp


Coming up next in Dreamland:  More vintage flowers and Ladies!!  See you then!
Stay warm!  Love ya.
Karen