Sunday, September 30, 2012

Character Construction Halloween Cat with Paper Piecing

Hi Dreamers!
It is all about Halloween here today!  I have been making Halloween cards and a treat bag with some really fun stamps from Character Construction.  I will be sharing all the projects through out the month of October to really get you in the Halloween mood.  Ohh, so spooky.......  Here is  the first card.


The stamps are from the Bird & Bee Paperie #16.  I paper pieced the image by stamping on Halloween and Fall themed decorative papers and cutting out.  


I added a diamond die cut strip, some rhinestones, and a bright orange ribbon.  


Inside


And how about a few fun challenges!!!

Amusing Challenges: Anything goes
365 Cards: color challenge
Challenges 4 Everybody: Anything goes
The Hybrid Chick: use 7 things-2 dp's, 3 stamps, 1 ribbon, rhinestones
ATCs and Cards with Attitude: anything goes
Fat pages and cards with Attitude: anything goes
Simon Says stamp: anything goes
Mandarin Orange Monday: orange art work or photo

Stayed tuned for more Halloween fun all  here at Dreaming & Creating.  October is going to be a fun month!  I am going to try my hand at altering a domino!  Doesn't that sound like fun??!!!  Hope you are having a great weekend!!  Love ya.
Karen

Thursday, September 27, 2012

Family Tea with The Stampsmith

Hi Dreamers!
I received several packs of 7 Gypsy decorative paper from the lovely Christine at Christine's Creations!!  Thank you so much, Christine!!  I am really enjoying the papers.  I used a sheet on today's card.  The papers are so nice you can just about slap a stamped image on them and you are done.  Well, I did add a few other things too.


The stamp is called "Family Tea" and is from The Stampsmith.  I stamped the image on glossy white CS with black dye ink.  Added some layers, two glittery ribbons, and some gold pearls.  I think this could double as a Holiday card if I put a Happy Holiday sentiment on the inside.  I think that is what I will do since I am in dire need of Christmas cards.


And, now some fun Challenges:
Simon Says Stamp: anything goes
Fab and Funky: starts with F---Family
Love to Create: anything goes

So, what are you up to?  Are you going to make any Halloween cards?  I am going to make just a few for my family and my BF.  Then I really must start thinking about my Christmas cards.   Well, guess that's all for now.  I hope you are having a great day!  Love ya.
Karen

Wednesday, September 26, 2012

WOYWW 173--Making Backgrounds--Again!

Hi Dreamers!
Wednesday has rolled around and again.  And, it is time to take a look at all the work spaces around the world with Julia at The Stamping Ground.    It is fun to be nosy!  You would be surprised at all the great ideas you can get just by looking at someone's work space.  On my desk is a stack of backgrounds that I made through trial and error.  I was trying for a particular look.  And once I have my Craft Sheet out, and it has lots of left over ink on it,  I might as well grab a few scraps and pick up all that nice ink.  


I was using Walnut Antiquing Solutions in Cornflower and Walnut.  There is also a card that is almost done on the right.  You can see the ones that did not make it to a card in the stack too.  But, I can slice them up for  different projects.  The larger blue piece with the kangi stamped on it also made it to a  card.

Close up


Thanks for stopping by to say Hi and having a look at my workdesk Wednesday.  Have a great day.  I have to go get a cup of coffee and troll around and see what is going on!  Love ya.
Karen

Tuesday, September 25, 2012

Blockheads Whimsical Dragon

Hi Dreamers!
I am trying to get back into the swing of things since being sick.  You know how it is...sometimes it takes a few days to get the old mojo back.  So, to get my brain back in the mood to be creative, I played with making some backgrounds.  After quite a few tries, I ended up with a background that was colored with Walnut Antiquing Solution in Cornflower and  heat embossed stamping.


Materials List:
Blockheads Stamps
 Chinese Traditional
Chinese Princess -Kangi images
Inks 
Versamark
Coffee Bean Brilliance
Distress Inks - Frayed Burlap and Faded Jeans
Cornflower Walnut Ink Antiquing Solution 
Antique Linen Distress Stain
Brown Embossing Powder
Craft Sheet
Cream, Black, and dark blue CS
Gold and black ribbon
Gold pearls


To make the background, lay out the craft sheet.  Spray the Cornflower ink on the sheet and add some water.  Press cream CS into the ink, repeat.  Dry.  Add the Antique Linen Distress Stain, and Distress inks.  Stamp the Kangi with Coffee Bean ink and heat emboss with brown powder.  Stamp the Dragon with Versamark and heat emboss.   Cut the image with a circle die.  Add the Distress inks.  Add a spritz of Iridescent spray ink for lots of glitter.


I made a ribbon tassel--just for a little something different.  To make the tassel, hold four pieces of ribbon together.  Wrap the black ribbon around several times and tie in double knot.  Trim for length.  Cut each piece of ribbon into three pieces to make it look more fringey.


Check back tomorrow for a peek at some of the other backgrounds.  I will put them in folder for future use.

And, now, how about a few fun Challenges??!!
Simon Says stamp - embossing
Simon Says Stamp and Show- sparkle
Art with No Boundaries - Asian inspired
Try in on Tuesday- Lot of layers
Love to Create - anything goes

Hope you are having a great day!!  Nice and cool here in Michigan today.  See you tomorrow.  Love ya.
Karen

Friday, September 21, 2012

Blockheads Technique Challenge Pocket Card

Hi Dreamers!
Here I am back today with my project for the September Blockheads Technique Challenge --Pocket Cards.  Design Team Member, Barb, shows use how to make this versatile Pocket card that can be used for a tea bag, gift card, or whatever our little hearts desire.  The complete instructions are on the Blockheads Web site in the Technique section here.  Make your project and link up on the blog.  If you would like to participate in the blog hop, pick up the html code on the Technique instruction page.  Here  is my Pocket Card.


Materials List:
Blockhead Stamps: Chinese Traditions Full Sheet
Verses full Sheet
Ink: Coffee Archival - Ranger
Spun Sugar Distress Ink
Sprays: Walnut Ink Antiquing Solution -Cherry Blossom and Willow
Mini Cosmic Swirl Crafter's Workshop Template
Wonder Tape 1/8 inch
Memento Marker -Angel Pink
Pioneer Glue Stick
Ribbon
Pink and White CS

I followed the instructions to make my card.  I cut it from pink CS.  I made the stamped pieces by spraying white Cs with the spray inks and the Template.  I stamped the Cherry blossom stamp with Coffee ink and colored the flowers the Angel pink marker.    I added some ribbons and pearls.


On the back, I repeated the front --without the ribbons.  


 I added a sentiment to the inside.  I have tucked a gift card into the pocket and below, a tea bag.


I would also like to enter my Pocket card in the Fashionable Stamping Challenge-Good things come in small packages.

Let's see what you can come up with!!  This is such a great project!
Hope you have a great day!!  Love ya.
Karen

Thursday, September 20, 2012

Glitzy Halloween Witch

Hi Dreamers!
I am feeling better and manged to finish the Halloween Witch card.  I am still a bit feverish, so my card seems a bit wild to me.  You know, kind of like when you make cards at 2:00 in the morning.  The cards always seem to turn out a bit on the wild side....well, I guess mine do.  I used the stamp Victorian Halloween Collage (JB-060-Q) from Third Coast Rubber Stamps.  The stamp is stamped on white cardstock.  I used Liquid Perfect Pearls and Stickles to decorate the card.


See, what I mean?  It is a bit wild.  I used the liquid Perfect Pearls straight from the bottle to outline the image.  I diluted it with water to  make a wash and painted it on the black CS.  I like how that looks.  The orange piece is white  CS that was distressed with Distress inks ( Spiced Marmalade, Rusty Hinge, Barn Door) and then dry embossed.  After dry embossing, I went over the paper with Black Soot and Vintage Photo.


 I added a length of ribbon and glued some orange buttons onto it.  


I went wild on the inside too.  


Inside

I am going to send this to my BF for Halloween.

And, now for a few Challenges!!
Third Coast Rubber Stamps: Halloween and Bingo.  I used all the elements except a die cut.  Darn..I missed that one.
Creative Challenges: Anything goes
Loves Rubber stamps: make backgrounds
Through the Craft room door: anything goes #36
Craft Your Passion: bingo- elements I used--Emboss, ribbon, buttons
Divas by Design: at least four layers
Frilly and Funky: fall
Mark's Finest: fav technique--distressing with inks.
Simon Says stamp: Emboss it

Oh, I guess that is enough for now.
I hope  you are having a great  day!!  Love ya.
Karen

Wednesday, September 19, 2012

WOYWW-172 Sad and Lonely

Hi Dreamers!
I am back.  Been off line since Friday.  Down and out with a terrible virus.  Feeling better today and ready to get back in the swing of things and take a look at all the work desks around the world with Julia at The Stamping Ground.   My work table looks very sad and lonely today.  There is a bit of a Halloween card (unfinished) that has been laying there since Friday, some new stamps that I have not tried yet.  Some bright colored Perfect Pearls.  I used the Liquid Perfect Pearls straight from the bottle around the edge of the Halloween image and diluted them with water and brushed them on the black cardstock.  There is also my dad's  Birthday card (stamps from Our Daily Bread).  The birthday party was postponed until this week end.


And, because my table looked so sad and lonely, I also took a picture of my sewing machine cabinet.  As you can see, I need to file and put away lots of cards.  There really is a sewing machine under all that.  The basket on the back left has bits and pieces that will be used for some future projects.  The other baskets and the box are filled with finished cards.


Hope you have enjoyed looking at my sad and lonely work table today.   I don't have any new projects to post today but, I do have a card in the new Oct/Nov/Dec Stampers' Sampler!!  I made a vintagey Christmas card with Stamps from My Favorite Things.  Hope you will check it out.
Have a great day!!  Love ya.
Karen

Friday, September 14, 2012

Just Us Chickens!

Hi Dreamers!
Been a busy week here.  I have hardly had time to get in the studio and work.  Been running around somewhere nearly everyday.  But, tomorrow, I should have the whole day.  So, for today's card we have a bit of poultry.   This is a fun card I made using the Chicken Wire Crafters Workshop Template and stamps from Mark's Finest Heinrich Collection.


I used Glimmer Mists to create the background and stamped the Chickens with Versafine Black ink.  The combs are colored with a marker.  I added a feather---just for fun.


Inside

On the inside, I used a scrap of the background, stamped another chicken, and a funny sentiment.

Challenges, you ask??  Why not!!??
Mark's Finest: White and red
Artistic Stampers: splatters and sprinkles
Aud Sentiments: something funny
Frilly and Funky: outdoors

Hope you enjoyed "chicken in" with me today!  I wish you a happy day full of lovely things!  Love ya.
Karen

Wednesday, September 12, 2012

Gold Embossed Wedding Card

Hi Dreamers,
Today's card is a commission card for my BF's son's wedding.  I found this great stamp at the Heirloom show in August and just could not wait to try it out.  The bride and groom stamp are from Another Stamp Company.   I stamped with gold Brilliance pigment ink and heat embossed with gold powder.


I added some May Arts trim, lace, satin ribbon and paper flowers.    The DP is from Anna Griffin.  Not sure if you can see, but I matched the pattern in the two DP's.  Just like you would do with fabric.  Can you see how the pattern in the paper flows from the darker to the lighter?


Inside


Inside

Challenges for my Gold Embossed Wedding Card:

Tuesday Taggers: anything goes
Make My Monday: vintage wedding
Through the Craft room Door: anything goes #35
ABC Challenge: wishes

That's about it for me today.  Have to get some "other" things done today.  Those pesky "other" things!!  Have a happy day!!  Love ya.
Karen

WOYWW 171- Making Backgrounds

Hi Dreamers!
Happy Wednesday!!  It is time again to check out all the work areas around the world with Julia at the Stamping Ground.  My work area is covered with backgrounds that I made with Crafter's Workshop Templates and spray inks.


Opps!  My foot got in the picture.  At least my toes look good.  LOL   I tried to use the template and sprays on a lunch bag (at the top of photo). As long as I used a template that was not too detailed it was okay.  But, on the reverse side of  bag (not shown) I tried a very detailed template and  the lunch bag was too thin and the inks just ran and looked all blobby.


 I do like how the brown and blue look together.  The orange backgrounds will be great for some Fall themed cards.  I will put the background in a folder for future use.  I like to keep a stack of background so I can just grab a few when making cards.
Thanks for stopping by and taking a look at my work space.  I think I will be back later with a wedding card.
Have a great day!  Love ya.
Karen

Tuesday, September 11, 2012

Silk Scarf with Stamping

Hi Dreamers!
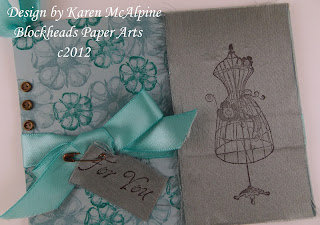
The lovely Design Team Members at Blockhead Paper Arts have all put their thinking caps on to come up with gift ideas.   I have a fun gift idea today...make and stamp a scarf!   I made a scarf from blue silk fabric and stamped a border along each short end.   I also made a coordinating gift card to pin to the scarf.


Materials List:
Stamps from Blockheads Paper Arts
Dress Form (Vintage Light and Form Set)
Flowers (Victorian Eccentricities Set)
Sentiment (Daisies Set)
Ink: Versa Color-Black
Blue Silk Fabric


Make the Scarf: Wash and dry the Silk Fabric and cut a large rectangle.  Turn under the edges ¼ inch and press.  Turn under again for a double fold hem   Stitch the hem on the sewing machine.  Press the scarf.  Stamp the images on the short ends of the scarf with the Versa Color Black ink.  Lay a press cloth on the ironing board and lay scarf on top.  Lay another press cloth over the scarf.  Press with the iron on a dry/silk setting.  Go over several times slowly.  This will set the ink and make the scarf washable.


Make the Gift Card: Make card from  CS.  Stamp the flowers in two shades of blue/green inks multiple times on the left side of card.  Wrap ribbon around card and tie in bow.  Stamp the Dress Form on a small scrap of the silk fabric.  Glue the fabric to the right side of card.  Stamp sentiment on fabric and pin to bow with Safety Pin.  Add Brads.  Punch hole in card and thread ribbon through.  Pin to Gift Card to scarf.  

Hope you are having a great day!!  See you tomorrow!  Love ya.
Karen

Sunday, September 9, 2012

Chocolate to the Rescue

Hi Dreamers,
Chocolate lovers: attention, please.  Chocolate can do it all.  Well, not really but check out the funny sentiments from Stampsmith --Say It Like It Is Full Sheet---that I used on the two cards for today's post.  All stamps are from The Stampsmith.  The first card uses the single stamp---Maxine.  The Photo images are stamped on Glossy CS with black dye ink.


I wanted to go with a retro fifties kind of look and found some  DP from Cosmo Cricket that seemed retro-y to me.  


I added some ribbon from May Arts and a few pearls.


Card number two used an image from the Those Were The Days Full Sheet.  I used the same papers and ribbon. 


Too funny!! 

A Few Challenges for my Chocolate Lovers cards:
365 Cards: day 187 Smart---my sentiments are kind of SMART-alecky.
The Poodles Parlour: here come the girls
Simon Says Stamp: put a stamp on it
Sentimental Sundays: humor me
One stop Craft: no floral embellishments

Hope you are having a great day!!  Love ya.
Karen

Saturday, September 8, 2012

Cute Mini Hedgie Cards

Hi Dreamers,
Happy Saturday!  The weather is great here today in Michigan.  Nice and cool--for a change!!  I am channeling cuteness today here on D n'C.  I made a group of mini cards with some cute Hedgehog stamps from Penny Black.   The cards are all approximately 3 1/2 inches.


They are all stamped with black dye ink and colored with Copic Markers.  


I am also entering my Hedgies in the Simon Says stamp Challenge--Put a stamp on it for the Stamptember hop!!


Just a quick post today.  Hope you are having a great weekend!  Love ya.
Karen

Friday, September 7, 2012

Thank You Tag in Blues

Hi Dreamers,
Another day, another tag.  I am just loving tags lately!   I have another one to share with you today.  I made the tag  from white CS sprayed with Glimmer Mists.  I used stamps from Gina K. Designs - Block Greetings set.


I stamped on white CS with Pacific Point ink (Stampin' Up).  I made some little fabric poofs and glued them on the top and bottom of the stamped image.  The poofs are really easy to make.  Cut a circle from fabric and hand gather the edge.  Pull the stitches tight and that's it.  Really fun and a great way to use up little scraps of fabric.  (I also used the poofs on this tag here.)


 I tied a strip of fabric in a knot and added three strips of fabric at the top of the tag.


And, how about a few challenges!!??
Gina K Designs: sewing
Simon says stamp: put a stamp on it
Penny's Challenge: sew charming
Through the craft room door: anything goes
Our Daily Bread: you leave me in stitches
City Crafter: monochromatic
Fussy and Fancy: fabric
Anything But a Card: anything goes---New Challenge Blog

Well, I guess that's enough for now.  Going out for a birthday lunch today.  Should be fun.  Have a great day!  Love ya.
Karen

Thursday, September 6, 2012

Shabby Chic Dreams

Hi Dreamers!
How is your day going??  Doing great here.  I had some time today to get a couple projects made.   I pulled  out some of my new Gina K Design stamps (Dreams and Lacy Borders sets)  and made this shabby chic card.


This was a fun card to make.  I cut a piece of lace fabric the size of the card base, and glued it onto the card front.   I stamped on Blush Blossom CS (a shell pink color) with brown ink.   I hand cut the edge of the lace stamped piece--not too hard.


I dry embossed a piece of the Blush Blossom CS and layered that onto the card.  I added a layer of blue/green velum under the main image.


Added some tiny pearls on the edge of the lace stamped piece and  tied Glace crochet ribbon next to that.


Inside

And, now for some Challenges!!
Gina K Designs: Shabby chic
Simon Says Stamp: Put a stamp on it
In the Pink: pink and anything but a square
Frilly and Funky: the great outdoors
Perfect Sentiments: all creatures

Have a great day!  Love ya.
Karen