Wednesday, December 28, 2016

Inspirational Sentiments on Silhouette stamps from Technique Junkies

Hello Dreamers,
We are getting closer and closer to the end of the year.  How about some lovely sentiments to close out the year.  The stamps are from Technique Junkies.
The first project is for all the dog lovers:


Materials:
Stamps: Rescue Love from Technique Junkies
Ink: Cornflower Archival 
CS: White; Lost Lagoon (Stampin' Up)
DP: K & Company
Blue Doily: Curiosity Corners
Sugar Dots Embellishments - Michaels
Ribbon Seam Binding Baja Breeze (SU)
Scallop Heart Die Cut- Spellbinders
Thread to match Seam binding
Needle


 Make It:

  • Make a card base from Lost Lagoon CS (a medium teal color)
  • Add a layer of DP and the Doily
  • On white CS stamp Rescue Love stamp with Cornflower ink and die cut
  • die cut another heart layer from Lost Lagoon CS
  • Add both to the card base
  • Add Sugar Dot embellishments


  •  Make ruffle with Ribbon Seam binding: cut a length of seam binding.  With needle and thread run long stitches along edge and pull up to gather.  Place a line of glue around top left of heart and press the ruffle into the glue.  Add a bow to the end of the ruffle


Second project:

Materials List:
Stamps: Survive Together and Trust Your Journey both from Technique Junkies
Ink: Regal Rose Dye (Stampin' Up); Pearlescent Poppy Brilliance Pigment
CS: white, pink textured, dark pink
Velum
Paper Flower Embellishment
Pink Ribbon
Heat gun


Make It:

  • Make a card base from pink textured CS
  • Stamp the Survive together on white CS with Regal Rose ink
  • Add a layer of dark pink CS; add to card base
  • Stamp Trust Your Journey on Velum with pigment ink
  • Heat set with heat gun
  • Glue to bottom of card slightly overlapping main image


  •  Glue the ribbon to card and add paper flower over ends of ribbon


If I don't see again until next year, I wish you the happiest and healthiest New Year.  And, thanks for brightening my day by stopping by to say hi.
Karen McAlpine

Sunday, December 25, 2016

Merry Christmas!!

Hello Friends, Family, Followers, and Everyone,


Have a Very Merry Christmas!!!!!!!!!!


I will have a few more posts this year.  Looking forward to the new year.  Have a lovely day.
Karen

Saturday, December 24, 2016

Merry and Bright Christmas Cards

Hello Everyone!
Just a really quick post to share the rest of the Christmas cards I made to send out.
This card uses  heavy decorative paper.  I cut the front down to show the inside of the card.


One more card to go.  I will post it tomorrow.  Having a small get together this afternoon.  Should be fun.
Karen

Friday, December 23, 2016

Christmas Cards Using Rub Ons

Hello All,
Getting closer to Christmas.   I baked all day Wednesday.  I made up a few plates of cookies for my neighbors and began delivering them.  I have two plates left to deliver today.  I also included a cross stitched ornament with the cookies.

I found a package of rub ons in my stash.  The designs were really pretty, but I had never used them.  I decided that I would use each large rub on as the focal point instead of trying to add it as an embellishment.  This worked out well.  The cards were sent out to friends.
3-D holly stickers and ribbon were added to complete the cards.


See you next time for more Christmas cards.  I have two more designs to share.  Have a great day.
Karen

Thursday, December 22, 2016

Whimsical Bird on Christmas Card

Hello Dreamers!
Still time for one more Christmas card before the big day.  I hope you are enjoying your Holiday season.  I am busy with preparations for the Holiday.  My nephew and niece are hosting dinner this year.  Which is nice.  I will make a dish to take along.
So, let's check out my Christmas card made with Technique Junkies stamps.  I used a non Christmas stamp and a Christmas sentiment to make two pretty little cards.


Materials List:
Stamps: Whimsical Bird Branch and Christmas Ornament Trio set (sentiment) both from Technique Junkies
Ink: Real Red and Garden Green (Stampin' Up)
CS: white, bright green, light bright green, dark green
DP: Christmas paper
Copic Markers
Ribbons
Spellbinders Oval Die Cut


Make It:

  • Make card bases from green CS
  • Wrap ribbons around layers of DP and CS before gluing to the card base
  • Add layers of CS and DP to complete the backgrounds
  • On white CS stamp the Whimsical Bird Branch - once in red and once in green ink
  • Color the images with Copic Markers
  • Die cut the stamped pieces
  • Stamp the sentiment 
  • Tie ribbons in bows and add to cards


Inside of Card: sentiment is from Christmas Ornament Trio Set

I would like to wish everyone a Merry Christmas!!  I hope your Holiday is filled with Love, Laughter, and Joy!
Karen McAlpine
Dreaming and Creating

Friday, December 16, 2016

Christmas Card with Doily

Hello Dreamers!
Hope you are all well.  We are very cold here in Michigan, USA. We had a super hot summer and looks like we are going to have a super cold winter.  Well, gives me more time to stay in and create fun projects.   Today, I have two more Christmas cards I made to send out.
I continue to use the beautiful papers in my stash.  I decided that I was going to cut into all my papers this year.  You know how it is--some papers I just hate to cut. But, this was the year.  LOL  It had to be done.  I added a gold doily to one of the cards, die cut circles, ribbon, and 3-D stickers to complete the design.


Decorative Paper and 3-D stickers from K & Company.


Challenges for Cards:
Holly Jolly: Christmas cards or anything but a card
Everybody Art: doily
Creates and Makes: use red, green and gold
Christmas Cards All Year Round: anything goes Holiday
Crafty Hazelnut Pattern Paper: use your Pattern papers--Dec

I am still working on my handmade gifts--crocheted scarves and cross stitch ornaments.  I will probably be working on them right up to Christmas eve.  I did not start early enough this year.  Oh, I do so enjoy giving a handmade gift.  Hope you are having a great day!  I will be posting more Christmas cards for the rest of the month.  See you next time.
Karen

Monday, December 12, 2016

Poinsettia Paper Cards

Hello Everyone!
Getting ready for Christmas??   I am doing well with the gift shopping.  Pretty near finished.  I am also making a few gifts.  Have quite of few done and quite a few more to make.  So, pretty busy here in Dreamland.  Lots of fun events too.

and 


Check out both of those fun events!!!

Today, I have a card I made to send out to those on my Christmas card list.   I used a pretty poinsettia paper to make the cards.  I added paper doilies, 3-d sticker embellishments (K & Company), Christmas Decorative paper, and ribbons to complete the cards.
The poinsettia paper is from Anna Griffin.


Challenges for my Poinsettia cards
Crafty Hazelnuts Pattern Paper: anything goes with decorative paper- Dec
Christmas Cards all year round: anything holiday
52 (Christmas) Cards: pick a past theme---April 2016 Christmas Foliage

See you soon for more Christmas cards!!  Hope you day has been filled with joy.
Karen

Friday, December 9, 2016

Christmas/Winter Themed Event with Lost Coast Designs

Hello Everyone,
Welcome to the:
It's beginning to look a lot like Christmas!!!

The December/January Lost Coast Designs and Carmen's Veranda winter event.
The Design Team is making Projects with a Christmas or Winter theme.  See all the event details on the Portal to Creativity blog.
I used four stamps to create this vintage/folk art Chrirstmas card.  Check it out.


Materials List:
Stamps: Plaid Pants Santa and Christmas Tree from Carmen's Veranda; Party Words and Yourba Adire from Lost Coast Designs
Ink: Sepia Archival
Distress Inks: Barn Red, Victorian Velvet, Frayed Burlap, Black Soot,
Markers
CS: white, green
Stickles Glitter Glue


Make It:

  • Make a card from green CS
  • On white CS stamp the Yourba Adire background stamp by inking the stamp with two colors of Distress ink
  • Distress background with Barn Red and Frayed Burlap inks


  •  Stamp Christmas tree and Plaid Pants Santa with Sepia ink
  • Color with markers
  • Add stamped piece to card base


  •  Add glitter glue to cuffs, and ornaments on tree
  • Stamp sentiment with Black Soot ink

Thanks for stopping by! Head over to the Portal to Creativity to link up your own holiday/winter project.  And, check out the other DT projects too!!
Hope your Holiday preparations are going well!!
Karen

Thursday, December 8, 2016

Day 24 - Thirty Days of Christmas Event with Technique Junkies

Hello Dreamers!
Welcome to Day 24 of the Thirty Days of Christmas Event with Technique Junkies!
The Design Junkies have lots of ideas for holiday cards and to get you in the mood for the season,
The Technique Junkies will be celebrating the Holidays with ............

The Thirty Days of Christmas

When: November 15 - December 15

The Design Team will be sharing Christmas/Holiday projects using Technique Junkie Stamps.  All Christmas stamps will be on sale during the event--
25% off!!
On my day 24 projects, I used  TJ stamps (which are  25% off) and a non- Christmas stamp.  See all The Christmas Sale stamps here


Materials List:
Stamps: Ornaments Trio Set  (25% off) from Technique Junkies
Ink: Archival Cobalt and Black
CS: white and navy
Metallic Marker
Twinkling H2O's watercolor paints
Paint brush
Silver and navy ribbon


 Make It:

  • Make a card from navy CS
  • Stamp three of the hanging ornaments with Cobalt Archival ink on white CS
  • Dip a wet brush into the watercolor paints and add splotches of color to the background-- the ornaments will not smear because they were stamped with Archival ink.
  • Add dots with a metallic marker and run the maker along the edges
  • Add stamped piece to card
  • Stamp Merry Christmas (also included in the Ornament Trio stamp set)with black ink in lower corner
  • Tie ribbon into three bows and add one to top of each ornament

 Inside of the Card:

Change up!!
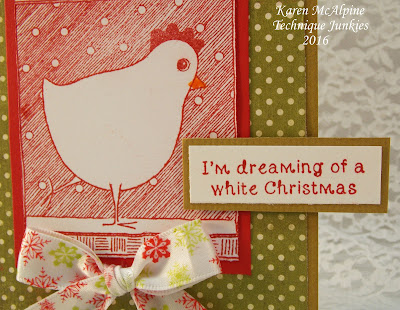
I'm Dreaming of a White Christmas Chicken !!??  Now, I know you have a bird or chicken lover on you card giving list.  They will love this little Christmas Chicken card.  And, this card also shows how you can use non-Holiday stamps to make holiday cards.


Materials List:
Stamps: Chicken and Red or White Christmas (sentiment) both from Technique Junkies
Ink: Red
CS: white, red, green
DP: MME Found Christmas pad
Snowflake ribbon

Stamp this sweet little chicken with red ink and pair with red and green papers. Stamp the sentiment from the Red or White Christmas stamp; cut out and layer with green CS.  Tie ribbon in bow.


I hope you are enjoying all the Technique Junkies' Holiday projects!  Don't forget to grab you favorite stamps while the 25% sale is on.  See you again soon!!
Karen

Monday, December 5, 2016

December Challenge with Lost Coast Designs

Hello Everyone,
Time for a new Challenge on the Lost Coast Designs Portal to Creativity!
The challenge theme for this month is:

 Party Critters!

That would include animals in hats and celebrating.  You may use any stamps for the theme.

My celebrating animal is on a birthday card made for my nephew.  This little puppy has his party hat on is ready to go!


Materials:
Ink: Black; Chocolate Chip and Close To Cocoa (Stampin' Up)
Distress Inks: Vintage Photo, Frayed Burlap, Antique Linen
CS:white; Kraft
Paper: Mixed Media pad
DP: Brown swirl from My & My Big Ideas; Brown Print from K & Company
Gold glitter glue

 Make It:

  • Make a card from from Kraft CS
  • Add a layer of brown print DP
  • On a piece of mixed media paper distress with the Distress inks and add to card base
  • Cut the swirls from DP and add to card
  • Add a strip of the brown print DP over the brown swirl


  • On White CS stamp the Large Film Strip with Chocolate Chip ink and cut out
  • Stamp the word Happy with Close to Cocoa ink within each Filmstrip frame
  • Add filmstrip to card
  • Stamp Party Dog on white CS with black ink; distress with Antique Linen ink, cut out and add to card with dimensional adhesive
  • Apply gold glitter glue to tassel on dog's hat
  • Stamp Birthday with Close to Cocoa ink on white CS;cut out and add to card with dimensional adhesive


Ain't he sweet??!!  My nephew loved his card, by the way.  I hope you will join in the challenge and show us your party spirit!!

Thanks for stopping by!  See you next time with Christmas cards!
Karen

Friday, December 2, 2016

Reindeer Themed Christmas Cards

Hello Dreamers!
I have another collection of Christmas Cards to share today.  Again, I used beautiful Decorative Papers with minimal stamping.  I wanted to use all those lovely papers I have had in my stash for several years.  Sometimes I think they are too pretty to cut.  But, I decided to jump right in and cut away!  LOL  This paper was heavy enough that I was able to used it as the card base.  I added die cuts and ribbons to complete each project.


Stamps are from Stampin' Up.

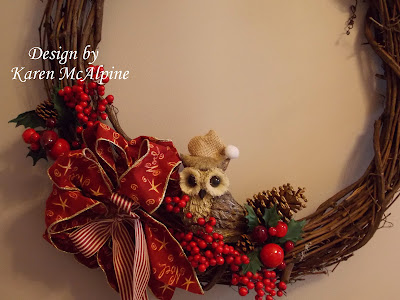
I put up some of my decorations yesterday.  I put together this cute owl wreath and hung it in my entry foyer.  Here are a few picts.


I only put a very tiny tree.  And, a few quilts and pillows.  Here is the fireplace area.


*******************
Challenges for my Reindeer Cards:
Simon Wednesday: anything goes
Mod Squad: Holiday Dimension
Holly Jolly Christmas challenge: a Christmas card or anything but a card
Merry Monday: masculine Christmas card


Well, I guess that's it for me today.  Hope you are having a lovely day!
Karen