Wednesday, November 27, 2013

Christmas Owl

Hi Dreamers!
How is your week going?  Tomorrow is Thanksgiving here in the USA.  We are having a big family dinner with turkey and all the trimmings.  I am making desserts.  Should be a great get-together!!

**********************************************************
Okay, so I will tell you a bit more about my surprise for December:  I will be doing what I am calling 

The Twenty-Five Days of Christmas!!! 

Beginning December 1, 2013 I will be showcasing 25 different Christmas cards!  One each day until December 25th!! As you can imagine, I have been very busy preparing for my event!!  I have all the cards finished and photographed.  I have to get the photo editing done and then POST!!!  One card a day!!!  I will  have  a little blog candy on offer too--keeping that a surprise---You will have to check back on Sunday, December 1 for all the details!!  As you can imagine, I am pretty excited about this event.  I hope you will enjoy all the Christmas inspiration!!!  

**********************************************************

Now, back to reality and to get you in the Holiday spirit.......Today, I have a fun Christmas card made with a Meljens digi stamp.  I used lots of bright colors and tons of glitter.


Materials:
Stamps: Cozy Winter Owl digi -Meljens Designs; Sentiments-My Sentiments Exactly and Stampin' Up
Copic Markers
CS: Black polka Dot- A Muse Studios; Real Red -Stampin' Up; White
Spellbinders die
Dots Embossing Folder-Cuttlebug
Stripe red and sheer red ribbon
Gold and Diamond Stickles Glitter Glue


Instructions:

  • Make a card base from the black polka dot CS 
  • Dry Emboss a piece of Real Red CS and add to card base
  • Print out the digi on white CS--make sure the ink is dry before coloring!


  • Color the image with Copic Markers
  • Die cut the image and add to card with dimensional adhesive
  • Add the Glitter glue to the image and the Red CS


  • Decorate the inside in the same manner as the front and add a Holiday sentiment.


Challenges for my Christmas Owl:
Meljens: use a black card base
New Challenge Blog***** Crafting From the Heart: anything goes
Cutie Pie: cute scenes and backgrounds
Ribbon Carousel: Holidays and a spooled item
Simon's Wednesday: anything goes
ABC Christmas: no square cards--"Out of the box"

Okay, join me on December 1 for The Twenty-Five days of Christmas!!  I think it will be a lot of fun!!  I have really enjoyed making all the cards!!  See you then!!  Love ya.
Karen

Saturday, November 23, 2013

Paper Artsy Stamps on Stenciled Background

Hi Dreamers!
Cold here today in Michigan.  We has a little dusting of snow this morning.  It is all melted now, but still cold.  So, let's warm things up a bit with a vintage style card.  I used Paper Artsy stamps on a background that I made with a Stencil/template and spray inks.


Materials List:
Stamps: Lynne Perrella set "Nina" from Paper Artsy
Inks: Ginger Adirondack, Perfect Plum - Stampin' Up
Distress Ink: Antique Linen
Spray inks in brown and purple ( Walnut ink and Tattered Angels)
CS: Kraft, cream, scrap of dark brown and purple
Template: Mini Harlequin - Crafters Workshop Templates
Fibers: Brown Twill - Jo Ann Fabrics; Purple Scalloped edged ribbon - Stampin' Up


Instructions:

  • Start by making the background --lay the template over the CS and spray with one color of ink
  • The way to get the depth and almost reverse image look to the background is to flip the template over onto a clean piece of CS without cleaning the template and spraying more ink.  
  • Let backgrounds dry


  •  Make a card base from Kraft CS
  • Stamp keys and  circle with Ginger and Perfect Plum inks
  • Add background to card base


  • Stamp the lady  on cream CS with Ginger ink
  • Tear out image and layer onto torn pieces of purple and brown CS


  • Add a piece of scallop edged ribbon and a tied piece of brown twill ribbon
  • Use some of the scraps to decorate the inside


Inside


********Challenges for my Paper Artsy Vintage Card:
Simon's Monday: mystery Technique
Paper Artsy: inspired by Liz's collage stamping
4 Krafty Girlz: anything goes


I have something special planned for the month of December.  Not going to tell you yet what it is!!  I want to surprise you.  LOL.  I have been working on "this" all month and am still working.  So, stayed tuned for that.  To finish out the month of November, I have one more vintage card with Paper Artsy stamps.  That project will be posted soon.  I hope you are having a great weekend.  Love ya.
Karen

Wednesday, November 20, 2013

Making Backgrounds and Collage Style Stamping

Hi Dreamers!
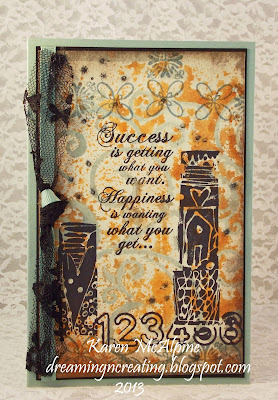
As you know, I love to make my own backgrounds.  I have been at it again..... My project fits in perfectly with the Simon's Monday Challenge---A Mystery Technique.  Can you guess how I made the backgrounds???   I was also inspired by the guest designer over on the Paper Artsy blog to use stamps to create a collage effect.  


Have you guessed how I made the background?  Oh, I will tell you now.  Check out the list of materials and that will give you a clue.


Materials:
Stamps: Lynne Perrella's Pacific Queen and Hot Pick 1102--both from Paper Artsy Stamps
Ink: Jet Black Archival; Bordering Blue - Stampin' Up
Distress Ink: Pumice Stone
Spray inks and Glimmer Mists
CS: Cream, black, Sage Shadow _Stampin' Up (retired)
Crafters Workshop Template- Mini Capricious


Instructions:

  • Start by making the background --lay the template over the CS and spray with one color of ink
  • The way to get the depth and almost reverse image look to the background is to flip the template over onto a clean piece of CS without cleaning the template and spraying more ink.  
  • Let backgrounds dry


  • Stamp with black and Bordering Blue inks
  • Distress edges with Pumice Stone DI
  • Layer onto Black CS and a card base of Sage Shadow
  • Add ribbon and black lace


Inside


  • Add one of the pieces left over from trimming to the inside.  Still lots of room to write a note.


A few fun Challenges for my Paper Artsy Quote Card:
Simon's Monday: Mystery technique
Paper Artsy: be inspired by guest designer + PA stamp--I was inspired to create a project with a collage style stamping like the sample that Liz made on Tuesday.

I have two more Paper Artsy cards to share!  So, check back in a bit!!  See you soon.  Love ya.
Karen

Monday, November 18, 2013

Thanksgiving Cards

Hello Dreamers!
I thought I would post a few more Thanksgiving cards.  --While there is still time to make a few.  The cards shown here today will be sent out to friends/family.--Whoa!  I guess I better get them in the mail now--Thanksgiving is next week.  Boy, the days just fly by.   I did see a similar design for this card somewhere and I cased it--I can't remember where.  It may have been a magazine or Pinterest.  I changed it a bit and used different leaf stamps.


Materials:
Stamps: Autumn Leaves - A Muse Studios; Sentiment- My Sentiments Exactly; Dots for the background
CS: Cream, orange, rust, and yellow
Ink: Chocolate Chip,  Really Rust, Pumpkin Pie, and Crushed Curry - Stampin'Up; 
Dot Embossing Folder
Spellbinders die
Corner Rounder Punch


Instructions:

  • Make card bases from CS and round opposite corners
  • Stamp the leaves, sentiment, and background dots
  • Dry emboss--I dry embossed two of the cards


The cards go together quickly and are simple enough for making multiples.

****A few fun Challenges for my Thanksgiving Cards:
Amusing Challenge: Thanksgiving
Eureka stamps: Thanksgiving
The Paper Girls: Thankful Projects
Pile It On: with thanks
Brown Sugar: Thanksgiving
Craftitude: anything goes with falling leaves
Simple Create Too: Thanksgiving
Simon's Wednesday Challenge: Thanksgiving


See you next time!!  Hope you are having a great day.  Love ya.
Karen

Wednesday, November 13, 2013

Using My Scraps On Scenes of Provence Cards

Hello Dreamers!
I thought I would change things up a bit today and do something completely un-Fallish.  I made these fun cards using scraps of watercolored papers.  I like to make my own background papers and always have lots of left over pieces.  I used the smaller pieces to make a patchwork/collage type background to stamp on.    Take a look.


Materials:
Stamps: A Provence Window (605KUM) and Old Provence (634QCL) Serendipity  Stamps.
Inks: Onyx Black (VF-82) Versa Fine.
Distress Inks: Victorian Velvet. Spun Sugar, Tattered Rose-Ranger
Spray Inks:  Vintage Pink and Iridescent Gold- Tattered Angels; Cherry Blossom Walnut ink-Tsukineko.
Cardstock: Bush Blossom-Stampin’ Up.
Embellishments: Pearls-Jolee’s EK Success; Velvet Ribbon (107301) and Sheer Ribbon -Michaels.
Other: Craft Sheet - Ranger.


Instructions
  • Watercolor scraps:  Apply inks and spray inks to a Craft Sheet (or a plastic bag) and add a few sprays of water.  Place scrap pieces of white and cream CS into the ink.  Move the pieces around to pick up all the ink.  Add more ink and water if necessary to make additional pieces.

  • Card: Select watercolor scraps that are in the same color family for a monochromatic look.  Lay the scraps out on a piece of Blush Blossom CS in a pleasing arrangement. 

  • TIP: stamp image on a piece of scrap paper and roughly cut out.  Use this as a pattern to help layout the scraps. 
  • Glue the watercolor scraps to the base.  Ink  stamps with Onyx Black ink and stamp over the watercolor scraps.  
  • Add pearls and ribbon (I grabbed the ribbon from my ribbon scrap bag).  


***********Challenges for My Provence Watercolor Scrap cards:
Serendipity Stamps: use your scraps and a Serendipity stamp


Still have three more Thanksgiving cards to share.  Will post those later in the week.  I am working on a sewing project this week.   I will get back to making Christmas cards when I have finished the sewing!!  I hope you are having a super day!!  Love ya.
Karen

Tuesday, November 12, 2013

Thanksgiving Cards!

Hi Dreamers,
Another busy week.  I finally finished the yard work for the year.  This morning I dug up the dahlias, cana lilies, and gladioli bulbs. They are all packed up and  stored away for spring next year.   So, no more yard work until Spring.  Well actually, I will have to rake some leaves this week.  But, that is all.  I have been spending some time crocheting scarves and some owl stuffed toys. They will make  nice gifts.

Now, let's look at a few cards I made to send out for Thanksgiving.  I made a total of 12 cards.  I did case some of these and I will let you know which ones are cased.


This cute Fall foliage Bird card I cased from a Stampin' Up Catalog.  I change the ribbon a bit.   The bird stamp is from Stampin' Up; the sentiment is from A Muse Studio.


This one is my design.  I used a wheat stamp from A Muse and some wheat decorative paper from K & Company.


For the layout of this card I used a card I made a Suzzane Everett's Fall Fest.  I used different stamps, but the layout is pretty much the same.  The wood background is from Paper Artsy; the wheat from Stampin' Up.


Challenges: 
Card Making Mamas: Thankful sentiments
Stampin for the Weekend: fall colors


I will be back later in the week to showcase the remaining Thanksgiving cards!!  Stay tuned for that.  Hope you are having a great day!!  Love ya.
Karen

Monday, November 4, 2013

Hat Boxes--Decorated with Fabric

Hi Dreamers!
I finished my decorated Hat Boxes!!!  I have been working on them for weeks.  Now, I know they are not a paper craft or a card, but I thought you may like to take a look at them.  The hat boxes are large ( 16 inches diameter) and they are made from wood.  I picked them up at a garage sale this summer for $3 bucks each.  Fabulous deal!!  Here are two  pics of the  hat boxes before decorating.  Aren't they awesome!!


I covered the hat boxes with home decorator fabrics.  The Toile is the fabric I used to make the draperies in the dining room.  I had about 1.5 yards left over from the drapes to cover the box.  The second box is covered with the fabric I used to recover the dining room chair seats.  I used Fabri-Tac glue to put everything together.


I added lots of trims and laces.


I padded the top of this box and added some hand made satin roses, vintage laces, doilies, wired ribbon, and a pretty bird.


On the second box, I added lace, trims, and pearls.  I wanted this box to have a flat top so I could stack them.  


Third Box


On this hat box, I tied knots in sheer ribbon and layered it with white tulle.  Also used the pearls here.


I tied a a bow in the ribbon and one in the tulle and glued them together.


I have the two boxes stacked here in my dining room.  Look to the right of the boxes.  See that kind of messy pile of table linens on the shelf?  I am going to store all those linens in the hat boxes.  The boxes can sit here on the floor and look pretty.  And, I gain another shelf for my china pieces.  How great is that??!!


So, back to cards on the next post.  I have been making some Thanksgiving cards.  Some I cased from various sources.  I have to finish those up and take some pics.  Stay tuned for that.  I will be starting on Christmas cards soon too.  Well, I hope you are having a lovely day and I am so glad you stopped by.  Love ya.
Karen