Thursday, October 31, 2013

Spicy and Sassy Girl in Shades of Yellow and Gold

Hi Dreamers,
I am back today with my Guest Design Project for the 4 Krafty Girlz Challenge!!!   The Theme for this fortnight is ANYTHING GOES!!  Very nice and easy.  The sponsors for this challenge are:

Meljen's Designs
Glamoureyes
Sassy Studio 

^^^^^^^^^^^^^^^^^^ A SPECIAL THANK YOU to 4 Krafty Girlz for having  me design this month---Very fun!!  Thanks Grilz!!!  ^^^^^^^^^^^^


For my project I used a fun image from Sassy Studios---And is this lovely every sassy!!  I paired her with lots of gorgeous decorative papers in shades of yellows and gold.


Materials:
Stamps: Sassy Studios Digi; sentiment- My Favorite Things
CS: Crushed Curry - Stampin' Up
Decorative Paper: Essentials Collection from Authentique
Copic Markers
Ribbon: Lido from A Muse Studios
Yellow Tulle
Dies: Label Four and Fancy Tags - Spellbinders; 


Instructions:

  • Make a card from Crushed Curry CS
  • Layer with Decorative Paper


  • Print out the digital image on white CS---make sure the ink is dry before coloring
  • Color image with Copic Markers


  • Cut out the image with die Labels Four


  • Die cut two pieces of with the Harlequin die from DP
  • Die cut two Eiffel Towers from Crushed Curry and Houndstooth DP


  • Add the Harlequin die cut pieces (diamonds) to the card front with dimensional adhesive along the left side and the bottom
  • Wrap Yellow tulle around card and tie in knot
  • Tie the Lido (yellow) ribbon around the tulle
  • Add the Eiffel Towers with Dimensional adhesive


  • Stamp the sentiment on Crushed Curry CS and cut out 
  • Die cut the Fancy Tag from DP and add the sentiment to it
  • Add to card with dimensional adhesive


  • Add more of the papers and a piece of the Harlequin die cut for the inside
  • Leave room to write a little note or stamp an additional sentiment.  This would make a cute birthday card.


Inside


Cute!!??  Pretty sure I will use this for a birthday card for one of my lovely friends.

**********Challenges for my Spicy, Sassy Gal
Simon's Wednesday: anything goes
Die Cuttin Divas: anything goes with die cuts
Flourishes Timeless Tuesday: plaid or houndstooth pattern---I used Houndstooth patterned paper to die cut the Eiffel Tower and I used the same paper on the inside of the card
Through the purple haze: :for the girls


Oh, Happy Halloween.  I am working on covering three hat boxes with fabric (not paper).  I decided to use fabric since the boxes are made of wood.  I still have a lot of work to do on those, but, I will show you when I am all done.  I have to fly...lots on the schedule for today!!  Have a great day!!  Love ya.
Karen

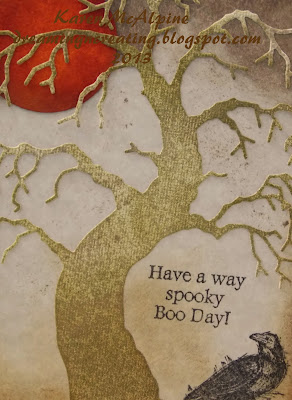
Happy Halloween! And a SCARY card

Hi Dreamers!
Happy Halloween!!  I have the treats all ready for the little Trick or Treaters tonight.  Unfortunately, it is raining now.  Hopefully the rain will stop for tonight. Should be fun!!   To celebrate, I have one more scary card to share!


Materials:
Willow Tree Die Cut- Memory Box
Stamps: Raven-Stampin' Up; sentiment- A Muse Studios
CS: Green, Orange, White textured, Gray Marbled
Inks: Black
Distress Inks: Frayed Burlap, Rusty Hinge, Vintage Photo
Circle Punch


Instructions:

  • Make a card from Green CS and layer with Orange
  • Punch a circle from orange CS and distress with inks
  • Die cut the tree from white textured CS and distress with Frayed Burlap distress ink
  • Glue both to gray marbled CS and distress with inks
  • Stamp the raven and sentiment with black ink


Challenges for my Happy Halloween Card:
Simon's Monday: vintage + anything goes
Flutterby Wednesday: any winged creature
365 Cards: starts with R---I used a raven
4 Crafty Chicks: Halloween

I hope you have a SPOOKY HALLOWEEN.  See you back today for my Guest Designer project for the 
4 Krafty Girlz Challenge!!!  Love ya.
Karen


Tuesday, October 29, 2013

Cute Halloween Cards - Not too scary

Hi Dreamers,
The Halloween fun continues!!!  Today, I have  un-scary Halloween cards to share.  The cards are more on the cute side than the creepy side.  I sent one to my Mom and Dad, and to my friend, Arloa.  I stamped the same images to create the Halloween scene and varied the sentiment a bit.  Take a look.


Card #1


Materials:
Stamps: Spooky Boo Day - A Muse Studios
Inks: Chocolate Chip and Pumpkin Pie - Stampin' Up
CS: Brown, orange, white, yellow, and kraft
DP: K & Company
Orange Copic Marker
Dots - Stampin' Up


Instructions:

  • Make two cards from kraft CS
  • Layer with yellow and orange CS; and with the DP
  • On white CS, Stamp the Owl, tree and sentiment with Chocolate Chip ink


Card #2

  • Stamp the moon with Pumpkin Pie ink on the second card
  • Color in the O's with the orange Copic Marker


A Few fun Challenges for my un-scary Halloween Cards
Amusing challenges: anything goes
A Muse Studio Challenge: use kraft CS
Clear it Out: Halloween and an orange item from your stash---I used this orange DP that has been in my stash for over a year.
Try It on Tuesdays: Halloween
Craft Your passion: Halloween, but nice
Love to Create: Halloween


I have one more Halloween card to share this week. And, on Thursday another project as Guest Designer on the 4 Krafty Girlz Challenge blog.  So, lots going on here in Dreamland this week. Stayed tuned!!  See you soon.  Love ya
Karen

Saturday, October 26, 2013

Scary Halloween Cards

Hi Dreamers!
Back with two more Scary Halloween Cards!  This set of cards has the addition of some scary critters.  I also used the Memory Box tree die and made backgrounds with Distress inks and stains.  Let's look at card #1 with a spooky Black cat!


Materials for both cards:
Willow Tree Die Cut- Memory Box
Picket Fence Die Cut- A Muse Studios
CS: orange, green, white, kraft
Distress Inks and Stains in browns, blues, and oranges
Stamps: Black Cat and Owl-Stampin' Up
Embossing Folder: Notebook Tim Holtz Texture Fades 


Instructions:

  • Make the card bases from orange and green CS; layer Card #2 with orange CS
  • Make the background by dropping Distress Stains and inks on a craft sheet, spritz with water and press the CS into the inks.
  • Add Rusty Hinge Distress inks to center of background piece and Black Soot on the edges
  • Die Cut Tree from Kraft CS and distress with Vintage Photo ink
  • Die cut fence 
  • Add both die cuts to card
  • Stamp Cat and cut out; add to card


  • Make Background by dry embossing white CS and distressing with orange and yellow Distress inks;Vintage Photo on the edges
  • Die cut tree from White CS and distress with Frayed Burlap Distress ink


  • Add tree to card
  • Stamp owl and cut out; add to card with dimensional adhesive
  • Add a scary sentiment


A few super fun Challenges for my Scary Halloween cards!!

Simon's Monday: Spooky
Simon's Wednesday: Halloween
365 Cards: stamp for Halloween
Alphabet Challenge: S for Scary
Crafts  4 eternity: Halloween
New Challenge Blog!!! Crafty Hands: anything goes
Cut It Up: Halloween
Left of Center: Halloween
Crafty Creations: Halloween


I have a few more Halloween Cards to share and then I will move on to Thanksgiving for the month of November.  Stayed tuned for all the Fall Fun!!  I have been working on a fabric project--covering a hat box.  I will share photos of that when finished.  I plan to use the hat box to hold table linens in the dining room.   I hope you are having a great weekend.  I hope I can get outside and do a bit of clean up work in the garden.  It is time to put away all the garden ornaments and clay pots.  Getting colder every day here in good old Michigan.  So, see you next time for more Halloween Scariness.  Love ya.
Karen

Monday, October 21, 2013

Spooky Haunted House with Scary Tree--- Halloween Card!!

Hi Dreamers,
Really starting to seem like Fall here in Michigan, USA.  Cooler temps and rain today.  The Leaves are changing colors and making a lovely show!  I finished up the Halloween cards!  I will be sharing two of them today and the others will be posted throughout the next two weeks until Halloween.  Lots of time left to make a few cards to send out.  To create my creepy cards, I used stamps, a die cut tree,  and lots of Distress inks.

Card #1


Materials:
Stamps: Haunted House-Stampin' Up; Bats -A Muse
Die: Willow Tree -Memory Box
CS: White, Kraft, Yellow, Orange, Gray, Sahara Sand - Stampin' Up
Black ink
Distress inks: Stormy Sky, Black Soot, Frayed Burlap, Rusty Hinge
Copic Markers


Instructions:

  • Make a card base from yellow CS (card 1) and Orange CS (card 2)
  • Layer with Orange(card 1)/Gray (card 2)
  • Stamp the Haunted house with black ink
  • Color the moon and windows with Copic Markers


  • Color the background with the Distress inks and glue to card base
  • Die cut trees from white and Kraft CS
  • Distress trees with Distress inks
  • Add white tree to card #1
  • Stamp Bats


Card #2


  • On the second card, I thought I wanted the tree cut from Kraft CS.  But, I thought it did not stand out enough.  I layered a second white tree over the Kraft tree letting the Kraft tree show slightly.
  • I also added Rusty Hinge to the background on this card--wanted to make the moon look like it was glowing.  

*******A few fun challenges for my Spooky House Halloween Cards:
Dream Valley: Halloween
Pile it On: Halloween
2 Sisters: colors of Halloween
Crafty calendar: Halloween

Well, I guess that is it for me today.  Stayed tuned for more Halloween fun!!!  Hope you are having a great day.  Love ya.
Karen

Thursday, October 17, 2013

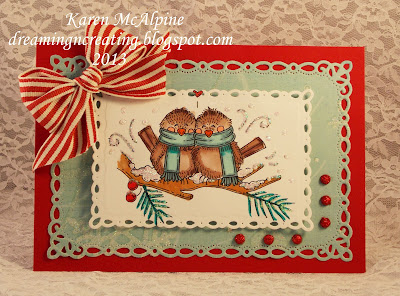
Happy Holiday Birds

Hi Dreamers!

I am back today making a start on my Holiday cards with this Happy Holiday card.  This project is also the second post as Guest Designer on the 4 Krafty Girlz Challenge Blog.  Challenge #4 is Anything Goes with the following sponsors:
Meljens Designs
Sassy Studios
Glamoureyes

I used a digi stamp from Meljens Designs called Cozy Little Chickadees on my Holiday Card.  I wanted to go with a non-traditional color scheme for this Holiday card.  I found a piece of aqua with glitter decorative paper in a holiday stack.  And to make the aqua really stand out, I paired it with a cherry red CS.  Love the combo!  Take a peek!


Materials:
CS: White; Electric Red - My Favorite Things; Pool Party - Stampin' Up ( on the inside of card)
Decorative Paper: K & Company
Die Cut: Romantic Rectangles - Spellbinders
Copic Markers
White Marvy Pigmented Opaque Ink Marker 
Stickles Crystal Glitter Glue
Striped wide ribbon - Stampin' Up
Red Glitter dome embellishments


Instructions:

  • Make a top fold card from Electric Red CS
  • Use the die cut to cut out the decorative paper layer
  • Print the digi from computer on white CS


  • Die cut the image with the Spellbinders
  • Color the image with Copic alcohol ink markers
  • Color the snow with White Pigment Marker
  • Add to card with dimensional adhesive


  • Tie striped ribbon in a bow and glue to upper corner of card


  • Add the Glitter Dome embellishments to  lower corner


  • Add the Glitter Glue to the snow and swirls


Inside


  • On the inside die cut a piece of Pool Party Cardstock
  • Stamp Happy Holidays


**********A few fun Challenge for My Happy Holiday Birds*******
Simon's Wednesday: Holiday/Christmas
Addicted to Stamps and More: use Markers
The Crafter's Cafe: Cute
Crafting by Design: anything goes
Crafting With Dragonflies: trees, leaves, nature
Crimbo Crackers: Christmas Birds
Craft-Room: Feathered Friends
Crafting Musketeers: Christmas in October
Penny's Challenge: anything goes
Crafty Hazelnut's Christmas: anything goes as long as Christmas


Another busy week here!  Spent yesterday driving all over Southeastern Michigan visiting.  Spent half the day with Mom and Dad and the other half with my dear Friend, Laurie.  I did not get home until late, but had a great day.  I will have some Halloween cards for you later in the week.  The cards are not finished yet, but they soon will be!!  See you soon for more holiday fun!!  Love ya.
Karen

Monday, October 14, 2013

Cute Little Mouse Card

Hi Dreamers!
I am back in Dreamland today!  I Can't believe it has been ten days since my last post!  I guess I was busy!!??  LOL.  I have been working on a few things.  Card Ministry was last week and we made 35 Thanksgiving cards for shut-ins.  I moved my living furniture around.  --Always fun to look at something differently!  LOL.  I got out the "Fall" table linens, quilts, and decorative pillows.  Looking pretty "Fally" here now.  Weather still seems like nice cool summer though.  I also hooked up a big rain barrel to catch the rainwater from the gutter.  My husband did most of the work on that--thanks, Honey.  My dear Brother bought the rain barrel  for my birthday last month--thanks, Bro!    Oh, I also had some sewing projects going on-- -Bustled one gown and removed a train from another for Homecoming Dance dresses.   So, just  hoppin' around doing all kinds of things.

Today, I have a sweet My Favorite Things stamps all cutesy on this any occasion card. 


The cute mouse is stamped on watercolor paper and colored with Markers.


*****I am entering my cute Mouse in one of my Fav challenges:
Simon's Wednesday Challenge: use a rubber or clear stamp---I used a clear MFT stamp***********


Coming this week in Dreamland!!----

  • I have a few more cutesy suitable for the kiddies cards 
  • My second Guest Designer project for  4 Krafty Girlz
  • I have been working on a few Halloween cards.  I should have those ready soon!! 

See you soon.  Love ya.
Karen

Friday, October 4, 2013

Halloween Treat Bag with Domino Art

Hi Dreamers!
I have started to make a few things for Halloween.  Even though I still can't believe that it is already October!!  Where does the time go??!!  I will make some cards to send out and a few treat bags for some special little goblins.

I am joining in with the 31 Days of Halloween fun over on Leigh's Domino Art Blog Day 5.    The projects have to be Halloween themed and incorporate a game piece--like a domino.   I used a decorated domino to embellish my Halloween Treat bag.


Materials:
Stamps: Spider - Stampin' Up; Sentiments - Impression Obsession
Inks: Stazon Black
Raisin Alcohol Ink-  Ranger
Decorative Paper -K & Company
Glossy Accents
Lime Glitter -A Muse Studios
Green Glitter Ribbon
Orange Rhinestones
Die Cut Box: Popcorn Box - A Muse Studios
Label Die Cut: Vintage Labels 1 -A Muse Studios
Domino


Instructions for Decorating the Domino:

  • Apply Raisin colored Alcohol ink to the Domino by patting the ink onto the domino with a Ranger application tool.  Let it dry for a few minutes
  • Stamp the Spider with Jet Black Stazon ink
  • Apply a layer of Glossy Accents to the sides of the domino
  • Dip the sides into Lime Glitter
  • Apply a layer of Glossy Accents to the front of the domino
  • Sprinkle a little bit of Lime Glitter on the front of the domino
  • Let dry--will take a while for the Glossy Accents to dry---make the box while domino is drying


Instructions for Completing the Treat Box:

  • Die cut the box from Halloween decorative paper 
  • Crease the fold lines with a bone folder and fold up the box gluing the flaps
Note: Because I added the heavy domino to the front of the treat bag, I wanted to reinforce the bag.  I die cut a second box from heavy white CS and slipped it inside the box made with DP


  • Apply glue to edges of the box and dip into glitter---let dry
  • Tie the ribbon around the top of the box
  • Stamp the sentiments on DP and cut out with die
  • Add the sentiments to the box as shown


  • Attach the domino to the box with a strong glue.  I used Fabri Tac
  • Add the Rhinestones


  •  Fill box with treats and shredded paper-- This treat box would be a cute party favor too.  Picture it  with lollipops sticking out. 


**********Challenges for my Spider Domino Treat Box
Domino Art: 31 Days of Halloween
 Decorate to Celebrate: a party decoration and Halloween
Cuttin and Stampin: halloween
Paper take weekly: anything goes or Halloween treat holder
Ribbon Carousel: Halloween
2 Creative Chicks Halloween Linky party: Halloween
Country View: halloween
Emergency Crafters: Halloween
Feeling Crafty: autumn
Really Reasonable ribbon: Halloween or Fall + ribbon

Well, that was fun!  I know who is going to get this treat box filled with goodies.  Hope you are having a great day looking forward to a nice weekend.  See you soon.  Love ya.
Karen

Thursday, October 3, 2013

Guest Designing for 4 Krafty Girlz

Hi Dreamers!
I was invited to join the lovely ladies over on the 4 Krafty Girlz Challenge blog as a Guest Designer for the month of October!!!  Check out their challenges!!  The challenge are always fun with cool prizes and run for two weeks.  The current challenge, that starts today, is an Anything Goes Challenge!!
The sponsors for the Challenge are:

Dilly Beans Stamps
Floppy Latte's Digital Designs
Angie's Digi Stamps


For my Guest Designer project, I used an image from Dilly Beans called Daisy Girl Framed.


Materials:
CS: White, Always Artichoke and Rich Razzleberry (Stampin' Up)
Decorative Papers: Lost and Found Blush from My Mind's Eye
Copic and Marvey Alcohol Markers
Plum Pearls from Kaiser Craft
Magenta Colored Grosgrain Ribbon
Dimensional Adhesive


Instructions:

  • Make a top fold card from Rich Razzleberry CS
  • Layer with Always Artichoke CS
  • Add  two pieces of DP


  • Print out two image in two different sizes
  • Color the larger image with Alcohol Markers
  • Cut out around the image
  • Add to card front with dimensional adhesive


  • On the second smaller printed image, color just the flowers
  • Cut out the flowers
  • Add the flowers to the lower right corner with dimensional adhesive


  • Tie the ribbon in a bow and glue to card
  • Add a few pearls to the hair and the flowers


Inside


  • On the inside, repeat the paper layers
  • Stamp a pretty sentiment (this one is from  Stamping Bella) on White CS
  • Add three more flowers


Head over to the 4 Krafty Girlz Challenge and link up your Anything Goes Card!!!  Don't you just love "Anything Goes" ???!!!


*******Other fun Challenges for my Daisy girl card
Link Up For Pink: use pink---This is a linky party to help promote Breast Cancer Awareness!!!!
Belli Challenge: pearls and ribbon
Loves Rubber Stamps: anything goes
Cards Galore: flowers
Oozak: anything goes


See you next time with "something" fun.  Maybe some cards for kids???  Does that sound good?  Oh, and I will be back on the 5th with my Halloween Domino Art project!!  Ohhh should be scary.  Hope you are having a great day!!  Love ya.
Karen
Tuesday, October 1, 2013

Elegant Welcome Baby Card

Hi Dreamers!
What a busy week!!  Oh, and Happy October!!  Wow, I can't believe that it is already October!  Where did the summer go??!!  I have been busy running around getting some errands done, picking out a new truck, visiting with friends, doing a sewing project, and etc.......
Today, here in Dreamland, let's look at this dreamy elegant Welcome Baby card.  This was a special order card for my friend.  Her son and daughter-in-law will be having their first baby soon.  The request was for a baby card that was NOT cutesy.  I think I did good??!!


As you can see, I added some of the papers to the flap of the envelope for an extra special polished  look.


Materials:
CS: Cream, White, Blush Blossom (Stampin' Up retired)
Decorative Paper: Embossed creamy colored paper --This one is from the Bissette pad from SEI
Spellbinders: Circle and Picot Edge Circle
Eyelet Edge Punch
Corner Rounder Punch
Wide Satin Ribbon
Tiny Shell pink Pearls
Sentiment stamps


Instructions:

  • Make a top fold card from Cream CS
  • Cut and punch the layers:  
  1. two strips of White CS with one edge punched
  2. two narrow strips of Blush Blossom CS
  3. Cut the Decorative paper
  4. One large circle from Cream CS
  5. One medium Picot Edge circle from White CS 
  • Assemble the layers in that order (above list)


  • Stamp the sentiment (Sweet N Sassy retired) with black ink on Blush Blossom CS and round the corners
  • Add the sentiment to the die cut circles with dimensional adhesive
  • Add the pearls 
  • Wrap ribbon around card and tie in a bow


 Inside


  • On the inside repeat the layers
  • Stamp sentiment (Blue Ridge Impressions) on white CS

So, you can do a baby card that is elegant and not cutesy.  Just use soft colored papers and add the embellishments.  

********Challenges for my Elegant Baby Card:
365 Cards: must haves---I just had to have that Picot Edge circle die cut--It can be a background piece or as I have done here, the focal point.
Craftin Desert Divas Linky Party: anything with a sentiment
Simon's Wednesday: anything goes
There She Goes: decorate the inside
Avenue 613: anything goes
PaperTake Weekly: anything goes


!!!!!!!What is coming to Dreamland in October!!!

I will be Guest Designing for the month of October for the 4 Krafty Girlz Challenge Blog.  I will be making three project throughout the month---The first project will be posted on the 3rd.  

I will also be participating in the 31 Days of Halloween on Leigh's Domino Art Blog on the 5th of the month. 

So stayed tuned for all that fun stuff!!!!   A very busy month!!

I hope you are having a lovely October day!  Take some time to stamp and create.  Love ya.
Karen