Showing posts with label Hero Arts. Show all posts

Monday, August 18, 2014

Love To Scrap Challenge Blog New Challenge- Anything Goes

Hello Friends!
Time for a new challenge on the Love To Scrap Challenge Blog!!  The new theme is always a favorite!


Anything Goes with a Rubber or Clear Stamp


Make any project you like using a rubber or clear stamps.  No digis this time.

We have a lovely sponsor for the Challenge:

$25 Gift Certificate to Heartfelt Creations!!!

Heartfelt Creations


For my design team project, I made a vintagey card with a travel theme.  I stamped on glossy CS and used lots of distress inks.


Materials List:
Stamps: Bicycle Collage and Enchante both from Hero Arts; Sentiments from Blockheads Stamps
CS:Glossy white and white
Ink: Vintage Sepia - Versa Fine; Yellow and Green dye inks
Distress Ink: Forest Moss, Mansard Seed, Vintage Photo- Ranger
Dies: Ticket - A Muse; File Folder Tab -- My Favorite Things
Ribbon
Pearls


Instructions:

  • Make a top fold card from Glossy white CS
  • Stamp the Bicycle Collage with Vintage Sepia
  • On White CS stamp the Enchant stamp three times with three different inks:  Yellow, green and Vintage Sepia
  • Die cut with the ticket die
  • Die cut the File Folder Tab


  • Distress all the die cuts and the card with the distress inks
  • Stamp the sentiment
  • Glue the die cuts pieces to the card


  • Add pearls to the card front along the edge of the collage stamp
  • Tie a knot in ribbon and wrap around card front


******Challenges for My vintage travel card:
Amusing Challenge at Stamped Blessings: die cuts
Corrosive Challenge: B Unique---Things that start with B---I used bike, brown ribbon, brown ink, bon voyage
Crafting from the Heart: anything goes
Incy Wincy: things and wheels
Love to Create: polka dots and pearls
Simon's Monday: anything goes
Vintage stamping Challenge: summer days

*********************************

Would love to see what you make!!  Don't forget that nice prize from Heartfelt Creations....I wish I could enter......LOL

Hope you had a great weekend!  See you next time!!  Love ya.
Karen

Thursday, August 15, 2013

Owls, Owls, and More Owls Part Two

Hi Dreamers!
Here I am back today with Part Two of my owls made with papers and CS from the good old scrap basket. I did not cut into any new sheets of paper or CS to make all the cute little owl cards.  I even ended up with a Christmas version  (my first Christmas card of the year!).


Materials:
Stamp: Owl from Hero Arts
Black Pigment Ink
Black Embossing Powder
Markers
Assorted DP's, CS, and ribbons
Punches and dies


Why don't we start with the Christmas version?!!  I used Cosmo Cricket Paper for the background.  I die cut and punched  two shades of yellow  and a dark green CS to make some layers for the little owl.  All the Owls are stamped with black pigment ink and heat embossed with black powder.


Embellishments: The holly dimensional stickers are from K & Company; glitter dots, red ribbon.  Sentiment on the outside: Victorian Originals.


Inside


*************


This a gate fold card with gold Stickles here and there.  The DP is from Stampin' Up.


Inside when card is completely opened


Close up of inside.  Sentiment is from Sweet N Sassy


**************

And, last but not least, this small Birthday card.  The bright yellow CS is dry embossed and I used some punched and die cut shapes to layer.  Sentiments are from Gina K Designs.


Inside


I already sent out the Gatefold card to my friend, Jan.  She loves owls, so I am pretty sure she will like this one!    The Christmas card will go in the Christmas card box.  Only 70 more to go.  LOL.

Challenges for my scrappy Owls:
Holly Jolly Christmas: glitter--card #1 uses glitter dots
Winter wonderland: cute Christmas
Paper Take Weekly: occasions
ABC Christmas: P is for----pretty paper, a pair of pre cut holly embellishments
Divas by Design: Christmas
Whimsical Designs: bingo---die cuts; free; stamps


Now, next time for sure, I will have a finished card made with my new stamped backgrounds!  Hope you are  having a great day!  I am off to get a mammogram today.   Love ya.
Karen

Wednesday, August 14, 2013

Owls, Owls, and More Owls Part One

Hi Dreamers!
Well, I did not finish the card using my new stamped backgrounds (from Monday's post).  I have been busy cleaning the house, baking, and ironing.   Lots of those kind of things that I got behind on while my husband was off sick.

So, I decided to share the Owl cards I made.  I mentioned the cards last week.  The cards were made using only my scrap basket and my stack of folded cards left over from other projects.  I think it is fun to challenge myself to use up some of my scraps.  I always find a small piece of a  favorite paper or CS color.  Fun!


Materials:
Stamp: Owl from Hero Arts
Black Pigment Ink
Black Embossing Powder
Markers
Assorted DP's, CS, and ribbons
Punches and dies


All the Owls are stamped with black pigment ink and heat embossed with black powder.  I used some hemp twine and DP from K & Company on this owl.  Just Because stamp is from AMuse Studios.


I used a white card base and Stampin' Up DP on the card below.


The Owl is colored with markers.


Repeat the paper on the inside.  This fun sentiment is from DRS Designs.

Inside


I think I could use this orange version for Halloween by simply adding a sentiment on the inside.  This orange polka dot paper is from AMuse Studios.  The Yellow DP is from Stampin' Up.


Challenges for my scrappy Owl cards:
Die cut Divas: orange and white---card #3
Oldie But a goodie: cards for boys---items used --all the papers and CS were in my scrap basket and some are 4 + years old

Craft Door Magazine: anything goes
ABC Challenge: stamps, ink, paper
C is for Challenge: fresh and bright
Crafting by Design: anything goes
Simon's Wednesday Challenge: monochromatic---card #2
Sisterhood of Crafters: scraps


Well, I made so many owls that I will have to break it down into two posts.  So, check back for part two!
Hope you are having a great day!!  Love ya.
Karen

Saturday, August 10, 2013

Feminine Congratulations Card with Fabric Accents

Hi Dreamers!
In the midst of the weekend here.  My husband has finally been released to return to work!  He has been off sick for 10 weeks and the doctor felt he was well enough now to go back to work.  My husband has turned the corner and feels much better.  If you remember, he had pneumonia and then that was complicated by hypothyroidism.  So, he was  really feeling rotten and so weak. We are both really glad that he is doing better now!
Now, let's look at a card!  I made this feminine Congratulations card using a stamp from Hero Arts- Antique Keys.  I did lots of distressing and added some fabric accents.


Materials List:
Stamps: Hero Arts – Antique Keys (CG178)
Congratulations – My Sentiments Exactly;
Card Stock: Rich Razzleberry –Stampin’ Up; Coral and Pink –Bazzill;
White -Staples.
Inks: Cherry Cobbler Pigment- Stampin’ Up 
Vintage Photo, Spun Sugar, and Victorian Velvet Distress Ink from Ranger
Other: Sheer Creations Ribbon Celebrate It- Michaels
Kassies Brocade Cuttlebug Embossing Folder 
Clear Super fine Embossing Powder-Ranger
Zots 3-D Clear Adhesive Dots from Therm-o-Web
Fabric Scraps
Thread and Needle 
Fabri-Tac Glue from Beacon Adhesives.


Instructions

  • Make a card from Pink CS.  
  • Dry emboss a rectangle of Coral CS and distress with Victorian Velvet. 
  • Layer rectangle with Rich Razzleberry CS and add to the left side of card.  
  • Tie ribbon around card.  


  • Stamp Antique Keys with Cherry Cobbler pigment ink; heat emboss with clear powder.
  • Apply Distress Inks starting with the lightest shade and ending with darkest. 
  • Layer stamped piece with Rich Razzleberry CS.


  • To Make Fabric Poufs: Cut 2’’ circles from fabric scraps.  Run small stitches along outside edge.  Pull stitches tight and fabric will form into pouf. Try to flatten the pouf on the gathered end; knot the thread.  Glue the poufs  to the backside of the stamped piece with Fabri- Tac glue. 
  • When glue is dry add the piece to the card front with 3-D Zots.  
  • Stamp sentiment and color CS with Distress inks 
  • Cut out sentiment and layer with Rich Razzleberry CS  
  • Add to card front.  


I use this design for Graduations cards (changing the color scheme for masculine cards), but it would be great for any kind of  congratulation card  -  like retirement, house warming, anniversary, etc...  Just add an appropriate sentiment to the inside.


********Challenges for My Feminine Congratulations Card:
Inspire Me Fridays: anything goes
Brown Sugar: anything goes
Allsorts: stitching--I stitched the little fabric poufs
Crafty Calendar: anything goes
One Stop Craft: use pastel colors

I hope you are enjoying the weekend.  We are having a quiet weekend here. Don has to rest up a bit to meet the demands of his first day back to work on Monday.  I did some sewing this week--mending mostly.  But I still had time to make a bunch of owl and bird themed cards--using only scraps.  I like to challenge myself to use only scraps once in awhile---it's fun!!  I will have those for you later in the week.  See you then!  Love ya.
Karen

Thursday, July 4, 2013

Vintage Bird Single Layer Card


Happy Fourth of July!!

Hi Dreamers,
Not doing too much today for the holiday.  My husband is still not feeling well ( still recovering from pneumonia).  He has been off work for a month now.  He is taking a nap right now.  That gives me some free time to do a bit of blogging.  I have a fun single layer card to share with you today!  I used "Timely Bird" from Hero Arts  for this project.  I went all vintagey!!


  • Make a folded card from pale yellow CS (this is Barely Banana from Stampin' Up)
  • Tear bottom edge
  • Stamp image with Onyx Black VersaFine ink
  • Layer a paper doily onto the card--cover the stamped image with a scrap piece of paper
  • Spray paper doily with spray inks (I used Willow Walnut ink)
  • Let Dry


  • Spray more of the Willow and add a bit of Walnut spray ink
  • Color the flowers, leaves, and clock faces with Distress Markers
  • Distress edges with Antique Linen Distress Ink


  • Add a bow and some tiny pearls
  • All done!  Stamp your favorite sentiment on the inside


This card is entered in the:
Hero Arts: single layer card
Ruby's Challenge: things with wings


So, that is all for me today.  I will be sharing all my bug themed cards next.  So, stayed tuned for that!!  I made a bunch of those.  Very fun!!   Have a great day!!  Love ya
Karen

Sunday, June 23, 2013

Emboss Resist Flowers

Hi Dreamers!
Boy, it has been a crazy week.  We had three large trees removed from the yard.  The yard now looks like a  disaster area.  Had crews here for three days.  That part is all done, but now I have to clean up and try to restore my yard to it's previous condition.  I am heading to the nursery tomorrow to look for two small trees and a few shrubs to fill the void left by the mature trees that were removed.  I should be done with this project some time next year.  LOL.  I may have to change the shape and size of one of the beds, but I may leave that for next year.  I just want to get my hostas back in --hopefully this week.  I had to dig up 40 hostas so that the plants would not be destroyed by the tree removal.  Really need to get those back in the ground. Lots of work for me!  And,  my husband is still quite sick with pneumonia.  He has been off work over two weeks now.   I hope he will start to feel better this week.

Well, let's get to some card making projects.  I saw a technique a while ago on the Hero Arts blog that used heat embossing, a reverse stamp (with recessed image), and markers.  I had the stamp that was in the sample and finally got around to trying this technique  a couple of weeks ago.  Really fun technique.   This stamp is from Hero Arts and is called Flower Medley (K5361). It is available on the Simon Says stamp site.


  • Stamp the reverse stamp with VersaMark ink
  • Heat emboss with White embossing powder.  Make sure to completely cover the image with powder.
  • If you do miss a few spots, trim the image down and you can still use it.

The background is all white embossing powder


  • When the embossing powder is cool, color in the recessed areas with Markers
  • Wipe the markers' ink off the white embossing with a paper towel or rag


This is such a quick and easy technique that I ended up making four cards!! 


I added a die cut butterfly (AMuse Studios) on this card.


This card uses a piece of background I made with a Gelli Plate.


*****************I am going to put one of these in the mail for Maddy Justice (a cancer patient).  I read about her on the Simon Says Stamp blog.   They are holding a card drive for her while she going thru treatment at St Judes.  This will be my third card to Maddy.   I sent one last year during part of her treatment and another a month ago.      ****************

Oh, I guess that is it for now.  I will be back in a few days with another Lost Coast Designs project and something fun made with Blockhead stamps.

Reminder:
****The Blockheads store wide sale is still going on---35% off everything in the store.  Stock up on inks and those hard to find re-inkers.  

 I hope you are having a great weekend!!  See you soon.  Love ya.
Karen

Wednesday, June 5, 2013

Use Those Ribbon Scraps to Embellish Cards

Hi Dreamers!
I am back again today with a fun idea for using some of those small bits of ribbon that we all have in abundance.  Don't throw those out!  Use them to embellish your projects.  I gathered up ribbon scraps in oranges, reds, browns, and cream to jazz up a card.  Take a look at the card!---Very Jazzy!!


Finished size: 4 1/2" x 6 3/4"


Materials List:
Willow colored Crinkle Silk ribbon from May Arts
Cream Bullion Trim from May Arts
Scrap Ribbons in orange, reds, brown, and cream
Stamp:Two Vine Scroll (CG174) Hero Arts
Ink: Jet Black Archival (Ranger)
Crafters Workshop Template - Cosmic Swirls
Spray inks
Fabri-Tac Glue
Cardstock: cream, orange, and  black


Instructions:
  • Make a black card base and layer with orange CS
  • Make the background of the stamped piece by placing the Cosmic Swirls template over cream CS and spraying with spray inks
  • When the background is dry, stamp the Hero Arts stamp with Jet Black ink
  • Add stamped piece to center of card with dimensional adhesive 


  • Starting at the bottom on the card, begin gluing ribbon by folding  the small lengths of ribbon in half and placing a drop of glue on the ends of each piece
  • Continue up the sides and finishing with the top of the card
  • Trim the ends of the ribbons


I  used only scraps for the entire surface, except for the lacy trim and the bow at the top of the card.  I did have to cut these two pieces.  To cover the ends of the ribbons at the top of the card, I glued a piece of the lacy bullion trim.  Tie the wide willow colored silk May Arts ribbon in a bow and glue to the card.


So, now I know you won't throw out those little bits and pieces of your beautiful ribbons!  This idea would also be great on scrapbook pages, altered items, and small wall hangings.  I am actually going to use this piece as a small wall hanging.  I can tuck it in a small space for a pop of color.  I bet you are saying to yourself, "But, Karen, how do I store all my ribbon scraps?"  Stayed tune for my next post!  I have a fun idea for storing your ribbon scraps coming up! And, you guessed, I did use ribbon!!  LOL


******How about a few fun Challenges for my Ribbon Scrap Art
Craft-room Challenge:use your scraps
Loves Rubber stamps: anything goes
Paper take Weekly: anything goes
Use It Tuesday: anything goes
Simon Says Stamp and show: use things beginning with "S"----I used scraps, swirls, stamping

Okay, I will see you next time for my ribbon scrap storage idea!!  Have a lovely day.
Love ya.
Karen

Ribbon Rosettes Tutorial and Card

Hi Everyone,
I am back today with the one of the ribbon ideas I have been promising!  I will show you how to make pretty ribbon rosettes that can be used in a variety of ways.  I added mine to a card, but they could be used on a headband, jewelry, a scrapbook page, alters items, etc....  Let's look at the finished card first.


Materials List:
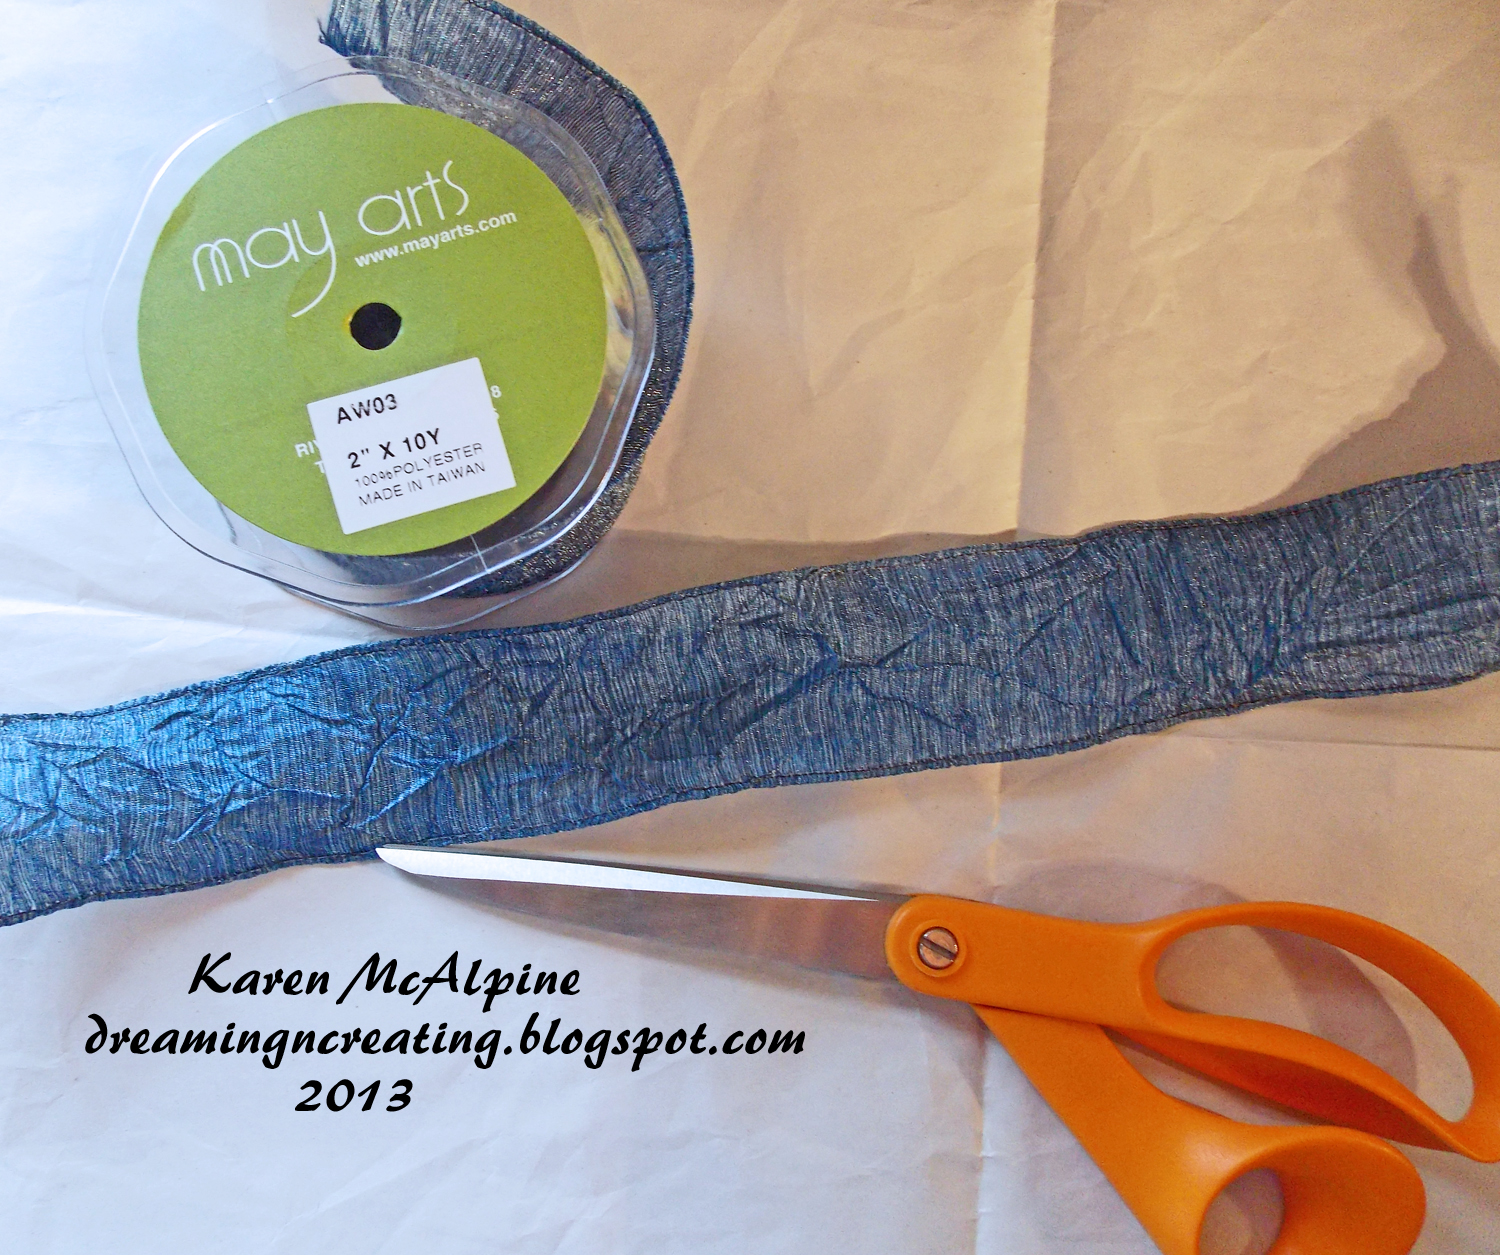
Blue Wired Crinkle Ribbon (AW03) May Arts
Stamp: Flower Text (S5506) Hero Arts
Ink: Onyx Black VersaFine
Ranger Distress Markers: Crushed Olive, Shabby Shutters, Mustard Seed, Weathered Wood, Faded Jeans
Cardstock: white, black, and Not Quite Navy (Stampin' Up)
Yellow Crystal Stickers 10 mm-Mark Richards
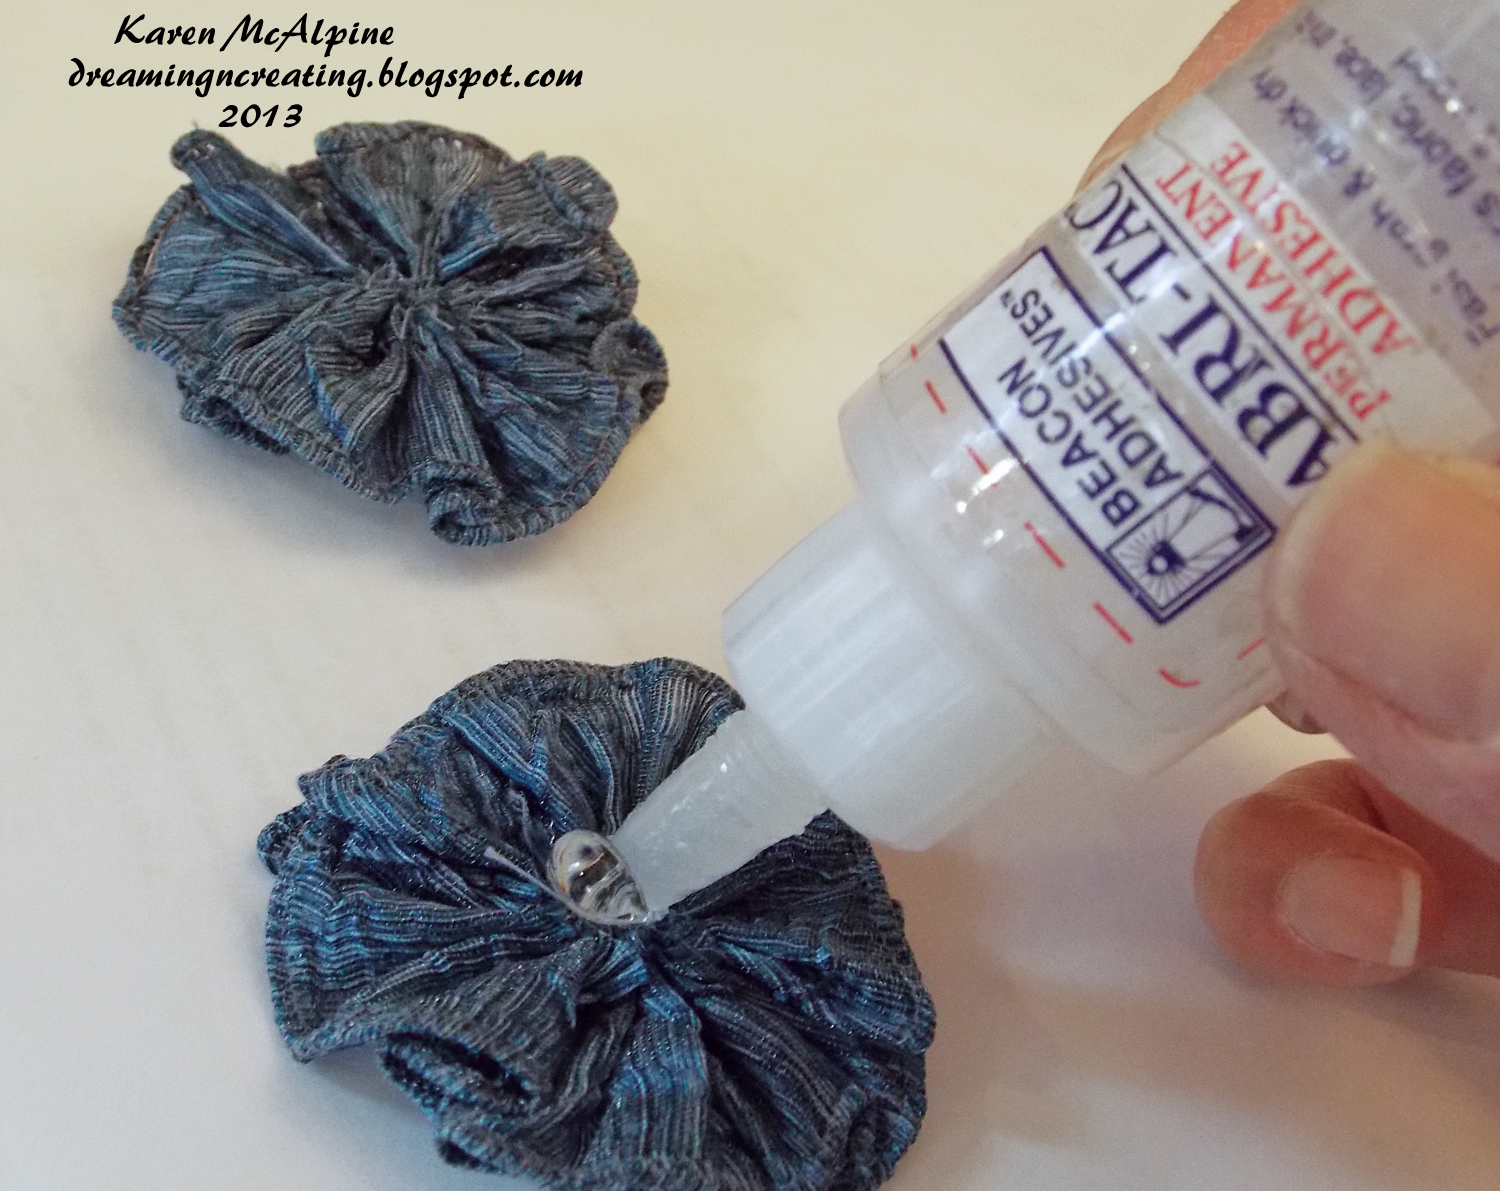
Fabri-Tac Glue
Sharp Scissors


Instructions:


  • Cut a length of the Blue Wired May Arts Ribbon   


  • An eleven inch piece of ribbon will  make  2 two inch rosettes


  • Cut the ribbon in half lengthwise with a sharp pair of dressmaking shears


  • Sew the two short ends together with needle and thread ( I used regular sewing thread)
  • Make a small knot on the top edge so that the stitches made on the short end don't gather up


  • Run gathering stitches down on long edge


  • Begin to pull the stitches to gather the ribbon


  • Pull the thread to tightly gather the ribbon 
  • Now your rosette has taken shape.


  • Take several more stitches across the center of the rosette to secure the ribbon 
  • Knot the thread and cut the thread


That's it!  Wasn't that easy!!  Now you are ready to decorate a project with your hand made embellishment.  ***If you use a narrower ribbon, skip the step of cutting the ribbon in half lengthwise.  


Here is how I completed my Card:
  • Make a card base with Not Quite Navy CS
  • Layer with Black CS
  • Stamp the Hero Arts stamp on white CS with Black Onyx ink


  • Color the flowers with Distress Markers with the colors listed on the Materials list
  • Add to the card base


  • Use Fabri-Tac glue (or another strong craft glue) to attached the rosettes to the card
  • Add the large Yellow gems in the center of the rosettes  ( I used the Fabri-Tac glue on the gems too)


Wouldn't you love to receive this card??  I think it would be great for a birthday, get well, or a thinking of you.  You could make a bunch of the rosettes ahead of time and keep them for future use.  I like to keep a few on hand.  But, sometimes I make them specifically for  a particular project. 
 I hope you will try to make these fun hand made embellishments.  

*****A Few fun Challenges for my Folk Art flowers
Challenges 4 Everybody: anything goes
Stamping Sensations: summer blooms
ABC Challenge: O is for open
Crafting Musketeers: use a stamp
Creative Moments: lots of layers
************

I will be back later with an idea that uses some of those ribbon scraps!!  Don't throw those away!!
I wish you a happy day.  Love ya.
Karen