Showing posts with label Graduation Cards. Show all posts

Wednesday, October 4, 2023

Girlie Graduation Card

Hello Crafty Friends,

I made this card for a friend who graduated from college.  Her degree is in commercial art.  So, I wanted to make an artsy card.  I may have gotten carried away with the bright pink ribbon.  Well, you can never have enough ribbon, can you?!  
I used multimedia paper (Strathmore) to stamp on and colored with watercolor markers. 


 Very cheerful!  I love the gigantic pink ribbon!  

Next time I will share a group of fall themed cards I made with stickers. 

See you then.

Karen

Thursday, June 10, 2021

Graduation Card

 Hello Everyone,

Here is an idea for any graduates in your life. This card is pretty feminine as I made it for a lovely young lady. I used an easel format.   


I stamped on chalkboard paper with chalk ink.


Inside of card.


So glad you stopped by today!  See you next time!

Karen

Friday, June 21, 2019

Congratulations Graduate!

Hello Everyone!
Wanted to share this card I made for my niece, Christina.  She graduated with her Associates degree in Health Information Tech.  Her favorite color is Aqua....

The envelope was also decorated with Cardstock and ribbon.


Three different dry embossing folders were used on this card.
I started with a dark teal card base.  I dry embossed the stripes on a medium toned aqua cs.  The white cs was dry embossed with a graduation hat folder and layered onto the dark teal cs.


The sentiment was also dry embossed on gold paper.  I added a teal ribbon and some Liquid Pearls dots on the corners.


Here is a better look at the graduation hat dry embossing.


So, turned out pretty nice and a fun way to utilize all the embossing folders that we have in our stashes.....

So glad you stopped by today!  Hope you are having a sweet day.
Karen.

Monday, July 23, 2018

Steampunk Graduation Card

Hello Everyone,
I wanted to share the graduation card I made for my nephew's college graduation.  (Yes, we are all soooo proud of him.)  His degree is in mechanical engineering.  He likes Steampunk designs, so this is what I came up with.  I used a teal and brown color combination (which I think worked really well with the theme and images).


On the inside, I stamped the sentiment once in each of the two colors, cut the sentences apart and layered each segment.


I also added some stamping to the envelope.


Okay, so I will see you soon for more crafty funness (don't think that is a word, but I am going to use it anyway.  LOL  Have a great day!
Karen

Friday, June 5, 2015

Card for the Graduate

Hello Everyone,
Hope you are having a great day.  Wanted to share this grad card I made for a card order.  Used my favorite grad stamp from the Stamping Place.


I stamped on the Chalkboard CS (Stampin' Up) with Versa Magic chalk ink. Really nice results with this CS/ink combo.


This sentiment is from DRS Designs.  See you soon.  I am on vacation and will be back next week.
Karen

Sunday, July 13, 2014

Easel Graduation Card

Hi Dreamers!
Hope you are having a great weekend!  We had some workers here putting in some new steps to the patio door.  I am really glad to have that done.

Do you have any grad parties this summer?  I seemed to have made lots of graduation cards this year.  I made this Graduation Card for my husband's cousin.  Well, actually, I made a total of four cards in this design.  Two were easels and the other regular cards.  My neighbor needed two grad cards and my friend needed one too---I sold those three and made one to send to our cousin.


Materials:
Stamps: Graduates from The Stamping Place; Sentiment from DRS Designs
Decorative Paper: K & Company
CS: Various shades of lavender and Purple
Markers
Label Die Cut: A Muse Studio
Sheer Peacock Blue Ribbon: Jo-Ann Fabric Store


Instructions:

  • Make an easel card from the dark purple CS
  • Add a layer of CS and  one of the DP
  • Stamp the image with black ink
  • Using the markers, watercolor the people
Here's how I watercolor with Markers:  Scribble the marker on an acrylic block and pick up the color with a slightly wet paint brush.   Fill the stamped area with color and pick up more water and color when the brush is dry.
  • Layer with dark purple CS and add to card


  • Tie a big bow in sheer ribbon and glue to top of card
  • Stamp the sentiment and die cut 
  • Add to the bottom 
  • Add a few pearls
  • Make the envelope pretty too by adding a piece of the DP to the flap


*********A Few Fun Challenges for my Easel Graduation Card:
Amusing Challenge: watercolor
Crafty Hazel Nut's Paper: use Decorative paper
Penny's Paper- Crafty: anything goes
Fussy and Fancy: all about girls
Sister Act: anything goes
Charisma Cardz: anything goes
Red Rubber Designs: anything goes with stamping
DRS Designs: cool colors or cool theme---I used a cool color scheme and a DRS           Designs sentiment

That's about it for now.  I will be back this week with more all occasion cards and another Lost Coast design card!!  Sound fun??  Yes, it does......  LOL  See next time!  Love ya.
Karen

Friday, June 27, 2014

Graduation Card and Announcement for My Nephew

Hi Dreamers!
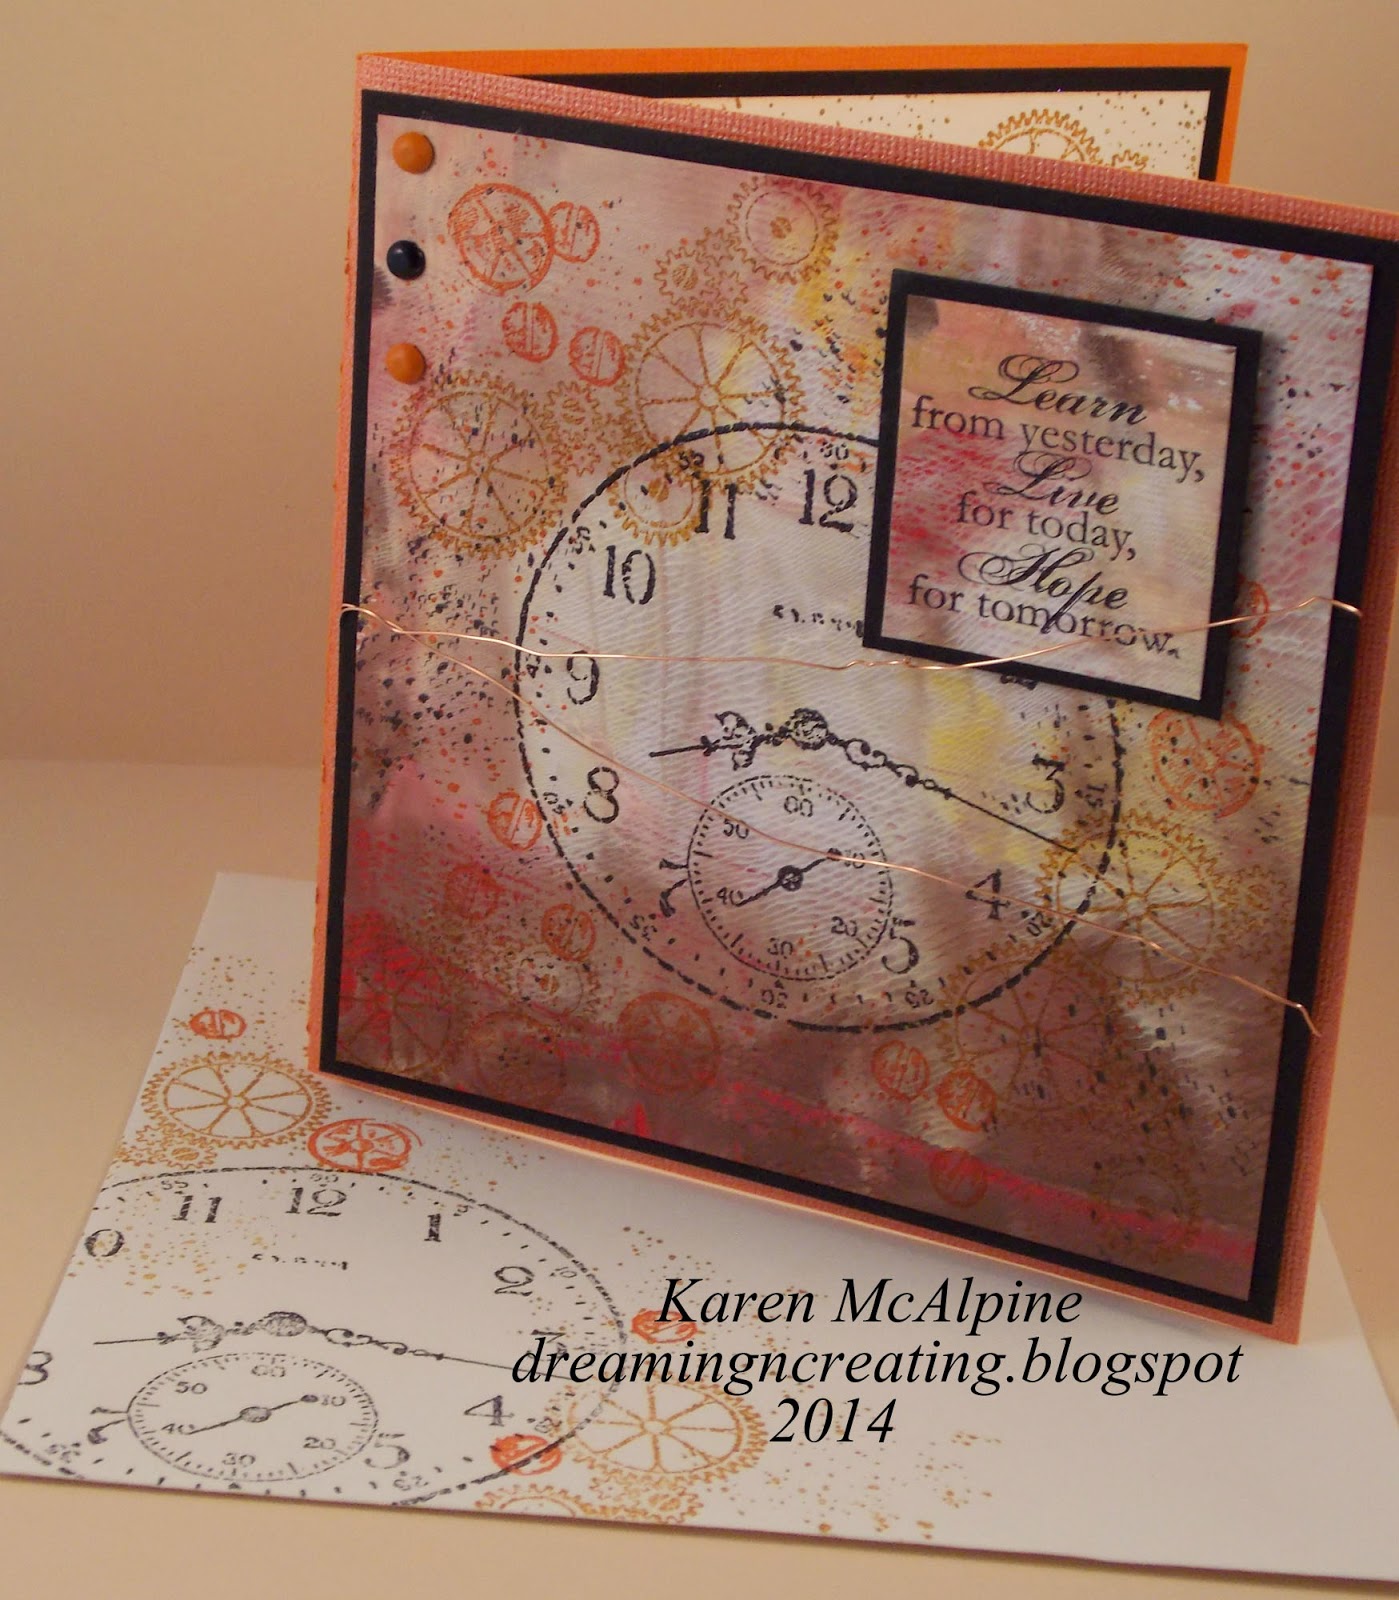
It is that time of year again when we send the young out into the world--the poor things.  LOL  My youngest nephew graduated from high school this month.  My brother asked if I could make an announcement for him.  I thought I could give it a try.  Here is the announcement that I made in Photoshop Elements.


I also needed  a Graduation card for him.   Still trying to think of a nice gift.......  His party is in July, so I still have time to come up with something.  Here is the card.


Materials List:
Stamps: Sense of Time, Aged to Perfection, Itty Bitty Backgrounds--Retired Stampin' Up sets  
Ink: Jet Black, Rusty Brown, Saddle Brown --Stazon 
CS: White, Black, Orange
Brads: black and orange
Cooper Wire
mono printing Plate
Acrylic Paints: white, brown, red, and yellow
Brayer


Instructions:

  • Make a card from orange CS
  • Use  a mono printing Plate to mono print the background---to see a tutorial on how I use the mono printing Plate, go here.   Note: I only brayered on the ink and did not press anything into the paint for this background.
  • Cut the background to size and add a layer of black CS


  • Begin stamping with the clock face in Jet Black ink.  I used Stazon inks as I was stamping on paint
  • Stamp the gears and other stamped elements
  • Use the Itty Bitty Background stamp to add the dots in black and brown inks


  • Add three brads  to the upper corner of the background
  • Add the wire wrapping around to the back side and secure with a Zot
  • Attached the stamped background piece to the card base with Zots 3-D dots
  • Stamp the sentiment on a leftover piece of the background
  • Layer with black CS and add to the  card front


  • On the inside, do a bit more stamping and add another sentiment---This one is from DRS Designs


Ans now, how about a few challenges for my Grad Card!!!
Simon's Wednesday Challenge: anything goes
Crafty catz: anything goes
Stamping for the Weekend: anything goes
Ruby's Rainbow: stamping
Scribbles Designs: say it with a sentiment
Lori's Mandarin Orange Photo art


I hope you enjoying summer!!  We are having great weather here in Michigan.   I was out in the yard today watering and weeding.  Put in a few more tomato plants that I had left over.  I bought a few too any.  So I just tucked them in here and there in some of the flower beds.  Not sure what I will do this weekend.  My husband will be busy with his band--playing at the country club.  Maybe I can get some cards made!!  Have a super day!  See you next time.  Love ya.
Karen

Saturday, August 10, 2013

Feminine Congratulations Card with Fabric Accents

Hi Dreamers!
In the midst of the weekend here.  My husband has finally been released to return to work!  He has been off sick for 10 weeks and the doctor felt he was well enough now to go back to work.  My husband has turned the corner and feels much better.  If you remember, he had pneumonia and then that was complicated by hypothyroidism.  So, he was  really feeling rotten and so weak. We are both really glad that he is doing better now!
Now, let's look at a card!  I made this feminine Congratulations card using a stamp from Hero Arts- Antique Keys.  I did lots of distressing and added some fabric accents.


Materials List:
Stamps: Hero Arts – Antique Keys (CG178)
Congratulations – My Sentiments Exactly;
Card Stock: Rich Razzleberry –Stampin’ Up; Coral and Pink –Bazzill;
White -Staples.
Inks: Cherry Cobbler Pigment- Stampin’ Up 
Vintage Photo, Spun Sugar, and Victorian Velvet Distress Ink from Ranger
Other: Sheer Creations Ribbon Celebrate It- Michaels
Kassies Brocade Cuttlebug Embossing Folder 
Clear Super fine Embossing Powder-Ranger
Zots 3-D Clear Adhesive Dots from Therm-o-Web
Fabric Scraps
Thread and Needle 
Fabri-Tac Glue from Beacon Adhesives.


Instructions

  • Make a card from Pink CS.  
  • Dry emboss a rectangle of Coral CS and distress with Victorian Velvet. 
  • Layer rectangle with Rich Razzleberry CS and add to the left side of card.  
  • Tie ribbon around card.  


  • Stamp Antique Keys with Cherry Cobbler pigment ink; heat emboss with clear powder.
  • Apply Distress Inks starting with the lightest shade and ending with darkest. 
  • Layer stamped piece with Rich Razzleberry CS.


  • To Make Fabric Poufs: Cut 2’’ circles from fabric scraps.  Run small stitches along outside edge.  Pull stitches tight and fabric will form into pouf. Try to flatten the pouf on the gathered end; knot the thread.  Glue the poufs  to the backside of the stamped piece with Fabri- Tac glue. 
  • When glue is dry add the piece to the card front with 3-D Zots.  
  • Stamp sentiment and color CS with Distress inks 
  • Cut out sentiment and layer with Rich Razzleberry CS  
  • Add to card front.  


I use this design for Graduations cards (changing the color scheme for masculine cards), but it would be great for any kind of  congratulation card  -  like retirement, house warming, anniversary, etc...  Just add an appropriate sentiment to the inside.


********Challenges for My Feminine Congratulations Card:
Inspire Me Fridays: anything goes
Brown Sugar: anything goes
Allsorts: stitching--I stitched the little fabric poufs
Crafty Calendar: anything goes
One Stop Craft: use pastel colors

I hope you are enjoying the weekend.  We are having a quiet weekend here. Don has to rest up a bit to meet the demands of his first day back to work on Monday.  I did some sewing this week--mending mostly.  But I still had time to make a bunch of owl and bird themed cards--using only scraps.  I like to challenge myself to use only scraps once in awhile---it's fun!!  I will have those for you later in the week.  See you then!  Love ya.
Karen

Monday, July 8, 2013

Grad Cards--Feminine and Masculine

Hi Dreamers,
I have been making a few special order cards this last week.  The order was for a feminine and a masculine Graduation card.  For the girlie card, I used a large sentiment with flower stamp from American Stamp Company.


I did a bit of coloring with Copic Markers and die cut the image with a Spellbinders die.  The DP is from K & Company.


For embellishments, I added ribbon and pearls


Just a simple congratulations of the inside.  Lots of room to write a nice note too.


And the masculine card:


I started with some DP from Basic Grey and stamped a clock face and gears (Stampin' Up).  And did some distressing with Distress inks (Vintage Photo and Faded Jeans).


Add a nice sentiment for a focal point.


On the inside, I added a sticker graduation cap; and more sentiments ( A Muse studios)


Stay tuned tomorrow for more of my Bug Themed cards--more ladybugs!!  Sound fun??!!  Hope you are having a great day!  Love ya.
Karen