Showing posts with label Gelli Plate. Show all posts

Wednesday, June 17, 2015

Mandelas with Lost Coast Designs Stamps

See more details here
Lost Coast Design Challenges will now be held on the Portal to Creativity Blog along with other fun events:
Current events--June Challenge: Numbers
and

You may now use any stamps--not just Lost Coast Designs on the challenges and Skellie Fest!!!!


******************************************
Hello Everyone!
I wanted to share with you two projects I made with Lost Coast Design Stamps new release.  The backgrounds are made with a Gelli Plate.  I made two cards with the background paper and added different ribbons to each piece.


Materials List:
Stamps: Light Mandelas from Lost Coast Designs
Ink: Jet Black Archival Ranger
CS: White, black, rose, Early Espresso Stampin' Up
Mono printing  Plate
Acrylic Paints
Empty Plastic ribbon reel
Rhinestones
Ribbons
Yarn

 Card #1

Instructions:

  • Make card bases from Early Espresso and rose CS
  • Backgrounds: add acrylic paints to the surface of mono printing Plate with a brayer
  • Press the plastic ribbon reel into the paint and remove
  • Press a sheet of white CS onto the mono printing Plate and smooth surface with hand
  • Pull CS up and let dry
  • Cut background into pieces to fit your card size

  • Stamp the Light Mandelas with Jet Black ink inside the circles made by the ribbon reel --Just amazing how well the stamps fit into the circles!  
  • Add  the background paper to the card bases
  • Add rhinestones around the circular motifs
  • Wrap ribbon around card 
  • Staple  additional ribbon pieces to wrapped ribbon
  • Tie a piece of ribbon in a  knot and glue to other ribbons
                                                           Card #2

  • On card two, Cut around one of the circular motifs so that it extends pasts the edge--I cut this by hand with scissors
  • Wrap yarn around card and tie ribbons onto yarn


Love this stamp set!!  Check out all the fun, artistic images available from Lost Coast Designs.  The images also look fab on white CS  colored with markers!!

*&*&*&**&***&&**&&**&*
Entering my mono printing Plate projects in:
Simon's Wed Challenge: use your fav technique or product----Gelli Plate background technique


 So, see you again soon!!  Love ya
Karen

Wednesday, September 17, 2014

Biking with Lost Coast Designs

Hi Dreamers!
How is your week going?  Everything is just dandy here.  Working on some cards---looking towards fall and the holidays.   Today, I have a fun bike riding bird from Lost Coast Designs to share.  The background was made with a mono printing Plate.  Take a look.


Materials List:
Stamps: Bird on Bike and Party Words from Lost Coast Designs
CS: white, More Mustard (Stampin' UP); green
Ink: Black Archival
Distress Inks: Mustard Seed and Bundled Sage
mono printing Plate
Acrylic paints- yellow and white
Empty ribbon reel
Green ribbon


Instructions:

  • Make the background with a mono printing Plate--cover the plate with yellow paint and press the empty ribbon reel into the paint to make an impression.  Press the mustard colored CS into the paint.  Let the paint dry and cut a piece for the background
  • Make a card from White CS and layer with green
  • Tie a knot in the end of two pieces of ribbon
  • Tuck the untied ends under the background piece and secure with glue
  • Add the background piece to card front


  • Stamp "Bird on Bike" on White CS with black ink
  • Tear out the image
  • Distress with Distress inks
  • Add to card
  • Stamp sentiment on mustard CS and tear out
  • Add to card


How about a few fun challenges for my bike riding bird??!!
Paula Holifields: distress it
Artistic Stamper: fall colors
Cardz for Guys: no pattern paper

Oh, I guess that is it for me tonight.  I think I will put my feet up for a few minutes.  Had a busy day running errands today.   Tomorrow, I can get in the studio and work on a project.  I hope you have a great evening.  Love ya.
Karen

Friday, June 27, 2014

Graduation Card and Announcement for My Nephew

Hi Dreamers!
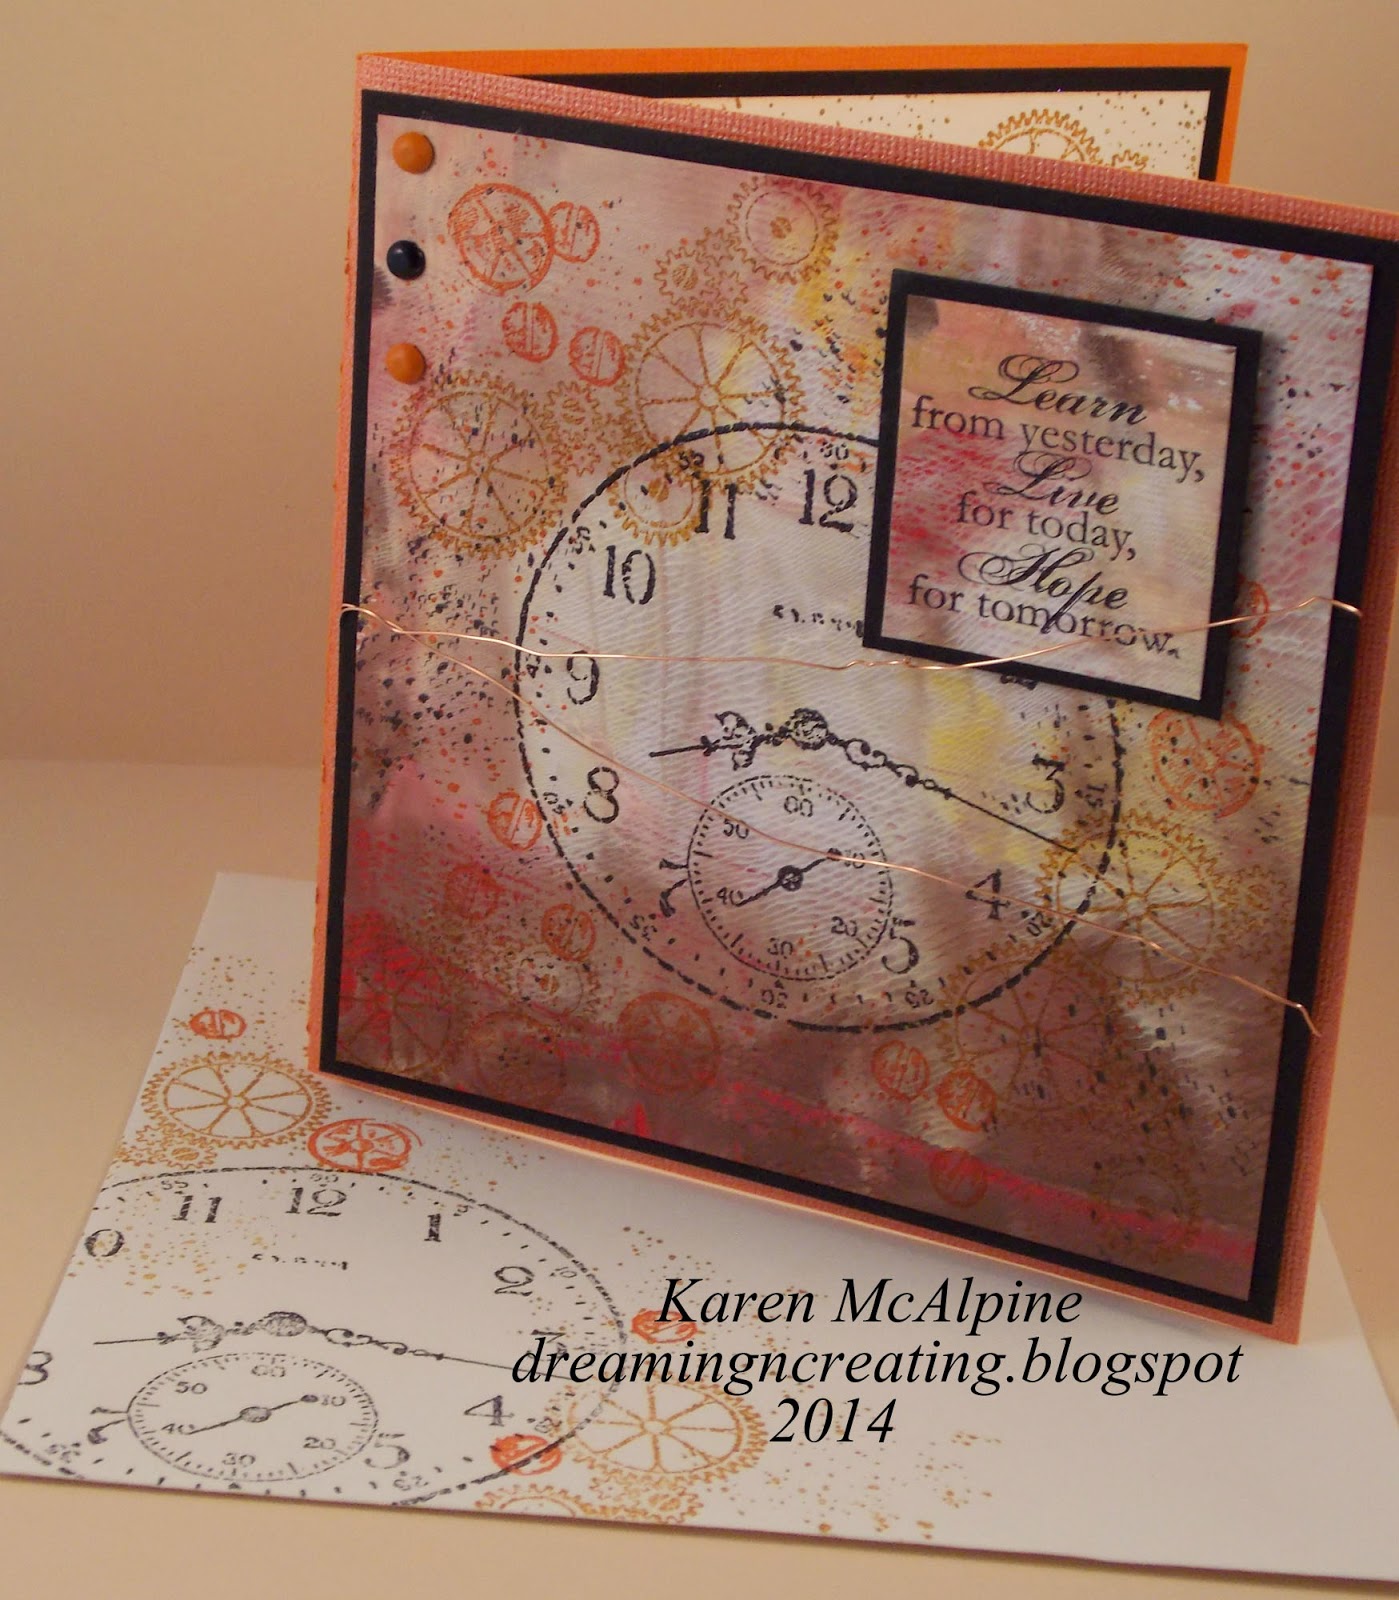
It is that time of year again when we send the young out into the world--the poor things.  LOL  My youngest nephew graduated from high school this month.  My brother asked if I could make an announcement for him.  I thought I could give it a try.  Here is the announcement that I made in Photoshop Elements.


I also needed  a Graduation card for him.   Still trying to think of a nice gift.......  His party is in July, so I still have time to come up with something.  Here is the card.


Materials List:
Stamps: Sense of Time, Aged to Perfection, Itty Bitty Backgrounds--Retired Stampin' Up sets  
Ink: Jet Black, Rusty Brown, Saddle Brown --Stazon 
CS: White, Black, Orange
Brads: black and orange
Cooper Wire
mono printing Plate
Acrylic Paints: white, brown, red, and yellow
Brayer


Instructions:

  • Make a card from orange CS
  • Use  a mono printing Plate to mono print the background---to see a tutorial on how I use the mono printing Plate, go here.   Note: I only brayered on the ink and did not press anything into the paint for this background.
  • Cut the background to size and add a layer of black CS


  • Begin stamping with the clock face in Jet Black ink.  I used Stazon inks as I was stamping on paint
  • Stamp the gears and other stamped elements
  • Use the Itty Bitty Background stamp to add the dots in black and brown inks


  • Add three brads  to the upper corner of the background
  • Add the wire wrapping around to the back side and secure with a Zot
  • Attached the stamped background piece to the card base with Zots 3-D dots
  • Stamp the sentiment on a leftover piece of the background
  • Layer with black CS and add to the  card front


  • On the inside, do a bit more stamping and add another sentiment---This one is from DRS Designs


Ans now, how about a few challenges for my Grad Card!!!
Simon's Wednesday Challenge: anything goes
Crafty catz: anything goes
Stamping for the Weekend: anything goes
Ruby's Rainbow: stamping
Scribbles Designs: say it with a sentiment
Lori's Mandarin Orange Photo art


I hope you enjoying summer!!  We are having great weather here in Michigan.   I was out in the yard today watering and weeding.  Put in a few more tomato plants that I had left over.  I bought a few too any.  So I just tucked them in here and there in some of the flower beds.  Not sure what I will do this weekend.  My husband will be busy with his band--playing at the country club.  Maybe I can get some cards made!!  Have a super day!  See you next time.  Love ya.
Karen

Monday, March 24, 2014

Blog Hop--Lost Coast Design Teams Up with Stencil Girl!!

April 2 update: The Blog Hop Winner is PK SEWS!  

Congrats, PK!!!!


Hello Everyone,
You have arrived at Karen's blog:

Welcome to the Lost Coast Design/Stencil Girl Blog Hop!!


The Design Teams of Lost Coast Design and Stencil Girl have joined forces to bring you lots of inspiration and project ideas!  
We have all made projects using Stamps from Lost Coast Designs and Stencils from Stencil Girl.
Visit all the blogs along the hop and leave a comment!  All commenters will be entered in a drawing and one lucky commenter will win: 


Two  9 x 12" Stencils from Stencil Girl And  $25 Gift Certificate from Lost Coast Designs


Hoppers will have one week to leave comments (Until Sunday, March 30).  The more comments--the better the chances of winning the prize package.  The winner will be announced April 2


*****For my project, I used a Stencil (Gigi D150) and a Gelli Plate to make backgrounds.  I then used the paper to make a cover for an accordion book which I decorated with lots of Lost Coast stamps.   I also made a tag incase I want to give this as a gift.  Take a look at the finished projects.


Materials List:
Stamps: All from Lost Coast Designs--
Stencil Girl Stencil --Gigi S150
Inks: Memento Rich Cocoa, Rhubarb Stalk, Toffee Crunch, Espresso Truffle
Archival Jet Black and Coffee
Acrylic Paints
CS: Cream and white
Other Tools:
Score Pad
mono printing Plate
Brayer
Martha Stewart Edge Punch
Ribbons, lace, bakers twine, gold elastic cording

Instructions:
I will start by showing how I made the background papers with the Gig Stencil and mono printing Plate
  • Brayer acrylic paints onto the mono printing Plate--I used red, white, and brown


  • Press the Stencil into the paint


  • Press a full sheet of White CS onto the mono printing Plate.  Run your hand across the entire surface to pick up all the paint


  • Lift the paper from the mono printing Plate


Look at the gorgeous papers!!  I usually make a stack since I have a big  mess anyway.  Be sure to wash the paint off the stencils!!


Select your favorite piece of the paper.   I found this book pattern in the, "Mini Books".  I changed the size a bit.  Here are the measurements I used.

  • Cut the paper 5.5" x 10"
  • Score the piece at 3",   3.25",   6.75",  7"


  • Cut the corners off one end


  • On the opposite end, cut a slit in the paper about 1.5" from the edge and  .75" from the top and bottom


  •  Fold on the score lines and it will look like this


  • When closed the cut end will slip inside the slit


  • Make the pages from Cream CS: Cut Two at 5.25" x 9.75"
  • Score each at 3.25"  and   6.5"
  • Fold like an accordion


  • Over lap the ends and glue securely


  • Decorate the cover and pages with stamping: use the Archival ink on the paint surfaces. 
  • Stamp The Divas with dye ink on Cream CS and cut out the images
  • Use smaller pieces of the background papers to decorate the pages
  • Let you imagination go!!


Cover
  

  • To keep a unified look use stamps with the same theme--like the Divas here
  • I stamped the same Mums border in the same color ink on all the pages to tie everything together


Pages


  • Add bits of ribbon and lace, some bakers twine too

Page


Page


  • When pages are all decorated, glue to the center of the cover and fold in the pages
  • Add some colored paper to inside of the cover if desired--Make sure to cut the slit in the colored paper too.


  • Fold the cover closed tucking in the flap.  I added a piece of gold elastic cord.

Now, continue on the hop by visiting Leslie Tucker Jenison's Blog  and checking out her great project!!

Don't forget to leave a comment!


Blog Hop Roll


  • StencilGirl Talk
  • LeighSBDesigns
  • Mary Beth Shaw
  • Mary Nasser
  • Cherri Robb
  • Judy Shea
  • Bibiana Martinez-Ziegler
  • Linda Kittmer
  • Carolyn Dube
  • Leslie Turner
  • Janet Joehlin
  • Karen McAlpine ---YOU ARE HERE
  • Leslie Tucker Jenison
  • DominoARTblog
  • Lindsay Weirich
  • Maria McGuire


  • Thanks for visiting!!  Hope you have fun looking at all the other fab projects!!!
    Karen

    Saturday, February 22, 2014

    Romantic Cameos in shades of Apricot

    Hi Dreamers!
    How are you doing this fine Saturday??!!  We haven't had any snow for a whole day so that is good!!  And, the sun is actually visible!  Nice change!  Now, on to some crafty fun.  I was inspired by the Simon Monday challenge of Cameos to make today's projects.  I said to myself, "Self, you have a whole set of Cameo stamps!"  Get busy!!  I used one of the six Cameos from the Lost Coast Design set called "Cameos".

    Materials List for both cards:
    Stamps: Cameo Set and Asmat Bones Border from Lost Coast Design
    Inks: 
    Stazon Jet Black and Saddle Brown
    Black Pigment
    Tea Dye and Antique Linen Distress 

    Distress Markers
    Acrylic Paints
    mono printing Plate
    Lumiere Paint
    CS: Bazzill
    Watercolor paper
    Blue Pearls


    I was making backgrounds with my mono printing Plate the other day (I will show you more pics of those in a later post).  I thought this Apricot colored background would be really cool with the Cameo.

    Let's take a look at card #1


    • I used acrylic paints on a mono printing Plate to make this background.  The paint colors used: brown, yellow, white, and red.


    • The Cameo was stamped twice. With Saddle Brown Stazon first and then with Jet Black Stazon directly onto the Acrylic paint background.  
    • Asmat Bones Border Stamp  (only $1.00 on the LCD web site!!) from Lost Coast Designs was stamped with Saddle Brown
    • I added a piece of velvet fabric---I was thinking that often Cameos are worn on velvet ribbon around the neck.


    Card two uses the same Cameo Stamp:


    • Stamp the Cameo with Black Pigment ink and heat emboss with black powder on cream CS
    • Color the Camaro with Tea Dye, Shabby Shutters, Tumbled Glass, Worn Lipstick, and Dried Marigold Distress Markers
    • Tear out and distress with Antique Linen and Tea Dye Distress Inks
    • Brush a little bit of Lumiere Acrylic paint on the edges


    • To make the watercolored piece: on a craft sheet scribble the blue maker and spritz with water; press a piece of watercolor paper into ink.  Repeat with Tea Dye Ink refill and other markers
    • Cut a rectangle from the  watercolored paper
    • Layer onto CS and brown wrapping paper
    • Add blue pearls


    ***************Challenges for my romantic Cameos:
    Simon Monday: Cameos
    Artistic Stamper: use distress
    Country View: use paint
    Allsorts: ladies day


    Now, go and enjoy your weekend!  Make sure you set aside some time to stamp--it is therapeutic.  See you next time!!  Love ya
    Karen

    Tuesday, March 19, 2013

    Bon Voyage with Blockhead Stamps

    Hi Dreamers,
    Welcome to new followers!!  So glad you have joined us here in Dreamland.  Travel is the theme today.  All the designers on the Blockheads' blog are showing ideas for using your travel themed stamps.  We are traveling to the far east today.  I used my mono printing Plate to create a background that perfectly showcases this Asian style stamp.


    Materials List:
    Stamps: Japanese Moonlight, Japanese Musicians, Vintage Travel (the sentiment) all from Blockheads
    Inks: Northern Pine Memento; Black Soot Distress Ink - Ranger
    Lulu Lavender Memento Marker
    mono printing Plate
    Acrylic Paints
    Oriental Weave Set and Corners and Damask set-Embossing Folders from Cuttlebug


    Instructions:
    • Make the background with a mono printing Plate, acrylic paints, white CS, and embossing folders
    • When paint is dry, stamp the Geisha, flower, and Sentiment with Northern Pine ink
    • Color the flowers with the marker
    • Distress the edges with Black Soot ink.


    • Layer onto a dark Lavender card base and dark green CS
    • Add Lavender rhinestones


    • Add the ribbon detail -- run a line of Fabri-Tac glue along edge of card.
    • Pleat the ribbon pressing it into the glue.
    • Tie a bow and glue to top of the pleated ribbon


    • On the inside, stamp the flower and color with marker
    • Sponge a bit of the Northern Pine ink on the edges.
    • Leave lots of room to write a nice note to someone special.


    How about a few fun challeges!!
    Craft Your Passion;ribbon or lace
    Kaboodle Doodles: anything with frills
    Pause Dream Enjoy:anything goes
    Mark's Finest: green

    I did get a few Easter Cards finished.  I made them quick and easy.  I used some pretty papers, rub ons, and some pre-cut shapes.  I also found some tulips that I had stamped previously.  I will share those with you this week.
    Check out my Published Work page for updates.   You can find my work in Take Ten, Scrap and Stamp Arts, and Just Cards this month.  

    Hope you had a great weekend and your week has started off well.  I will be back tomorrow with something to tempt you to get out those stamps and make a few cards.  Hope you have a great day!  Love ya.
    Karen