Thursday, December 4, 2014

Merry Moosemas-Fun Christmas Card

Hello Dreamers!
I am slowly getting all the pics of my Christmas cards edited and ready for posting.  I don't seem to be able to spend as much time on the computer lately.  Have lots going on and am trying to do some house cleaning too.  But, I did get this set of card photos edited!
For today, I have a set of three brightly colored Christmas cards made with a fun Moose stamp from Stampin' Up.  Check them out:


Materials:
Stamps: Visions of Santa - Stampin' Up; sentiment on inside: The Artful Stamper
CS: Green Polka Dot from A Muse Studios; reds and green
DP: red and green
Ink: Black; Real Red, Old Olive, Crushed Curry- Stampin' Up
Copic Markers
Ribbons
Scallop square punches


Instructions:

  • Make red and green card bases
  • Add a strip or  full piece  of DP
  • Stamp the Moose on White CS and color with Copics
  • Punch out
  • Tie two ribbons around card
  • Add sentiment
  • Decorate the inside


Variation two:

I cut tags from CS and DP.  And then  added them to the card bases.  Moose were colored with Copics.  Stars are stamped with Crushed Curry.

Variation three


Challenges for my fancy Moose Christmas cards:
Simon's Wednesday: holiday/Christmas
Crafting by Design: anything for Christmas
Crafty Hazelnut's Pattern Paper: anything with DP
4 Crafty Chicks: animals
Winter Wonderland: dies/punches
Amusing Challenge: anything goes

I will be back next time with more Christmas inspiration!   Are you making any cards this year??  Hope you have a great day!!  Love ya
Karen

Monday, December 1, 2014

Vintage Stamping Challenge-Christmas Songs

Hello Everyone!
Hope everyone had a great weekend.  It is the first Monday of the month and that means a new Challenge on the Vintage Stamping Challenge blog.
The theme for this month is:

Christmas Songs

Make a project with stamping inspired by a Christmas song or carol.  The challenge runs through the month of December.  One winner will receive a $20 GC to Flonzcraft Stamps!!

**The carol that inspired my tri-fold Holiday card is "Here We Come A Wassailing"
Lyrics:
Here we come a-wassailing
Among the leaves so green;
Here we come a-wand'ring
So fair to be seen.

REFRAIN:
Love and joy come to you,
And to you your wassail too;
And God bless you and send you a Happy New Year
And God send you a Happy New Year.


Materials List:
Stamp: Merrie Christmas set from Flonzcraft Stamps
CS: Old Olive and Very Vanilla - Stampin' Up; rust red
Ink: Chocolate Chip - Stampin' Up
DP: Found Christmas pad - MME
Ribbon
Pearls
Scallop edge Punch
Dots Embossing Folder 


Instructions:
  • Cut a 5 1/2 x 8 1/2 " piece of rust red CS
  • Score at: 2 1/8" and 6 3/8"
  • Fold on the score line
  • Dry Emboss the bottom flap
  • Cut DP to fit the top flap and layer with Old Olive CS


  • Punch a strip of Old Olive and add to top flap
  • Wrap ribbon around top flap
  • Add Pearls 
  • Stamp the Merrie Christmas stamp with Chocolate Chip ink on Very Vanilla CS
  • Layer with red and green CS
  • Add to top flap with dimensional adhesive---Note: be careful to place the dimensional adhesive only on the top half of the stamped piece


Challenges for my Here We come A wassailing card:

Eclectic Ellapu: vintage Christmas
Stamp and Create: anything Christmas
Crafty Hazelnut's Christmas: anything Christmas
Crafty Calender: Christmas
ABC Christmas: Christmas music

Hope you will make your own project and link up on the Vintage Stamping Challenge Blog!!  I will see you again soon with more Christmas card inspiration.  Love ya.
Karen

Friday, November 28, 2014

Gibson Girl Vintage Card

Hello Everyone,
Hope all had a great Thanksgiving.  We went to my brother's for a yummy turkey dinner.  Spent the day with him, niece, nephews, and mom and dad.  Great day.  
I would like to share this vintage card today.  It goes with the tag ( see tag here) I made for the Vintage Stamping Anything But a Card Challenge...which is still open!!  Plenty of time to enter.


Materials List:
Stamps: Gibson Girl # 12 from Flonz Craft
CS: white; Blushing Bride (Stampoin' Up); grays
Ink: Gray Flannel Memento
Copic Markers
Dot Stencil- Stampin' Up
Wide Sheer Pink and Gray Satin Ribbons
Rosa Embossing Folder - Cuttlebug
Oval die cut - Spellbinders


Instructions:
  • Make card from Blushing Bride CS
  • Layer with dark gray CS
  • Stamp Gibson Girl with Gray Flannel ink on white CS
  • Color the image with Copic Markers


  • Die cut image and a layer of Blushing Bride with dies
  • Dry emboss light gray CS 
  • Wrap wide sheer ribbon around light gray layer and tie in knot
  • Add to card base
  • Add the die cut ovals to card with dimensional adhesive
  • Tie gray satin ribbon in knot and glue to the pink ribbon


Challenges for my Gibson Girl Vintage Card
4 Crafty Chicks: die cuts
In the Pink: pink and die cuts/punches
A creative romance: something old---I used a Gibson girl image
Brown Sugar: anything goes
Crafty Catz Weekly: anything goes
Simon's Monday: anything goes


Next time I will be posting Christmas cards.  I will be posting Christmas cards a couple times a week until the end of the year.  I hope you check back for a little inspiration and to say hi!!  See you then.  Love ya.
Karen

Friday, November 21, 2014

Christmas Card - One layer Made in Under 5 Minutes

Hi Dreamers!
Back today with a Christmas card that is super easy.  I was blogging around and saw a challenge to make a One Layer card in under 5 minutes (Mod Squad Challenge).  I thought I was up to that challenge!!  And, it sounded fun.....  So, I grabbed a few stamps and a piece of white card stock---


***** Christmas Sleigh One Layer Card- Total time to make - 4 minutes
Within the 4 minutes, I even had time to decorate the envelope.


Materials List:
Stamps: Work of Art and Open Sleigh from Stampin' Up; sentiment on inside from The Artful Stamper
CS:white
Ink: Real Red - Stampin' Up; Rich Cocoa - Memento
Ribbons


Instructions:

  • Make card from White CS
  • Ink the brush stroke stamp with Real Red ink and stamp 3 times without reinking
  • Stamp the sleigh and Merry Christmas with Rich Cocoa
  • Tie the ribbons in bow around card


  • Stamp sentiment on inside
  • Ink Sleigh stamp and stamp off once and then stamp on inside
  • Stamp one brush stroke and sleigh on the envelope
DONE!!!  In 4 Minutes.   
I liked it well enough that I made 3 more!!  LOL  Here are the other three using a green ink (Old Olive Stampin' Up).  I gave one a red card base (because I stamped the sentiment on the inside upside down!!  LOL). It's all good!


 *******Challenges for my One Layer Christmas Card:
Mod Squad: one layer Christmas card in under 5 minutes
Winter Wonderland: Christmas only--sentiment on front of card
Red Rubber Inspiration: repeat yourself
Christmas Cards all year Round: Christmas only- no DP
Crafty Hazelnut Christmas Extra: anything Christmas goes

I think I am done with my Christmas cards now.  I have 55 cards and I think that will be enough.  I will continue to share the cards up until Christmas day.  I also have a pretty vintage Birthday card made with Flonzcraft stamps for the next post.  So, see you then.  Hope you are having a great day!  Love ya.
Karen

Thursday, November 20, 2014

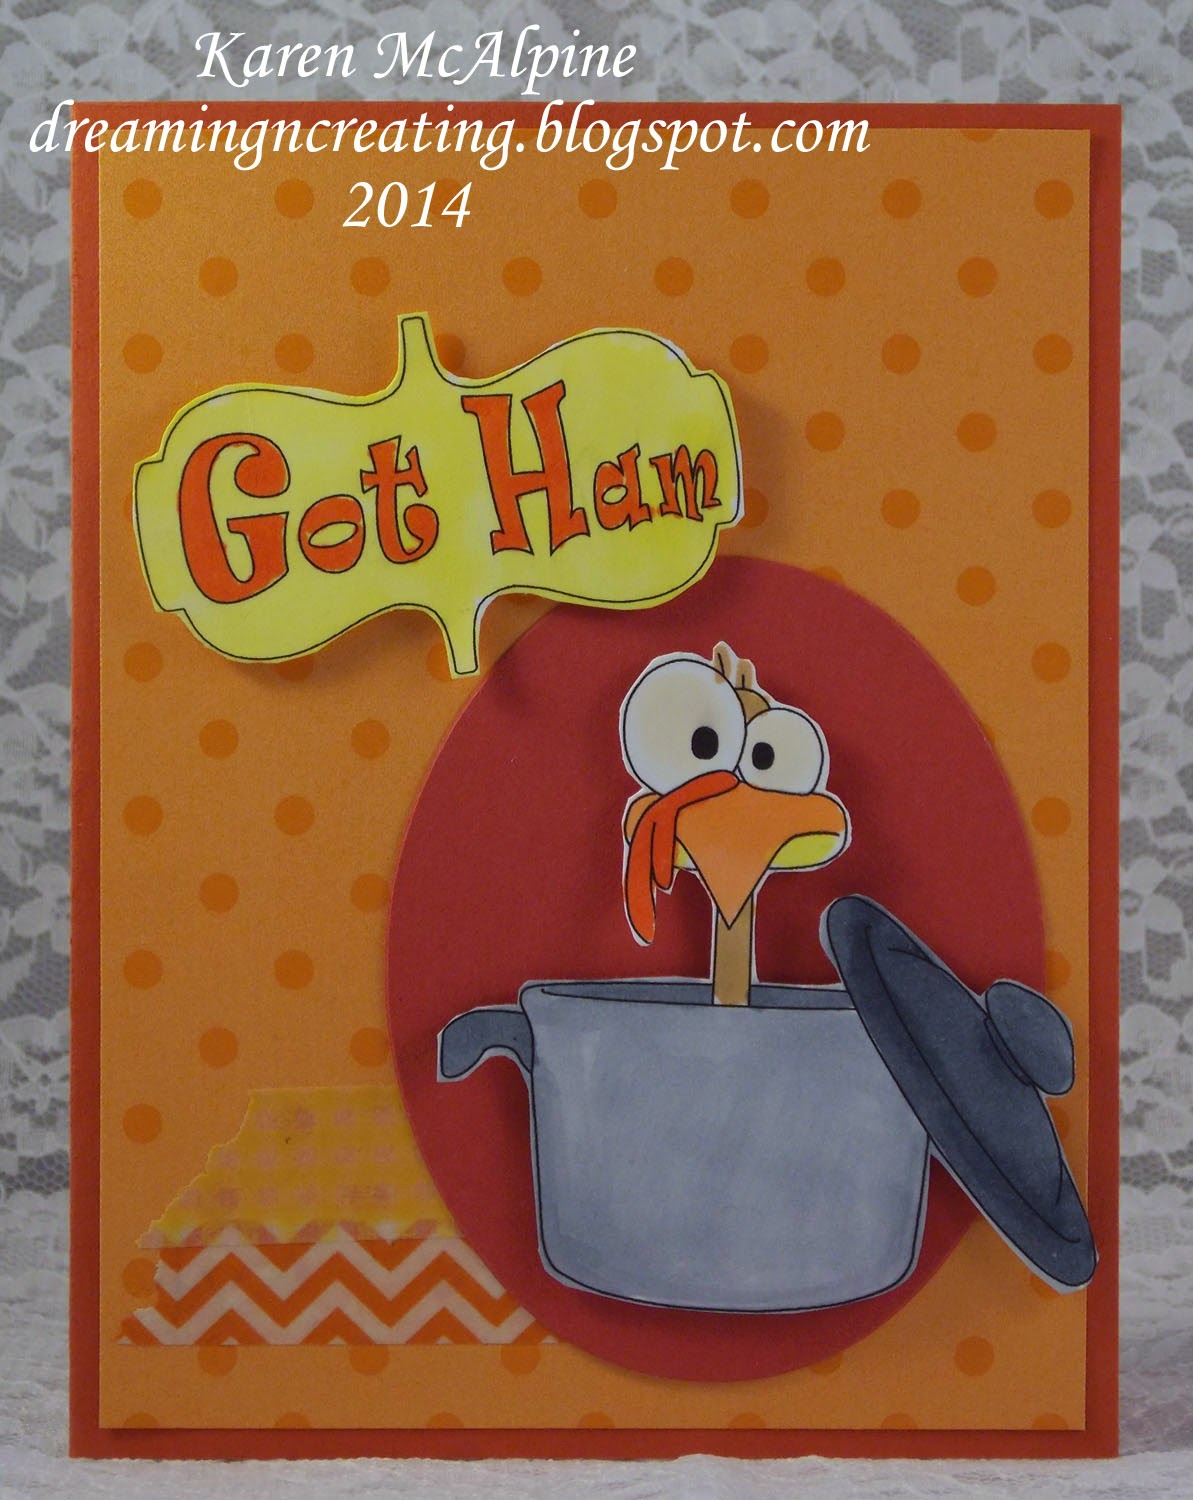
Turkey in Pot Thanksgiving Card

Hello Everyone,
Getting closer to Thanksgiving here in the USA--next week.  Thought I better get this Thanksgiving Card posted. To get you in the mood to make a few Thanksgiving cards.  LOL    I used a fun digi set from Stitchy Bear's Digi Outlet --the set includes the sentiment.


Materials List:
Stamps: Turkey Talk digi set from Stitchy Bear's Digi Outlet
CS: Solar white Neenah; Really Rust and Ruby Red from Stampin' Up
DP: Orange - Stampin' Up
Copic Markers
Oval die cut - Sizzix
3/8" Circle Punch
Orange Ribbons
Washi Tape - Stampin' Up


Instructions:

  • Make a card from Really Rust CS
  • Layer with DP
  • Add two strips of Washi Tape
  • Print the digi turkey and sentiment
  • Color with Copic Markers
  • Fussy cut both


  • Die cut an oval from Ruby Red CS and add to card
  • Add the images with dimensional adhesive


This card went out in the mail to a family member.  I think they will get a chuckle out of it.  

Challenges for my Turkey in Pot
Crafting with Dragonflies: anything goes with optional twist-goodbye
Penny's: anything goes
Simon's Wednesday: thanks/Thanksgiving
PDE Linky Party: turkeys, Pilgrims, Indians, scarecrows

Well, I guess I should get busy with some other things.... I will have some more vintage cards for you coming up in the next posts.  I am almost done with my Christmas cards and will start sharing those too.  I hope you are having a great day!!  Love ya.
Karen

Tuesday, November 18, 2014

Vintage Medallions

Hi Dreamers!
We have snow already!  Well, I am not ready for snow!  And, we are supposed to get a bit more tonight.  I will just have to stay cozy and warm making a few cards.  I made this card using a Stampin' Up set and set it on  a handmade background.

NOTE:  I was going through my ink pads recently and found that I had several of the small pads I had not used very much.  They had pigment inks on them and had gotten pretty dry---no reinkers unfortunately.  I thought I needed to use them anyways.  I stamped with them and just hit them with the heat gun.  Because they were kind of dried out, the ink dried quickly.  And, I liked the soft effect.  Then I use the pad to distress the edges too.


Materials List:
Stamps: Daydream Medallions - Stampin' Up
Ink: plum pigment (see note above)
CS: white, plum, metallic bronze
Spray inks
stencil - Crafters Workshop
Sheer plum ribbon


 Instructions:

  • Make a card from plum CS
  • Add a background piece made with a stencil and spray inks
  • Stamp the medallions of white CS with the plum pigment ink
  • Distress the edges with the same ink
  • Heat set the ink
  • Layer onto a piece of bronze metallic CS


  • Wrap ribbon around stamped piece and tie in bow
  • Add to the card
  • Decorate the inside

Inside of the card:


Challenges for my Vintage Medallions:
Pile it on: vintage
Craft-Dee Bow: anything goes + a bow
Dream Valley: anything goes
My Craft Creations: anything goes


I have another Turkey card to share, and that is coming up later in the week.  I have been working on Christmas cards and crocheting scarves....so keeping busy.  See you soon.  Love ya
Karen

Monday, November 17, 2014

Love To Scrap Challenge #42- Say it in Color

Hello Everyone!
Time for  new challenge on the Love to Scrap Challenge Blog!!  We have a fun new theme for the next two weeks:

Say It In Color

Stamp, Print, or die cut a sentiment in any other color except black or white.
Make any project with some stamping on it and link up on the challenge blog.

There are two fabulous sponsors for the challenge:


Prize: $10 gift certificate

Stitchy Bear's Digi Outlet


Prize: $10 gift certificate
SweetStamps.com

For my design team project, I used a fun digi set from Stitchy Bear's Digi Outlet and made Thanksgiving cards to send to my family.  I made two versions using the same image. And to  "Say It In Color", I stamped my sentiment in different colors of ink.

CARD #1

Materials List:
Stamps: Turkey Talk digi set from Stitchy Bear's Digi Outlet; Alpha Dots from My Sentiments Exactly!
CS: Solar white Neenah; Orange, Ruby Red, and Pumpkin Pie from Stampin' Up
DP: Orange - Stampin' Up; Plaid - K & Company
Copic Markers
Dye Ink: orange and brown
Spellbinders dies- Circles and Rectangles
3/8" Circle Punch
Orange Ribbons
Liquid Pearls-white


 Instructions:

  • Make cards from orange and Ruby Red card stock 
  • Layer with DP's
  • Print out the turkeys on Solar White CS--Let the ink dry
  • Color images with Copic Markers
  • Die cut images with Spellbinders and add a layer beneath
  • Add to card with dimensional adhesive


  • Stamp the Alpha Dots to spell out the words "Turkey Time" 
  • Punch out each letter with the 3/8" circle punch--or cut by hand
  • Add to the card with dimensional adhesive
  • Add ribbon bows


CARD #2


  • Card #2 is made the same way
  • Add Liquid Pearls to the background paper


Really fun image!!  I stamped Happy Thanksgiving on the inside.  The cards will be sent out to my family.


Challenges for my Turkey Talk Holiday cards
Crafts 4 Eternity: bright colors
Cut it Up: turkey talk
Simply Create Too: thanksgiving/thank you
Come and Get It: Thanksgiving traditions
Craft Your Passion: turkeys or pumpkins
PDE Linky Party: turkeys, pilgrims, Indians, scarecrows

I made another card with this same set, but different image and sentiment.  I will share that with you later in the week!!  See you then.  Love ya.
Karen