Hi Dreamers!
Time for another look at work areas around the world with Julia over at the Stamping Ground. This was actually my work table late Tuesday. I was working on some Design Team projects. So, be prepared, this table is really messy......
One of the cards is finished (upper left) and the blue floral card is still in pieces. I am trying to work out the ribbon here. My table liner paper is in shreds. I did change it after picking up a bit and putting everything away. I should have take a photo of that...all nice and clean. Well, it is too late now. My work desk is all filled up again with another project. Here is a little closer look below.
I did get both cards finished and posted to my blog. You can see what I ended up doing with the wide, dark green wired ribbon. Well, I am off to visit a few of the other work spaces now. I hope you are having a great day!! Love ya.
Karen
Tuesday, September 4, 2012
Flowers in Red and Blue
Hi Dreamers!
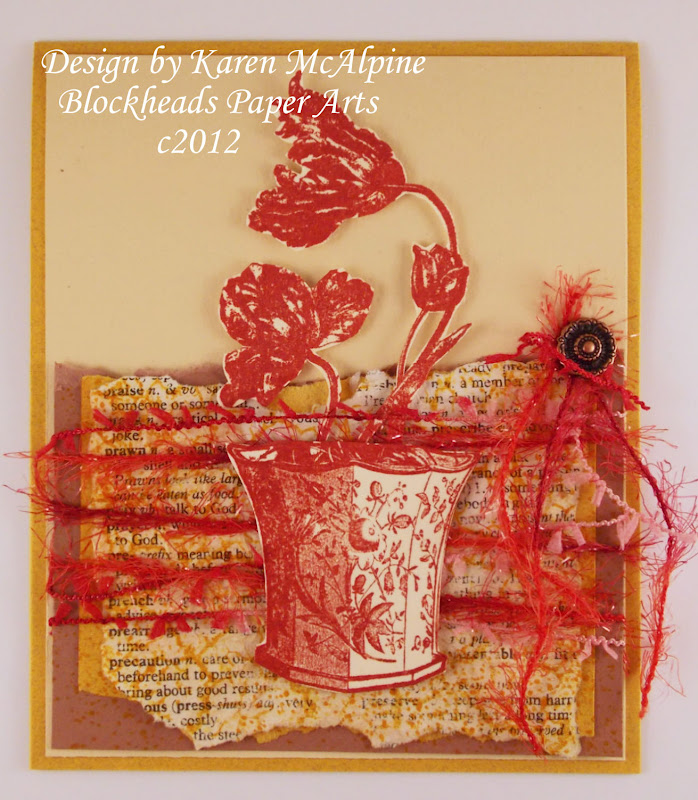
Hope everyone had a great holiday weekend! I was able to get some cards made over the weekend. I have two cards to share with you made with The Potted Tulip stamp from Blockheads Stamp which is included in the Victorian Eccentricities set or available as a single. I made a red and a blue version.
Stamp the image with Sienna ink and cut out. On a page from the dictionary, stamp the Crackle background stamp in Butterscotch ink. Crumple the page and smooth out. Spritz very lightly with water on the un-stamped side. Crumble again, smooth, dry with heat gun. Distress with Tea Dye ink. Tear page into desired size. Distress two pages in this way- one for each card.
Layer the CS's and add the flowers and vase with dimensional squares. Add some fun fibers and a fancy brad.
Now, I can grab this when I need a card for an occasion and add whatever sentiment I like. To make the Blue Flower card stamp the vase and flowers twice on white CS with Cobalt ink.
Cut out one set and layer over the other stamped vase. Add the dictionary page and CS layers.
I love wired ribbon...You can make it into any shape you like. I cut a couple lengths of ribbon in half lengthwise. I formed the ribbon into several fun shapes and glued to the card.
And, how about a few fun Challenges for my Red and Blue Flowers??!!
Simon Says Stamp and Show: Read all about it
Simon Says Stamp: anything goes
Loves Rubber stamps: anything goes
Paper Take Weekly: anything goes
Through the Craft room door: anything goes
Well, I guess that's it for me. Hope you have a great evening! Love ya.
Karen
Hope everyone had a great holiday weekend! I was able to get some cards made over the weekend. I have two cards to share with you made with The Potted Tulip stamp from Blockheads Stamp which is included in the Victorian Eccentricities set or available as a single. I made a red and a blue version.
Materials List for both Cards:
Blockheads Paper Arts Stamps: Victorian Eccentricities
Crackle Background
Archival Ink from Ranger- Sienna and Cobalt
Adirondack Ink from Ranger - Butterscotch
Distress Ink- Tea Dye
Pages from a Dictionary
CS in White, Cream, Dark Taupe, Mustard, and Navy
Crinkle CS in Gray
Stamp the image with Sienna ink and cut out. On a page from the dictionary, stamp the Crackle background stamp in Butterscotch ink. Crumple the page and smooth out. Spritz very lightly with water on the un-stamped side. Crumble again, smooth, dry with heat gun. Distress with Tea Dye ink. Tear page into desired size. Distress two pages in this way- one for each card.
Detail
Layer the CS's and add the flowers and vase with dimensional squares. Add some fun fibers and a fancy brad.
Inside
Now, I can grab this when I need a card for an occasion and add whatever sentiment I like. To make the Blue Flower card stamp the vase and flowers twice on white CS with Cobalt ink.
Cut out one set and layer over the other stamped vase. Add the dictionary page and CS layers.
I love wired ribbon...You can make it into any shape you like. I cut a couple lengths of ribbon in half lengthwise. I formed the ribbon into several fun shapes and glued to the card.
Inside
And, how about a few fun Challenges for my Red and Blue Flowers??!!
Simon Says Stamp and Show: Read all about it
Simon Says Stamp: anything goes
Loves Rubber stamps: anything goes
Paper Take Weekly: anything goes
Through the Craft room door: anything goes
Well, I guess that's it for me. Hope you have a great evening! Love ya.
Karen
Saturday, September 1, 2012
Bags and Tags: September Stampsmith Challenge
Hi Dreamers,
Wow, where did August go? September 1 today and time for a new Stampsmith Challenge! The new theme for the month of September is:
For my Design Team project, I made a gift bag and a matching card with a tag as the focal point. I used a stamp from the "Shall We Dance" Full Sheet and the Sentiment Full Sheet-Say It Like It Is.
To make the bag, trim the top edge down about four inches. Add a strip of black CS to the top edge and punch with an edge punch. Add a piece of decorative paper (the black lace paper) to the middle of the bag. And, a piece of black CS with one edge punched to the bottom of the bag. I did not glue the very top edge of this piece so that the bag could be folded flat if necessary.
Stamp the dancing girls on glossy white CS with black dye ink. Cut with a Sizzix die---Make two--one for the bag and one for the card. Glue to the bag.
Stamp the sentiments; cut out and glue to bag. Punch one hole on the side of the bag near the top through all layers. Run the ribbon through this hole and tie in a bow.
Let's see what you come up with!! Link your project up on the Stampsmith Challenge blog for a chance to win a $21 gift certificate!
And, how about a few other Challenges for my "Go Girl" gift bag and card??!!
Simon Says stamp:Anything goes
Perfect Sentiment: anything goes with a sentiment
Scrapalicious USA: anything goes
ATCs and Cards with Attitude: anything goes
The Stamp Man: Alter it
All sorts: anything but square
Hope you are having a great weekend!! Love ya.
Karen
Wow, where did August go? September 1 today and time for a new Stampsmith Challenge! The new theme for the month of September is:
Bags and Tags (with one Stampsmith stamp)
My gift bag started life as a ordinary brown paper lunch bag.
To make the bag, trim the top edge down about four inches. Add a strip of black CS to the top edge and punch with an edge punch. Add a piece of decorative paper (the black lace paper) to the middle of the bag. And, a piece of black CS with one edge punched to the bottom of the bag. I did not glue the very top edge of this piece so that the bag could be folded flat if necessary.
Stamp the dancing girls on glossy white CS with black dye ink. Cut with a Sizzix die---Make two--one for the bag and one for the card. Glue to the bag.
Stamp the sentiments; cut out and glue to bag. Punch one hole on the side of the bag near the top through all layers. Run the ribbon through this hole and tie in a bow.
Make the card in the same manner.
Detail
Let's see what you come up with!! Link your project up on the Stampsmith Challenge blog for a chance to win a $21 gift certificate!
And, how about a few other Challenges for my "Go Girl" gift bag and card??!!
Simon Says stamp:Anything goes
Perfect Sentiment: anything goes with a sentiment
Scrapalicious USA: anything goes
ATCs and Cards with Attitude: anything goes
The Stamp Man: Alter it
All sorts: anything but square
Hope you are having a great weekend!! Love ya.
Karen
Thursday, August 30, 2012
I "Heart" Paris Tag: Stampsmith Tag Swap
Hi Dreamers,
I wanted to show you the tag I made for a tag swap over on the Stampsmith Yahoo group. I sent this tag to Laurie, and she received it. So, I won't be spoiling her surprise by posting it now. LOL I made this tag with a Stampsmith Stamp: I Love Paris.
Challenges for The I "Heart" Paris Tag:
Craft Your Days Away: anything goes
Simon Say Stamp: Anything goes
Dragons Dream: tags -art for arts sake
Scrap Creations: off the edge
Craft Door: anything goes or diva
See another tag I made with this stamp on my blog here.
Another busy day here. I absolutely must clean my house today. No more playtime!! Must get to work.
I will be back on Saturday with the new Stampsmith Challenge for September!! I have a fun project to show you!
I hope you are having a great Thursday. See you Saturday. Love ya.
Karen
I wanted to show you the tag I made for a tag swap over on the Stampsmith Yahoo group. I sent this tag to Laurie, and she received it. So, I won't be spoiling her surprise by posting it now. LOL I made this tag with a Stampsmith Stamp: I Love Paris.
The background was made by spraying Glimmer mists onto a tag made from cream CS. I added lace, ribbons, and some rhinestones.
The hearts were made by covering punched CS hearts with Piccolo enamel powders.
Challenges for The I "Heart" Paris Tag:
Craft Your Days Away: anything goes
Simon Say Stamp: Anything goes
Dragons Dream: tags -art for arts sake
Scrap Creations: off the edge
Craft Door: anything goes or diva
See another tag I made with this stamp on my blog here.
Another busy day here. I absolutely must clean my house today. No more playtime!! Must get to work.
I will be back on Saturday with the new Stampsmith Challenge for September!! I have a fun project to show you!
I hope you are having a great Thursday. See you Saturday. Love ya.
Karen
Wednesday, August 29, 2012
Holiday Lady with Character Construction
Hi Dreamers!
I don't think it is too early to start on a few holiday cards, do you? I have been thinking about getting some made and this one "emerged" from one of my backgrounds. I make the backgrounds in big batches and put them in folder. I always have a nice selection ready to use. Now, back to the holiday topic. I like to try non-traditional images to make holiday cards...... You know, just for fun. Here is my Holiday Lady. I used the Character Construction Stamps:
I started with a background made with a Crafters Workshop Template and spray inks. I stamped onto the background with Sienna and Coffee Archival inks. I drew in skirt silhouette with a black marker following the diamond pattern in the background. I did not plan this, it just happened. LOL. Sometimes things just come together like that. Sometimes. I layered onto green and red CSs, and added a bit of shimmer with a gold pen on the edges of the card base.
I stamped the bird in red, cut out and layered onto the branch. I added some silk poinsettias with a gem in each center.
I added a nice sentiment to the inside, a left over piece of background, and a spritz of spray ink.
Inside
I think I will make a few more of these to go in the Holiday card box. I know some of my GF's would love this card.
How about a few Challenges??!!
Anything Challenge: make your own background
Creative Card Crew: Christmas
Fashionable Stamping: flowers
Winter Wonderland: red and green
ATC's and cards with Attitude: anything goes
Super busy day today, gotta run. Love ya.
Karen
WOYWW 169- Maybe a Holiday Card
Hi Dreamers!
Happy Wednesday and welcome to my messy work table! LOL. I was stamping on some of my backgrounds with this Character Construction stamp. I did not intend to make a Holiday card when I started, but the colors spoke to me and said, "yes, I am going to be a holiday card". There are the Archival inks that I used to stamped the lady. My favorite glue. Oh, and there is my to-do list too.
Check out what is on all the other work desks at Julia's blog ---Stamping-Ground.
Lots of fun things to see!! Busy day today!! Hope you are having a great day. Love ya.
Karen
Update: I did make this into a Holiday Card. LOL
Happy Wednesday and welcome to my messy work table! LOL. I was stamping on some of my backgrounds with this Character Construction stamp. I did not intend to make a Holiday card when I started, but the colors spoke to me and said, "yes, I am going to be a holiday card". There are the Archival inks that I used to stamped the lady. My favorite glue. Oh, and there is my to-do list too.
Check out what is on all the other work desks at Julia's blog ---Stamping-Ground.
Lots of fun things to see!! Busy day today!! Hope you are having a great day. Love ya.
Karen
Update: I did make this into a Holiday Card. LOL
Monday, August 27, 2012
Steampunk Owl with Metallic Tree
Hi Dreamers!
I had a dream...An owl with a rocket pack!! And, where do you suppose he lived?? In a metallic tree. Of course! Where else would a Steampunk Owl live??? This fun image is from the creative mind of Di Davies at Blockheads Stamps: the new set Fringe Folktales.
Stamp the Owl with black ink and lightly distress with Vintage Photo. I shaded and colored with my new Distress Markers. Cut out the Owl.
To make the tree dry emboss a piece of metallic gold paper. "Paint" the limbs with gold Stickles and the leaves with silver. Stamp the Circle Border on the left side. Stamp again on a piece of brown paper and tear into small pieces. Glue down over the stamping.
Stamp the clock from the Victorian Inventions stamp and cut out the small dial. Attach the dials to the tree with glue dots.
Add a bunch of fibers. Layer with green metallic and Teal CS. Stamp the Owl again for the inside.
How about a few fun challenges for my Steampunk Owl??!!
Simon Says Stamp and Show: summer colors or other new distress products
Cheerful Stamp Pad: Steampunk
Eureka stamps: anything goes
Take a Word: clockworks
Stampalot: Things with wings
Anything Goes: make your own background
Lovely raining day here in Michigan. I have lots to do in the studio today. All kinds of projects that I want to get done this week. I will be back on Wednesday with "something". See you then. Love ya.
Karen
I had a dream...An owl with a rocket pack!! And, where do you suppose he lived?? In a metallic tree. Of course! Where else would a Steampunk Owl live??? This fun image is from the creative mind of Di Davies at Blockheads Stamps: the new set Fringe Folktales.
Materials List:
Blockhead Stamps
Fringe Folktales
Botanical Silhouettes - Circle border
Victorian Inventions - gears
Ink: Tuxedo Black Memento
Vintage Photo Distress Ink
Distress Markers
Stickles - Gold and Silver
Metallic gold paper
Various scraps of ribbon and lace
A Tree Embossing Folder
Stamp the Owl with black ink and lightly distress with Vintage Photo. I shaded and colored with my new Distress Markers. Cut out the Owl.
To make the tree dry emboss a piece of metallic gold paper. "Paint" the limbs with gold Stickles and the leaves with silver. Stamp the Circle Border on the left side. Stamp again on a piece of brown paper and tear into small pieces. Glue down over the stamping.
Stamp the clock from the Victorian Inventions stamp and cut out the small dial. Attach the dials to the tree with glue dots.
Add a bunch of fibers. Layer with green metallic and Teal CS. Stamp the Owl again for the inside.
Inside
How about a few fun challenges for my Steampunk Owl??!!
Simon Says Stamp and Show: summer colors or other new distress products
Cheerful Stamp Pad: Steampunk
Eureka stamps: anything goes
Take a Word: clockworks
Stampalot: Things with wings
Anything Goes: make your own background
Lovely raining day here in Michigan. I have lots to do in the studio today. All kinds of projects that I want to get done this week. I will be back on Wednesday with "something". See you then. Love ya.
Karen
Subscribe to:
Posts (Atom)