Pages

Sunday, June 30, 2013

Fourth of July Card with America Collage

Hi Dreamers,
I made a few Fourth of July cards to send out to my friends and family.  I used the stamp America Collage from Lost Coast Designs.  The image was stamped on white CS with Jet Black Archival ink.


  • A red and yellow Marvy Marker was used to color the flag and dress of lady liberty


  • The coloring was done with Distress inks applied with the Ranger applicator tool
  • Distress ink colors: 
Antique Linen

Vintage Photo 
Frayed Burlap
Scattered Straw
Faded Jeans


  • Layer stamped piece on a red folded card and navy CS
  • Add three star brads


The cards went together quickly and I already put them in the mail.  I stamped Happy Fourth of July on the inside.
I finished up the work in my yard yesterday!  I planted  the second tree and moved the woodpile.  Also made some steps with cement blocks.  Lot of heavy work, but now it is all done.  I will take some photos soon to show you.  My back hurts, but I am glad to be done.  Now, I can sit back and enjoy!!  Break out the lemonade!!

Some very challenging Challenges for my America Collage Fourth of July Card
Chocolate, coffee, cards: fourth of July
Sugar Creek Hollow: colors of your flag
Sweet Stampin: not cute
Simon Says stamp: anything goes

That's it for me today.  Tomorrow is the start of a new Stampsmith Challenge.  Check out my Tea themed card for that on Monday.  Hope your weekend is going well.  See you tomorrow!  Love ya.
Karen

Thursday, June 27, 2013

Lavender Blue Cosmos Collage with Lost Coast Design

Hi Dreamers!
I have been super busy working on restoring my backyard.  I planted one new tree and three new shrubs.  I replanted 40 hostas that had to come out for the tree removal.   I have another tree to get in and some more clean up and that should do it.  The gardening has been taking all my time!

My husband is still home sick with pneumonia.  He has been sick for over 3 weeks now.  The poor dear still is feeling really rotten.

But, with all this going on, I managed to sneak  in a few hours to make some cards.  I made a series of three cards with Lost Coast Design's Cosmos Collage.  This is the second of the series.  (See the first here)


  • Make a card base from lavender CS (Bazzill)
  • Add a rectangle of black CS
  • Stamp the image with Jet Black Archival ink on light blue CS.


  • Distress the stamped piece with Milled Lavender, Dusty Concord, and Pumice Stone Distress Inks
  • Die cut several keys (Tim Holtz die) from CS in different shades of Lavender
  • Add keys to card


  •  Tie a scrap of gray fabric and satin gray ribbon in knot and add to the card


I would like to enter my Lavender Blue Cosmos card in the following challenges:
A Random Thursday Art Challenge: anything goes
Charisma Cardz: 3 2 1 recipe---I used three keys; two colors- blue and lavender; and one stamp
Addicted to Stamps: anything goes
Crafting by Design: anything goes
Simon Says Stamp: anything goes

I will post the third card in this series later in the week.  I also have a patriotic/ Fourth of July card ready.  I will post the tomorrow or Sat.  And, I made a bunch of "bug" themed all occasion summer cards.  I used butterflies, a ladybug, and dragonflies.  I will be sharing those over the next few weeks.  So, lots going on here in Dreamland.  I will have photos of the yard too.  I forgot to take a photo of one of the beds before I planted everything, but you can see the after!  I hope your week is going well!  See you soon.  Love ya.
Karen

Sunday, June 23, 2013

Emboss Resist Flowers

Hi Dreamers!
Boy, it has been a crazy week.  We had three large trees removed from the yard.  The yard now looks like a  disaster area.  Had crews here for three days.  That part is all done, but now I have to clean up and try to restore my yard to it's previous condition.  I am heading to the nursery tomorrow to look for two small trees and a few shrubs to fill the void left by the mature trees that were removed.  I should be done with this project some time next year.  LOL.  I may have to change the shape and size of one of the beds, but I may leave that for next year.  I just want to get my hostas back in --hopefully this week.  I had to dig up 40 hostas so that the plants would not be destroyed by the tree removal.  Really need to get those back in the ground. Lots of work for me!  And,  my husband is still quite sick with pneumonia.  He has been off work over two weeks now.   I hope he will start to feel better this week.

Well, let's get to some card making projects.  I saw a technique a while ago on the Hero Arts blog that used heat embossing, a reverse stamp (with recessed image), and markers.  I had the stamp that was in the sample and finally got around to trying this technique  a couple of weeks ago.  Really fun technique.   This stamp is from Hero Arts and is called Flower Medley (K5361). It is available on the Simon Says stamp site.


  • Stamp the reverse stamp with VersaMark ink
  • Heat emboss with White embossing powder.  Make sure to completely cover the image with powder.
  • If you do miss a few spots, trim the image down and you can still use it.

The background is all white embossing powder


  • When the embossing powder is cool, color in the recessed areas with Markers
  • Wipe the markers' ink off the white embossing with a paper towel or rag


This is such a quick and easy technique that I ended up making four cards!! 


I added a die cut butterfly (AMuse Studios) on this card.


This card uses a piece of background I made with a Gelli Plate.


*****************I am going to put one of these in the mail for Maddy Justice (a cancer patient).  I read about her on the Simon Says Stamp blog.   They are holding a card drive for her while she going thru treatment at St Judes.  This will be my third card to Maddy.   I sent one last year during part of her treatment and another a month ago.      ****************

Oh, I guess that is it for now.  I will be back in a few days with another Lost Coast Designs project and something fun made with Blockhead stamps.

Reminder:
****The Blockheads store wide sale is still going on---35% off everything in the store.  Stock up on inks and those hard to find re-inkers.  

 I hope you are having a great weekend!!  See you soon.  Love ya.
Karen

Tuesday, June 18, 2013

Wedding Cards for that Special Occasion with Blockhead Stamps

Hi Dreamers!
Today I have a pair of Wedding themed cards that I made using a pretty wedding cake stamp from Blockheads Stamps.  The stamp is available as a single or on the Love and Romance half sheet.


And, by the way:
Everything is 35% off on the Blockheads Paper Arts WebSite until June 30th!!!   Stock up on your favorite inks, supplies, and pick up a few new stamps!!


Take a look at my Wedding Cards:  Here is the pink version.


Materials List for both Cards
Stamps: Love and Romance half sheet from Blockheads Stamps
Inks:Tuxedo Black Memento;Shell Pink Adirondack
Copic Markers
CS: Solar White Neenah; White, Pink, Lavender, Gray
Tulle
Ribbon
Embossing Folder-Rosa (Anna Griffin) Cuttlebug
Tiny Pearls


Inside


Instructions:

  • Stamp the Wedding Cake with Tuxedo Black ink and color with Copic Markers
  • Stamp the Heart image with Shell Pink ink on the edge of the card base.  
  • Layer with Pink CS
  • Add some Tulle, ribbon, and tiny pearls


And, the Lavender card:


  • Stamp and color with Copics
  • Dry emboss a piece of Gray cardstock
  • Add to a lavender card base


  • Tie a bow in sheer gray ribbon and leave very long tails
  • Add a line of glue to the card and pleat the ribbon tails--press into the glue as you pleat


Love the soft stylized drawing of this stamp!  The cake makes such a great card for Weddings or Anniversaries.  Now, I have two to file in my card box to be sent when the need arises.


**********Challenges:
abc Challenge: pretty in pink---card #1
Make my Monday: purples with one neutral---card #2
Through the Craftroom Door:anything goes
**************************


Hope you day is happy and bright!  Love ya.
Karen

Monday, June 17, 2013

Cosmos Collage in Pink and Gray with Lost Coast Designs

Hi Dreamers!
Hope your weekend was good.   So, here we are on a Monday again.  I am sitting and waiting for a tree removal crew to come out and remove three large trees from my backyard.  One is dying and has to go.  The second tree is pushing the fence over and the third is just a poor innocent casualty that is in the way of the removal of the second tree.  That is the tree I will miss.  My yard will be a disaster area for  a bit.  But, then I will get to pick out a new tree--something dwarf that won't get very big.  Enough of my woes! 

 Let's have some fun card making!  I have a project to share today that I made with the Lost Coast Design stamp, Cosmos Collage.    


  • Make a card base from gray CS (Bazzill); tear one end
  • I stamped on pale pink CS with black ink and tore out the image
  • Distress with Antique Linen and Pumice Stone Distress inks.


  • Add fibers to the side.  I used burlap, burlap strands, and two ribbons


  • I cut the lace from an old hanky and tucked it up under the main image


  • I stamped the image again on blue CS; punched out the circles and added to card


I love this dreamy Leonardo sketched style stamp!!  What a great card it makes.  I just could not stop stamping and ended up with three completed projects.  I will share the others with you throughout this month.  I am just now getting a nice big cup of coffee.  Did not get a chance to have any this morning.  Yawn.  I will have  some extra zing (caffeine buzz) for the afternoon.  I have an order for three graduation cards.  I think I should be able to work on those today.


I hope you have a great day!!  Love ya.  
Karen

Friday, June 14, 2013

Emboss Resist Rabbit with Lost Coast Designs

Hi Dreamers,
My husband is still sick (pneumonia) and doesn't seem to be getting better.  He is at the doctor's office right now.  So, I thought I would take a few minutes and share this fun bunny card.  I used a stamp from Lost Coast Designs called Rabbit with Flowers.  


  • I used an emboss resist technique: Stamp with blue pigment ink  and heat emboss with clear embossing powder.
  • Using an application tool, apply Peacock Feathers and Bundled Sage Distress inks
  • Wipe the ink from the embossed image


  • Make a teal card and layer with DP (Authentique)


  • Wrap a sheer blue  and a blue satin ribbon around the corner 
  • Add stamped piece to card base
  • Tie ribbons in a bow and add pearls 


Inside

  • Stamp this fun sentiment from the Party Words   set also from Lost Coast Designs.  I used Garden Green ink (Stampin' Up) to stamp the sentiment.
  • Repeat the DP and distressing with the inks on white CS

And how about a few fun Challenges for my Emboss Resist Rabbit!!!
Alphabet Challenge: I is for image
Paper Play time: anything goes
Love to Scrap: use a rubber stamp

I hope you are having a great day!   See you soon!
Karen

Wednesday, June 12, 2013

Early Summer in the Garden

Hi Dreamers!!
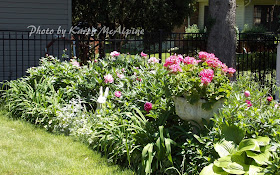
I thought you might enjoy a peek at my garden this week.  The peonies were in full bloom and the poppies are starting to make a show.  We have had several days of rain and that knocked all the peonies down.  So, I am so glad I snapped these pics when I did!!  Take a look at nature's splendor.


Pretty gorgeous, isn't it!!!  See you tomorrow for some crafty goodness.  Love ya.
Karen

Ancient Ornaments with Blockhead Stamps

Hi Dreamers!
I have been away for a few days.  My poor dear husband has pneumonia and has been pretty sick.   I snuck in a few hours here and there to make a few things and do a bit more organizing in my studio room.  I picked up a few more containers for markers.  On today's card, I used  stamps from Blockheads Paper Arts to make this dramatic vintage card.


Materials:
Stamp: Ancient Ornaments from Blockheads  (the other larger stamp is from a retired Blockheads sheet)
Ink: Mushroom Adirondack
Distress Inks: Bundled Sage and Vintage Photo
CS: dark green, black, kraft, and cream
Old potato bag--the netty kind


Instructions:

  • Make a card from dark green CS
  • Lay a netty potato bag on top of the card
  • Apply Bundled Sage DI by pouncing an applicator tool over the netty bag.  (Wipe ink off bag with a rag)
  • Distress edges of card with Vintage Photo DI


  • Stamp the two images with Mushroom Adirondack ink on kraft and cream CS
  • Layer each with black CS
  • Add to card front


Inside


  • Stamp the Ancient Ornament again on the inside on cream CS
I will stamp a sentiment on the inside later; when I use the card.  I will send it to someone who likes vintagey things.   

I will be back later with some photos of my garden.  And, some pretty cool cards made with Lost Coast Design stamps.  See you then!!  Love ya.
Karen

Thursday, June 6, 2013

Ribbon Dragonfly Storage Jar

Hi Dreamers!
Today, I have a fun storage idea to share!   I found some gigantic glass jars (the kind used for canning) at my local  craft store last week.  I saw lots of scope in them.  LOL  I knew they would be perfect for storing loose items.  Here are the 9 1/2" tall jars:


Materials List:
Glass Jars with screw top lids (I found these at Michaels Craft Store)
Bordered Orange Sheer Ribbon from May Arts (356-15-28)
Peach Satin Ribbon
Scraps of CS
Dragonfly die cut from Sizzix


I decorated the jar with ribbon dragonflies!  I used a Sizzix die to cut out the dragonflies.  Let's get started making our decorated storage jar.

Instructions:

  • Place ribbon on top of the die and cut.  I covered the die with a scrap piece of CS before running through my Cuttlebug just to hold the ribbon in place


  • Cut about 12 dragonflies from the ribbons.  Cut the same amount from cardstock


  • Cut off the heads from the ribbon dragonflies.  You can leave the body on some or cut it off
  • Cut the wings off the CS dragonflies
  • Glue the ribbon wings to the CS bodies


  • Attach the dragonflies to the jar with dimensional adhesive all around the jar
  • Tie ribbon around the neck of the jar


  • Decorate the top of the jar with a circle cut from yellow CS, a big bow and another dragonfly---for this dragonfly I did not cut away the CS wings, but left them to make the dragonfly more stable


Now, I have a super pretty storage jar!  And, guess what I decided to store in my Dragonfly Jar!!  You guessed it!  My ribbon scraps!  How Fun!!


I think this jar would look great with spools of thread or buttons.  You could use any size jar as well.  Smaller ones would be great to store Markers and pens.

*******A Few Fun Challenges for my Dragonfly Storage Jar**
Make My Monday: ribbon or lace
Paper Playtime: 2 or more ribbons
DL. Art: anything goes
CRAFT challenge: anything but a card
********


Well, I guess that is it for me today.  See you next time!  Love ya.
Karen