Pages

Friday, October 28, 2016

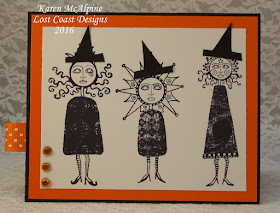
Three Diva Witches - 31 Days of Halloween


Hello Everyone!
Back again  with another wicked post for the Lost Coast Designs 31 Days of Halloween event!! You will find all the details on the Lost Coast Portal to Creativity -- The Crypt Master and Wicked Blogger.  You will find the blog roll there too.  So, check it out for lots of super scary projects!!


My project today uses  non-Holiday stamps--converted to  Halloween images. Love doing that! 


Materials List:
Ink: Black
CS: smooth finish white, orange, black
Orange Rhinestones
Orange Ribbon


Make It:

  • Make a card base from black CS
  • Add a layer of orange CS
  • On a smooth finish white CS, stamp the three divas with black ink
  • Cut witch's hats from black CS and glue to divas' heads
  • Add stamp piece to card base
  • Add three orange Rhinestones
  • Fold a short piece of ribbon in half; tuck ends on under side of card front


Aren't these girls cool??!!  They make a great wicked card for Halloween!!  
See you again soon!!
Karen

Thursday, October 27, 2016

Pinecones Stamped on Recycled Paper with Technique Junkies

Hello Dreamers,
Hope your day is going well!  I am still busy making Christmas cards.  I have completed all my Fall Holiday cards and the Halloween cards were mailed and are on there way.  So, let's check out a batch of Christmas cards I made using stamps from the October New Releases from Technique Junkies.

Now, being the fugal crafter that I am, I reused something to make the cards. Back story--I made a trip to the post office to send out a card order and buy some stamps.  The stamps were put in a nice shiny bag.  I thought it seemed like very interesting paper and I should not throw it out.  Okay, I know, not throw out a bag from the Post office??  But, really, just look at the bag.


As, you can see, I have stamped on the bag.  I used dye inks.  They worked the best.  I tried others but they did not turn out as well.  After cutting the bag apart, I was able to stamp five of the Pinecone images.  And, I turned the stamped bag into these cards...


Materials:
Stamps: Pinecones and All is Calm from Technique Junkies
Ink: Rich Cocoa and Tuxedo Black Memento dye ink
CS: gold
DP: Striped holiday paper MME
Burlap Snowflake ribbon
Charm
Bag from Post Office


Make It:

  • Make a card base with gold CS
  • Stamp Pinecones on the Post office bag with Rich Cocoa ink and trim to size
  • Add pinecones piece to card base
  • Tear pieces of decorative paper and add to the card base on corners


  • Stamp All is Calm with black ink in upper corner
  • Tie ribbon in bow 
  • Glue charm and bow to card front


Two more color options:


Of course, I had to try the stamp on other types of paper and CS.  I used different ink colors too.  Here are some more examples using the same layout.

Stamped on other types of papers:
Glossy White CS


 Shimmery cream CS


Regular white CS


The cards went together pretty quickly.  I spent most of the time going through all my decorative papers to find striped papers that coordinated with the stamping and CS.  LOL   I made ten all together.  They are going in my Christmas card list box.

Hope you enjoyed checking out the cards!!  See you again soon for more Holiday projects!!
Karen

Saturday, October 22, 2016

I Want Candy Monster - 31 Days of Halloween


Hello Scary Dreamers!
Back again  with another scary post for the Lost Coast Designs 31 Days of Halloween event!! You will find all the details on the Lost Coast Portal to Creativity -- The Crypt Master and Wicked Blogger.  You will find the blog roll there too.  

The Lost Coast Challenge is running along with the 31 Days of Halloween Event.  Link up all your Halloween/Scary/Weird projects for a chance to win prizes.  See All the challenge details here. 

Today, I have a card with the ultimate candy monster!  Look out!!  How much candy can a Godzilla monster eat??  All he wants.


Materials List:
Stamps: Godzilla - Carmen's Veranda, Cityscape  and Old Typewriter Alphabet from Lost Coast Designs
Ink: Espresso Truffle and Toffee Crunch Memento
Distress Ink: Stormy Sky, Wild Honey, and  Antique Linen
CS: white, navy blue, yellow


Make It:
  • Make a card base from yellow CS and add a layer of navy blue CS
  • On white CS, stamp Godzilla with Espresso Truffle ink
  • Stamp again on scrap paper and cut out to use as a mask
  • Cover Godzilla with the mask and stamp the Cityscape in Toffee Crunch ink
  • Color the background with the Distress inks
  • Stamp the word candy with the alphabet stamps in Espresso Truffle ink
  • Add stamped piece to card base
  • Use as fun Halloween card


Don't know about you, but I have always wanted a Godzilla stamp.  Quite frankly, I love  Godzilla movies.  One of my guilty secrets.  They are so charmingly bad.  I do so love le bad cinema.  So, anyway.........Leave it to Carmen's Veranda to come out with a Godzilla stamp!!

Don't forget to link up your own scary creation on the Lost Coast blog.  You may enter any project that is Scary or Weird using any kind of rubber stamps.
Okay, see you next time for more Holiday fun!!
Karen

Tuesday, October 18, 2016

Glittery Pinecone Holiday Card with Technique Junkies

Hello Dreamers!
So much Holiday fun going on in Dreamland this month!  Today's post is a glittery Pinecone Christmas card. I used a great stamp from the Technique Junkies October New Releases.


Materials List:
Stamp: Pinecones from Technique Junkies
Ink: green and brown dye
CS: white, brown, green
Glitter glue: crystal and gold
Wink of Stella Pen: gold


Make It:

  • Make a card from green CS and add a layer of brown CS
  • On white CS, stamp the Pinecones with green ink and and stamp a second image with brown ink
  • Add piece stamped with green ink to card base


  • Cut pinecones from the piece stamped with brown ink
  • Layer the pinecones over the first image using dimensional adhesive
  • Color in the pinecones with the Wink of Stella pen
  • Add the gold and crystal glitter glue to pinecones and pine needles


A Christmas sentiment was stamped on the inside to complete the card.  Love all this glitter.  This design is good for multiples.   But you have to allow time to let the glitter glue dry.
Thanks for stopping by!  See you next time for more Holiday projects!!
Karen

Monday, October 17, 2016

Scary Halloween Tag - 31 Days of Halloween


Hello Scary Dreamers!
Back again  with another scary post for the Lost Coast Designs 31 Days of Halloween event!! You will find all the details on the Lost Coast Portal to Creativity -- The Crypt Master and Wicked Blogger.  You will find the blog roll there too.  

The Lost Coast Challenge is running along with the 31 Days of Halloween Event.  Link up all your Halloween/Scary/Weird projects for a chance to win prizes.  See All the challenge details here. 

Check out my scary tag. I would use this for a treat box or bag, write or stamp a greeting on the back and use as a card, or use as a decoration.


Materials List:
Stamps: Flying Skull - Carmen's Veranda and Old Typewriter Alphabet - Lost Coast Designs
Ink: black
CS: orange, purple, green, and white
Copic Markers
Ribbons
hole punch


Make It:

  • Make a large tag (4.75 x 4 inches) from green CS
  • Add a layer of purple and orange CS
  • On white CS, stamp the Flying Skull and color with Copics
  • Cut out Skull and add to tag with dimensional adhesive
  • Stamp the word Scary in black ink using the alphabet stamps
  • Punch hole in top of tag and tie ribbons through hole
  • Use to decorate a treat box


Love the whimsy of butterfly wings on the skull.  My kind of skull.....LOL.  Not too scary.  Don't forget to check out all the 31 Days of Halloween projects and link up your own Scary projects!!  Have a great day!
Check back later for more Halloween and Christmas projects here in Dreamland.
Karen

Thursday, October 13, 2016

Star Book Decoration with Technique Junkies

Hello Everyone,
We are now enjoying Fall weather here in Michigan, USA.  Almost time to plant bulbs.  The leaves are just beginning to change color and drop off the trees.  And, although it is only Fall, I have been making Christmas projects this month. Trying to get a bit of a head start this year.  Today's project is made with a gorgeous October New Release from Technique Junkies.  This what the stamp looks like.

When I first saw that stamp, I thought silver embossing and then decoration or ornament.  Putting on the old thinking cap, I decided on the  Graduated Star Book (tutorial is from the Fancy Folds and Motion CD from Technique Junkies)


Materials List:
Stamp: Stars Are Brightly Shining from Technique Junkies
Ink: Versa Mark
Silver Embossing Powder
CS: white, dark green
DP: DCWV and Anna Griffin metallic papers
Green Ribbon
Green Stickles
Snowflake Punch
Tree Edge Punch
Happy and Christmas Words die cuts

Following the Graduated Star Book Tutorial I constructed the book.  I omitted the instructions for punching in the top layer.

Cover: Back
The book looks like this when it is closed and tied shut with ribbon.


Cover: Front

 Cover:Front and Back

Make It:

  • Follow the instructions on the tutorial to construct the book using white CS for the pagers and metallic papers for the second layer 
  • On white CS, stamp the Stars are Brightly Shining Stamp with Versa Mark ink and heat emboss with silver embossing powder - make 3
  • Cut the stamped image in half
  • Add the stamped pieces to the pages


  • Punch strips of dark green CS with the edge punch and glue to the edges of each page
  • Punch 14 snowflakes from metallic papers and add to the pages
  • Add glitter glue to the snow flakes


  • Die cut the words Happy and Christmas from green CS and add to the front and back covers
  • Glue long pieces of ribbon- one to the back and one to the front cover.  The ribbon will be  used to tie the book closed
  • Embellish covers with punched snowflakes, glitter glue and ribbon bows --Glue bows over the ends of the long ribbon pieces


More Pics:


This lovely star book could be hung or placed on a table for a pretty Holiday decoration.  It would also be a super nice card for an extra special person.  The stamp can also be used to make gorgeous cards.  Be sure to check out all the fabulous new release stamps here.

Thanks for stopping by.  See next time for a few Fall themed projects!!
Karen

Wednesday, October 12, 2016

Trick or Treat --31 Days of Halloween


Hello Scary Dreamers!
Back today with another of the Lost Coast Designs 31 Days of Halloween event!! You will find all the details on the Lost Coast Portal to Creativity -- The Crypt Master and Wicked Blogger.  You will find the blog roll there too.  

The Lost Coast Challenge is running along with the 31 Days of Halloween Event.  Link up all your Halloween/Scary/Weird projects for a chance to win prizes.  See All the challenge details here

My scary Halloween card features a skull background.  Very scary.


Materials List:
Stamps: Skull Background - Carmen's Veranda and Old Typewriter Alphabet- Lost Coast Designs
Ink: Rusty Hinge and Wild Honey Distress Ink; black
CS: White, orange, brown


Make It:

  • Make a card base from orange CS and add a layer of brown CS
  • On white CS, swipe the Rusty Hinge pad over the paper--lightly
  • Stamp the Skull Background with Wild Honey over the inked paper 
  • Trim to size and add to card base
  • Stamp the sentiment with the Old Typewriter Alphabet


Very Scary.  I will sent this to someone for Halloween.  I like the way the Background looks with ink swiped on before stamping.  I could really play with this technique using lots of ink colors.
Thanks for stopping in!!   See you again soon for more 31 Days of Halloween!!
Karen

Monday, October 10, 2016

Floral All Occasion Cards

Hello Dreamers!
Just popping in to do a quick post.  I will also have more Fall and Halloween projects later this month. And Christmas Cards too.  Christmas already??!!  Yep.

Today, I wanted to share some quick to make floral cards.  I made the cards for an order.  I used a variety of stamp companies--whatever struck my fancy.  One card is made with a napkin.

On this card, I took advantage of a piece of DP with printed sentiments.  I stamped the flowers (Stampin' Up) with Stazon Ink and colored with markers


 --------------

This card utilizes a dry embossing folder.  I cut along the edge of the embossing and added pretty paper.  I swiped a magenta colored ink pad over the embossing.


------------


This card is made with a napkin that is held down to the CS with hot wax.  This is a fun technique, but very messy.  So, when I do this technique, I make stacks of them.  Making the completed card is then really a snap.  I choose napkins with lots of design possibilities. And, than really only require a few embellishments to end up with an awesome project.


So glad you stopped in today!  I hope you are having a great Monday!  See you later in the week for a Holiday project with Technique Junkie Stamps.
Karen