Pages

Wednesday, August 26, 2015

Elegant Penguin?

Hello Everyone!
Hope your day is going well.  Got back from a nice mini vacation in Niagara Falls.  Very fun!
Today is my day to post on the Lost Coasters Review Design Team Blog.  (Check out all the Design Team Projects there!!)  So, of course, I wanted to show you my project.  I am calling it Elegant Penguin.  Can a penguin be elegant. Well........ you be the judge.


Materials List:
Ink: Dark Brown and Light Pink dye
CS: White, Pink, Brown
Corner Punch


Instructions:

  • Make a card from brown CS and add a layer of light pink
  • On white CS, stamp the Daisy Flourish with a light pink dye ink
  • Stamp the elegant penguin and the sentiment with brown dye ink
  • Punch the corners  and add to card front


A great card that really goes together quickly.  Who would not want to wished a Happy Everything??!!  So, what do you think??  Is the penguin elegant??  LOL
Lots of good stuff going on with Lost Coast Designs and Carmen's Veranda.  A new challenge starting in a few days on the Portal to Creativity blog and new projects daily on the Lost Coasters Review Design team blog.  Hope you will join us for all the fun!  Have a super day and see you next time.  Love ya.
Karen

Tuesday, August 25, 2015

Welcome Baby Cards

Hello Everyone!
How are you?  Doing good here, but keeping busy with the house selling and buying situation.  I still like to take some time out for a bit of therapeutic card making.  I made these Baby cards for an order.

The focus of the first card is dry embossing.  I used chalk to high lite the embossing.  Edge Punched an edge and added two different ribbons--pink and blue.


On the second card, I used a cute bird stamp set.  I used the same layout for both cards but, added a rounded corner on card two.  And, again, used two ribbons.


A Few fun Challenges!!!!
Dragonfly Dreams: flying high with wings
Craft-Dee Bowz: anything with a bow
Craft Your Passion: anything goes
Love to Scrap: anything goes

Lots of fun stuff going on in Dreamland.  Check back tomorrow for a fun project with Lost Coast Design stamps!!  See you then.  Love ya.
Karen

Thursday, August 20, 2015

Vintage Stamping Challenge Anything Goes!!

Hello Everyone,
Time for a new challenge with  the Vintage Stamping Challenge .  The challenge is a bit late this month, but our DT leader was away on vacation.  She is now back and we are up and running.  Sorry for the delay.  Winners of past challenges should be posted shortly too.

Since this is a busy time of year and lots of folks are on vacation, we have decided to select everyone's favorite theme...... Anything Goes!!

For you to have a chance to win the $20 gift certificate from Flonzcraft Stamps, simply link up your project on the Vintage Stamping Challenge Blog.

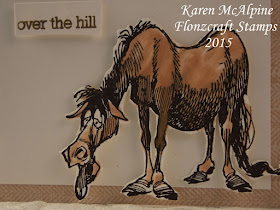
For my Design Team project, I used a humorous image to create an "Over the Hill" Birthday card.


Materials List:
Stamp:Funny Farm Set - Flonzcraft Stamps
Ink: black dye
CS: White, Brown, Tweed
Copic Markers
Burlap Ribbon
Dimensional adhesive

 Instructions:

  • Make card from Tweed CS
  • Add a rectangle of Brown CS to left side
  • Add a square of White CS
  • Stamp the Horse on another piece of White CS and color with Copic Markers
  • Cut out the Horse and add to the card with dimensional adhesive


  • Tie a knot in the burlap ribbon and glue to the white CS
  • Stamp or print "over the hill"; cut out, and add to card


Well, I think this card will go to someone with a good sense of humor!  LOL  Love this humorous horse!  I think it is perfect for over the hill cards.  Oh, wouldn't it be funny for a retirement card too??!


Thanks for stopping by!!  Hope your day is filled with creativity.   Love ya
Karen

Wednesday, August 19, 2015

Pretty Sympathy Card with Doily

Hello Dreamers,
Been crazy here.  Our house in on the market.  Spending most of my time focusing on that process and cleaning my house.  Yikes!  Not much time for creativity.  I do, however, have a pretty Sympathy card to share that I made recently.  I used soft greens and yellows for a calming feel.   I added some of the DP to the envelope too to make it extra special.


Markers (I used Distress Markers from Ranger) were used to ink the stamp. Which was then stamped on White CS.  I added lots of layers and a pretty white lace doily.


The same CS and DP layers were repeated on the inside with a sentiment.


***A few super fun Challenges for my Sympathy with lace doily
Shopping Our Stash: layer it on me
Try it on Tuesday: Sending you Flowers
Love To Scrap: anything goes
Mod Squad: lavender and/or lace

Well, I better shut off this computer and get going. Lots of things on the to-do list.  I hope you are having a great day!!  Love ya.
Karen

Tuesday, August 11, 2015

A Couple of Pairs of Pears- Pears Part Two

Hello Dreamers!
I will be sharing the rest of my pear cards with you today.  If you missed part one, check it out here.  I wanted to see how different I could make one stamp look by using different inks and coloring techniques.  I did a bit of heat embossing too.
Here is the whole group:


Card One:
Stamped on white CS with a bright green dye ink (Lettuce Adirondack). Layered on a green card base.  Add ribbon


Card Two:
Stamped on a light yellow CS with brown dye ink (Espresso Truffle Memento). Image colored with Copic Markers.  Layered onto green and yellow CS


Card Three:
Same green ink as card one, but then covered with Versa Mark ink. Clear embossing powder was sprinkled over the entire surface--also sprinkled iridescent embossing powder on the edges--- and heat set.  Layered onto two shades of green CS.


Really nice shinny surface!

Card Four:
Stamped on white cs with Butterscotch Adirondack ink. Covered the entire surface with Versa Mark ink. Clear embossing powder was sprinkled over the entire surface and heat set.  Layered onto two shades of yellow CS.


Card Five:
Stamped with dark brown ink on green CS.  Entire surface covered with
covered with Versa Mark ink. Iridescent embossing powder was sprinkled over the entire surface and heat set.  Layered onto bright green and dark teal CS.


The camera really did not capture how sparkly this card is.  The iridescent embossing powder really sparkles!  

****I am entering my Embossed Pear Cards in the
Sparkle N Sprinkle Creative Challenge: anything goes with loose glitter/embossing powder/ flocking

Craft-Dee Bowz: anything goes with a handmade bow

See you next time for more crafty goodness.  LOL.  Love ya.
Karen

Friday, August 7, 2015

Pears, Pears, Pears: In Many Colors and Coloring Techniques

Hello Dreamers,
Hope you are having a great day!  Very busy here with the house hunting, etc...  I wanted to share a group of cards I made using a artistic pear stamp (Pear Mosaic from The Artful Stamper).  I used different stamping and coloring techniques to make a diverse group of cards that are perfect for any occasion.
I find it so fun to see how different I can make one stamped image look.

I will post all the cards in two posts.  Here are all the pieces...


Which were turned into all these cards:


Card #1: Stamped with a bright green ink on green CS.  Colored by rubbing metallic rubs onto some of the areas of the stamped image.  Layered with tobacco green and gold metallic CS.  Add pretty ribbon.


Card #2:Stamped with a medium brown ink on White CS.  Colored by painting with Twinkling H2O's.  Layered with Yellow and brown CS.  Add pretty ribbon.


Card #3:Stamped with med blue/green ink on White CS.  Coloring done by filling in areas with a Versa Mark Pen and then applying chalks over the Versa pen ink. Layered with pink and green CS.  Add  pretty ribbon.


Card #4: Stamped with bright green ink on White CS.  No other coloring needed. Layered on a green card base.  Add pretty ribbon.


*******Entering my Double pair of Pear Cards into:
Simon's  Wednesday Challenge: Tie it up
Inspiration Destination: anything goes
Clear It Out: theme - anything goes; stash - anything goes. Used some coloring items that have been neglected.

I will be back in a couple days with the other cards in this group.  Have a sweet day!!  Love ya.
Karen

Tuesday, August 4, 2015

Whimsical Mannequin with Flourish Background

Hello Dreamers,
Whimsy is the key word for today's post.  Check out this cool Mannequin stamp from Carmen's Veranda.  It is oh so whimsical!!  Love the effect of stamping the image with brown ink and coloring with Copic Markers.


Materials List:
CS: pale pink, white, and cream
Ink: Brown and pale pink dye; Spun Sugar Distress Ink
Copic Markers
Lace
Piping (a sewing notion)
Ribbon


 Instructions:

  • Make a card from White or Cream CS
  • Glue a narrow strip of pale pink CS on the left edge of the card base
  • Stamp the Daisy Flourish about seven time on pale pink CS with pink ink covering the entire piece: add to card base
  • Stamp Mannequin on white or cream CS with brown ink 
  • Color with Copics and distress edges with Distress ink
  • Layer with brown CS and add to card base
  • Add piping and lace to edge of Mannequin tucking edge of lace and piping under CS (or add ribbon as in the second example below)


Second version made with cream CS and ribbon embellishment


Just love the Daisy Flourish as a background stamp!  I think it's a great way to have a custom background for my focal image.

Don't forget to check out the August Lost Coast Challenge-- Use Circles
Hope your summer is going well!  And, that you find time to indulge in some creative time.   See you next time!  Love ya.
Karen

Monday, August 3, 2015

Lost Coast Design August Challenge - Circles

Lost Coast Designs August Challenge

Hello Everyone!
Welcome to the August Challenge post for Lost Coast Designs 

(Please scroll down for the Vintage Stamping Blog Hop)

The theme for the month of August is:

Circles

Make a project using circles in some way.   You may use any stamp manufacturer on your project.  But, if you do use Lost Coast Designs or Carmen's Veranda we will really like you...and you get an extra entry in the drawing.  LOL

New Prize System:

To ensure you all have a fabulous time playing in our challenges we have a new format for our new blog!
1 - 4 entries = a winner will be awarded our Challenge Badge
5+ entries = one winner will receive a $5 gift certificate to spend at LCD/CV
10+ entries = one winner will receive a $10 gift certificate to spend at LCD/CV
(you get the Challenge Badge to proudly display on your blog too!


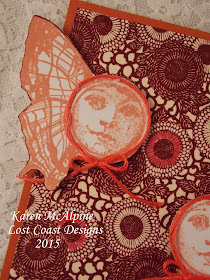
For my design team project, I incorporated circles in the background and in the focal images using two new release stamps.  Take a look.


Materials:
Stamps: Butterfly Face and Sunflowers Background - Lost Coast Designs
CS: white, cream, rust
Ink: Aged Mahogany Distress Ink; Peach Dye ink
Embroidery Floss
Glitter Pen


Instructions:

  • Make card from rust CS
  • On cream CS stamp the Sunflowers with Aged Mahogany ink and add to card base
  • On white CS stamp two Butterfly Faces with peach dye ink; cut out
  • Cut the wings off one side of each image
  • Glue embroidery floss to the outside edge of the face on each butterfly
  • Add Butterflies to the card base with dimensional adhesive.
  • Color in three of the Sunflowers with a glitter pen


Second color choice for the embroidery floss and different placement of the Butterfly Faces:

Can't wait to see your Circular projects~!!!!   Hope you will join in the fun!! Thanks for stopping by!
Karen