Pages

Wednesday, July 31, 2013

Watercolor Background Scraps with Lovely Ladies

Hi Everyone!
As you know, I love to make my own background papers.  I always keep the scrap pieces in a folder for use on another project.   I gathered up a pile of the scrap pieces and made a collage of sorts for my background.  Then, I stamped large stamps over the collaged backgrounds to make these girlie cards.  Take a look.


Sample #1


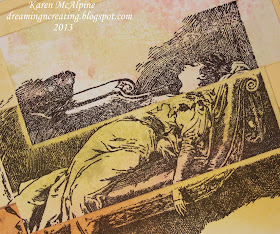
This stamp is called Patricia Swoons from Stampland.  The scraps for the background were made by putting inks, stains, and spray inks on a craft sheet; adding a spritz of water;  and pressing the CS into the inks.  I layered the scraps onto yellow CS.  The stamp is stamped with Onyx Black Versafine ink.


Sample #2


This card was made in the same way.  This stamp is called Judith's rose Capeau and is also from Stampland.  the scraps were layered onto Aqua CS.


Pretty fun way to use up all those scrap background pieces!!

******Challenges for my Collage Scrap Watercolor Backgrounds:

Addicted to stamps: anything goes
Ruby's Rainbow: layer it up
Simon's Wednesday: anything goes
ABC Challenge: use up scraps

I made three more cards like this with different stamps.  I will share those with you in a few days.  Tomorrow is the first of the month and the beginning of a New Challenge on the Stampsmith Challenge Blog.  So, check back for that!!  Hope you are having a great day.  Love ya.
Karen

Monday, July 29, 2013

"Fifties Girl" in Red Gingham Birthday Card

Hi Dreamers!
 I am back today continuing the girlie cards here in Dreamland.  And, this is the second project I made with the new stamp from Lost Coast Designs --50's Girl.  (See the first project here.)  This time I used a red and brown color scheme and added lots of fun red gingham ribbon--very Fifties!!


Materials:
Stamps: 50's Girl, Rulers Background, and Party Words Set  all from Lost Coast Designs
Inks: Red Pepper Adirondack, Coffee Archival
Distress Inks: Aged Mahogany and Pumice Stone
CS: Backed Brown Sugar and Cream from Stampin' Up; Textured Wine; Black
Red Gingham ribbon
Brown Satin Ribbon
Needle and Thread


Instructions:

  • Make a card from the Textured wine CS and layer with Baked Brown Sugar CS
  • On Baked Brown Sugar (Kraft) CS, stamp the Rulers Background with Red Pepper ink and distress with the distress inks.
  • Stamp 50's Girl on Cream CS with Coffee ink
  • Add a little bit of Aged Mahogany Distress ink to the dress.
  • Add a strip of Black CS and the brown ribbon to make a "shelf" for the girl to sit on


  • Stamp the sentiment and layer with wine CS--add to card
  • Tie a bow with the red gingham ribbon leaving very long tails.  
  • Gather the tails by running stitches along the top edge of each tail --pull the thread to gather.
  • Add a piece of the brown ribbon tied around the gingham bow


  • Make a ruffle for the bottom of the card by stitching along the top edge of a strip of ribbon.
  • Pull the stitches to gather the ribbon and glue to card --Looks like she is sitting on a ruffled sofa-Doesn't it??!!

The red gingham really reminds me of the fifties.  And, I think it matches the 50's Girl's dress.  LOL.   This makes a great birthday card too.  Wouldn't it be cute to wrap a small gift in gingham fabric??!!  And tie with the ribbon.  Yes, that would be cute.  

********Challenges for my Gingham 50's Girl:
Artistic Inspiration: celebrations
Craftin Desert Diva: birthday
Creative Creations: anything goes
Eureka Stamps: anything goes
Allsorts: Kraft


I do have a few more girlie cards to share with you.  So, I will be back soon with something all pretty and in soft colors.......  Hope you are having a great day!!  Love ya.
Karen

Fifties Sassy Gal in Pink and Turquoise

Hi Dreamers!
Today, we will take a trip back in time to the 1950's with with fun new stamp from Lost Coast Design called 50's Girl!  I had fun with this new stamp and made two projects.  I will share the Pink and Turquoise version today and tomorrow the Red gingham version.  As we all know, turquoise was "the" color in the fifties....so of course I had to incorporate that color into my design.


Materials:
Stamps: 50's Girl Circle Frame (used for the background), and Party Words, all from Lost Coast Designs
CS: Tempting Turquoise, Whisper White, and Pixie Pink from Stampin' Up; Glossy Black; Solar White Neenah
Inks: Tempting Turquoise (SU);Versafine Black Onyx
Pink Pirouette Marker (SU)
Gingham Ribbon
Pink rick rack
Pearls
Bright Pink Sharpie Marker


Instructions:

  • Make a folded card from Tempting Turquoise CS
  • Stamp Circle Frame with Tempting Turquoise ink on Whisper White CS and layer with Pixie Pink CS
  • Add to card front


  • Stamp the 50's Girl with Onyx Black ink on Solar White Neenah CS
  • Color the dress with Pink Pirouette Marker
  • Add to card with dimensional adhesive
  • Stamp the Sentiment with Tempting Turquoise ink on Pixie Pink CS
  • Color white pearls with a Bright Pink Sharpie Marker and add to card


  • Glue two pieces of pink rick rack to the stamped background
  • Wrap black gingham ribbon around card and tie in a bow

Isn't this a fun card!!  Who wouldn't love to get this on their birthday??!!  You could wrap the gift or use a gift bag in coordinating colors.

******Fun Challenges for my Turquoise and Pink Fifties Girl:
Crafts Too Challenge You: pick your Decade---I picked the 1950's ---and add lots of layers
Sister Act: anything goes
365 Cards : just a touch (of coloring on image)

So, see you next time with the second version of my 50's Girl!!  Have a super day!  Love ya.
Karen

Sunday, July 28, 2013

Feminine Card with Pretty Papers From Webster's Pages

Hi Dreamers!
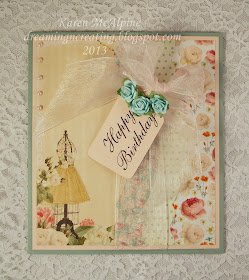
Hope you are enjoying your weekend!  We are having really nice, cool weather here in Michigan, USA.  I was able to turn off the Air conditioner and open up the windows!  We may get a little rain later, but for now, the weather is super enjoyable.  I am continuing my theme this month of girlie cards.  Today, I have a pretty thing to share with you that I made with papers from Webster's Pages (I bought  mine from the Stamp Simply Store.)  The only stamping on this card is the sentiment.  Take a look.


Materials:
Webster's Pages 6x6 paper packs
CS: Mellow Moss and Blush Blossom -Stampin' Up
Wide Sheer Pink Ribbon
Sentiment Stamp-Happy birthday from Blue Ridge Impressions
Sizzix Tag Die Cut 
Edgelits Adorning Accents Border Die Cut -Stampin' Up
Paper flowers-Recollections
Pale Pink Pearls


Instructions:

  • Make a folded card from Mellow Moss CS and layer with Blush Blossom CS
  • Select four different decorative papers --I selectively cut the paper with the dress dummy to showcase that image.
  • Use the edge die cut to cut the edge of three of the papers and layer them onto the card base


  • Die cut a tag from Blush Blossom CS
  • Stamp the sentiment on the tag
  • Tie the sheer pink ribbon around the card
  • Tie ribbon through hole in tag in a bow.


  • Glue the tag to the card front
  • Glue three paper roses to the tag


This makes a really special birthday card.  I have used this design before, but have given all the others away. They received lots of "oohs" and "awes"!  The card goes together quite quickly once you select your papers.
If you had some paper with a bird card or a large bunch of flowers, that would be beautiful in this design too!
*******How about a few fun challenges for my Feminine Birthday card?!!
Eclectic Ellapu: anything goes
Pile it On: anything goes
One Stop Craft: flowers or ribbon
Mark's Finest: tie it up
Blogger's Challenge: birthday
Crafts Too Challenge You: pick a decade-I picked the 1890's ---twist is add lots of layers


I have a few more girlie cards to share!  Next up will be a lovely 50's lady from Lost Coast Designs.  So, stay tuned for that!!  Enjoy your weekend.  Love ya.
Karen

Friday, July 26, 2013

Lovely Ladies in Coral Colors

Hi Dreamers,
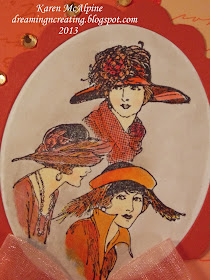
I have been out of action all week.  I am back today feeling much better and ready to share more girlie projects with you.  I used a sketch from the Rogue Redhead blog to help inspire me!  I used a monochromatic color scheme with several shades of coral colored CS, inks, and embellishments.


Materials:
Stamps: Milliner Misses and Hand Writing Background all from Rogue Redhead Designs
Inks: Tuxedo Black Memento, Burano and Pumpkin Pigment inks from A Muse Studios
CS: Solar White Neenah; Ruby Red, Crisp Cantaloupe, Calypso Coral-Stampin' Up; Medium Caribbean Coral - World Win; Lt. Peach - Bazzill; Cream
Copic Markers
Oval Die Cuts
Sheer and Satin ribbon'
Peach Rhinestones


Instructions:

  • Make a folded card from Cream CS and layer  with Ruby Red CS.
  • Cut three pieces from three different shades of Coral CS following the sketch for size
  • Stamp the script background with the pigment inks.  Heat set and add to card front


Add caption

  • Stamp the Milliner Misses on Solar White CS and color with Copic Markers.
  • Color the background with W1 and W3 Copic Markers to make the grayed/vintagey looking background.
  • Cut with an oval die and cut the scallop oval from Ruby Red CS


  • Add Rhinestones and ribbons


A few lovely Challenges for my lovely ladies:
Rogue Redheads: sketch


Crafts 4 eternity: anything goes
Card Makin Mamas: monochromatic


So, that's it for today.  I will be back tomorrow with more girlie projects!  See you then.  Hope you are having a great day!!  Love ya.
Karen

Sunday, July 21, 2013

Vintage Portrait Trio

Hi Dreamers!
Happy Sunday and hope your weekend is going well.  I am back today with a trio of vintage cards.  I used the same stamp on each card--Silhouette Portrait from Blockheads.  You can purchase this stamp for $1.50 until July 25 during the storewide 75% off sale on the Blockheads Web site!!   Take a look at my trio!


I stamped the vintage lady in coordinating ink colors on CS.  I dry embossed backgrounds as well.

On the first card, I added some pretty DP from Pink Paislee.  The main image is distressed on the edges with Mown Lawn Distress ink.


I added lace, green satin ribbon, and a paper flower on this card.


On the second card, I used a faux linen technique on the stamped part.  


  • Start with white glossy CS
  • Add blue ink and stamp the vintage lady with brown ink
  • sand the glossy paper with sandpaper


I dry embossed the stamped piece after doing the faux linen treatment.  I layered with dark brown CS and some pretty DP from Authentique.


To embellishment this card, I added paper roses and sheer blue ribbon.


On the third card, I stamped on pink CS with dark rose ink and then dry embossed.  


 I used sheer ribbon and tulle for the embellishments.


This stamp makes a great girly card.  I can use the cards for any occasion--maybe a birthday or thinking of you.  Three more nice cards for my card box!!


My lovely Vintage ladies are entered into the following challenges:
That Craft place: Its a girl thing
One stop Craft: make your own background --card # two (the blue card) Used the faux linen technique to make a background.
Hobby House Challenge: vintage
Alphabet Challenge: L is for lace --card #1
Brown Sugar: anything goes
Craft-Room Challenge: vintage


I will be posting girlie cards over the next few days.  I did the Carnival Girl ATC's and the Bird Cage DP only card so far.  I have a dress dummy, a wedding card,  and more vintage ladies coming up. All girly and pretty!!  So, stayed tuned.  Have a great day.  Love ya.
Karen

Saturday, July 20, 2013

No Stamping - Just Pretty Papers

Hi Everyone!
How is your weekend going?  Good here.  Got a bit of gardening in this afternoon.  I stayed in the shade  to stay a bit cooler.  LOL.  I was able to find time to make a  few cards this morning too.  During the week, I made a card without any stamping at all!  The main focus is the Decorative Papers.  Take a look.


Materials:
Lost and Found -Blush 6x6 Paper Pad from My Mind's Eye
CS: Rich Razzleberry and Very Vanilla from Stampin' Up
Ribbon: Sheer Magenta from Michaels Craft Store
Die Cut-Top Notch from Stampin' Up


Instructions:

  • Make a 5.5 x 6.25" folded card from Very Vanilla CS
  • To the card base, add narrow strips of Rich Razzleberry between two different DP's 
  • Cut a piece of Decorative Paper with the birdcage and a piece of Rich Razzleberry with the Die Cut
  • Layer the die cut pieces letting the Rich Razzleberry extend past the edge of the DP die cut


  • Wrap a sheer Magenta ribbon around die cut piece and tie in a bow
  • Add to card front with dimensional adhesive


Inside


  • Add more of the paper on the inside.
I can use this card for any occasion.  I will simply stamp the sentiment when I go to send the card.  I think I will save this on for a special  birthday card.  


Let's play a few challenges! 

Lisa Somerville Bloggers: things with wings
Charisma Cardz: girlie
Crafting by design: anything goes
Rhedd and Rosie: anything goes
Anything goes Challenge: anything goes
Incy Wincy: things with wings
Created with Love: anything goes
Polka doodles: things that fly

So, that about it for today.  I should probably start thinking about making some dinner.  Something cold.  A big salad, I think.  I hope you have a great weekend!!  Love ya.
Karen

Friday, July 19, 2013

Artist Trading Cards with Carnival Girl Stamp

Hi Dreamers,
Really hot here today in Michigan.  90's today!  Too hot to be outside.  I stayed in and stamped some fun ATC's (Artist Trading Cards- 2.5 x 3.5")  I used one of my favorite stamps from Blockheads-Carnival Girl.   This stamp and all other items are now 75% off  on the Blockheads Web Store!  (No coupon needed) You could picked up this stamp for $1!   Take a look at my ATC's.


I made the backgrounds by placing inks, spray inks, and stains on a craft sheet.  Add a few drops of water and press the CS into the inks.   Let dry and trim to size.   Stamp Carnival Girl with Archival inks.


I added lots of fibers and ribbons to my little cards.  The cards are so small, I was able to use ribbons from my scrap bag.    I will put my contact info on the backs of the cards and use as a business card.

**********A few fun Challenges for my Carnival Girl ATC's:
Fun with ATC's: Set of 3
365 Cards: set of 3
Brown Sugar: anything goes
Crafts 4 eternity: use paint or ink
Creative Fingers: anything goes
Inspire Me Fridays: anything

That's it for me today.  I will pop back in on Saturday with  a card to share!  Have a great weekend.  Love ya.
Karen

Wednesday, July 17, 2013

Ladybugs and Flowers--Summer Cards

Hi Dreamers!
More Bugs!!  This time I used the Ladybug and paired it with some fun punches.  On the first card I made a flower for the Ladybug to sit on  by combining punched shapes.     The Ladybug and leaf stamps are from Stampin' Up.  


The leaves are stamped and cut out.  I made a stem from a narrow strip of CS.  The Ladybug is colored with a red Marvy Marker.


The Just Because sentiment is from Sweet N Sassy stamps.  I added a few green pearls and a gingham ribbon.


This fun gingham paper on the second card is from A Muse Studios.  The stripe and Polka dot papers are from Crate Paper.


The cards were really fun to make and a great way to use some of my punches.  (The flower punch is from Stampin' Up)  Love the picnic feel the gingham papers and ribbons have.  Reminds me of a summer picnic.


A few fun Challenges for my Summer Ladybug Cards:
Creative Corner: anything goes
Inspire Me Friday: anything goes
Polka Doddle: summer fun
Sister Act Cards: anything goes

Tomorrow, I will have some vintagey ATC's to share with you!!  Stay tuned for that.  Have a lovely evening!  Love ya.
Karen

Tuesday, July 16, 2013

Blue, Blue, Blue, Butterflies and Dragonflies!

Hi Dreamers!
Raining like crazy here in Michigan again!  That's okay--all my new plants are loving it!  Today, I have more summery bug cards for you.  I made several cards all in blue--the colors made me think of nice cool evenings and cool breezes.  I used a butterfly and dragonfly stamp from Stampin' Up (retired stamps you may have in your collection).


BUTTERFLY CARD


  • Cardstock (Baja Breeze and Not Quite Navy) and Dp are from Stampin' Up. 


.


  •  I colored the butterfly with markers.  


  • The Butterfly sentiment is from My Sentiments Exactly stamped with Baja Breeze ink (SU).


DRAGONFLY CARDS


  • DP is from Cloud 9


  • Dragonfly is stamped with Stazon and colored with markers


  • This DP is also from Cloud 9


******I would like to enter my bug themed cards in the following challenges:
Anything goes Challenge: anything goes
Incy Wincy: things with wings
Created with Love: anything goes
Robyn's Fetish: things with wings


I now have a really nice collection of summer cards to send.  I have already sent out a few, but have plenty left to last until fall.  I have one more set of Buggy cards to share.  So, stay tuned for that soon.  Maybe tomorrow.   Hope you are having a super day!  Love ya.
Karen