Wednesday, October 31, 2012

WOYWW 178---A Few Things in the Works

HAPPY HALLOWEEN!


Hi Everyone,
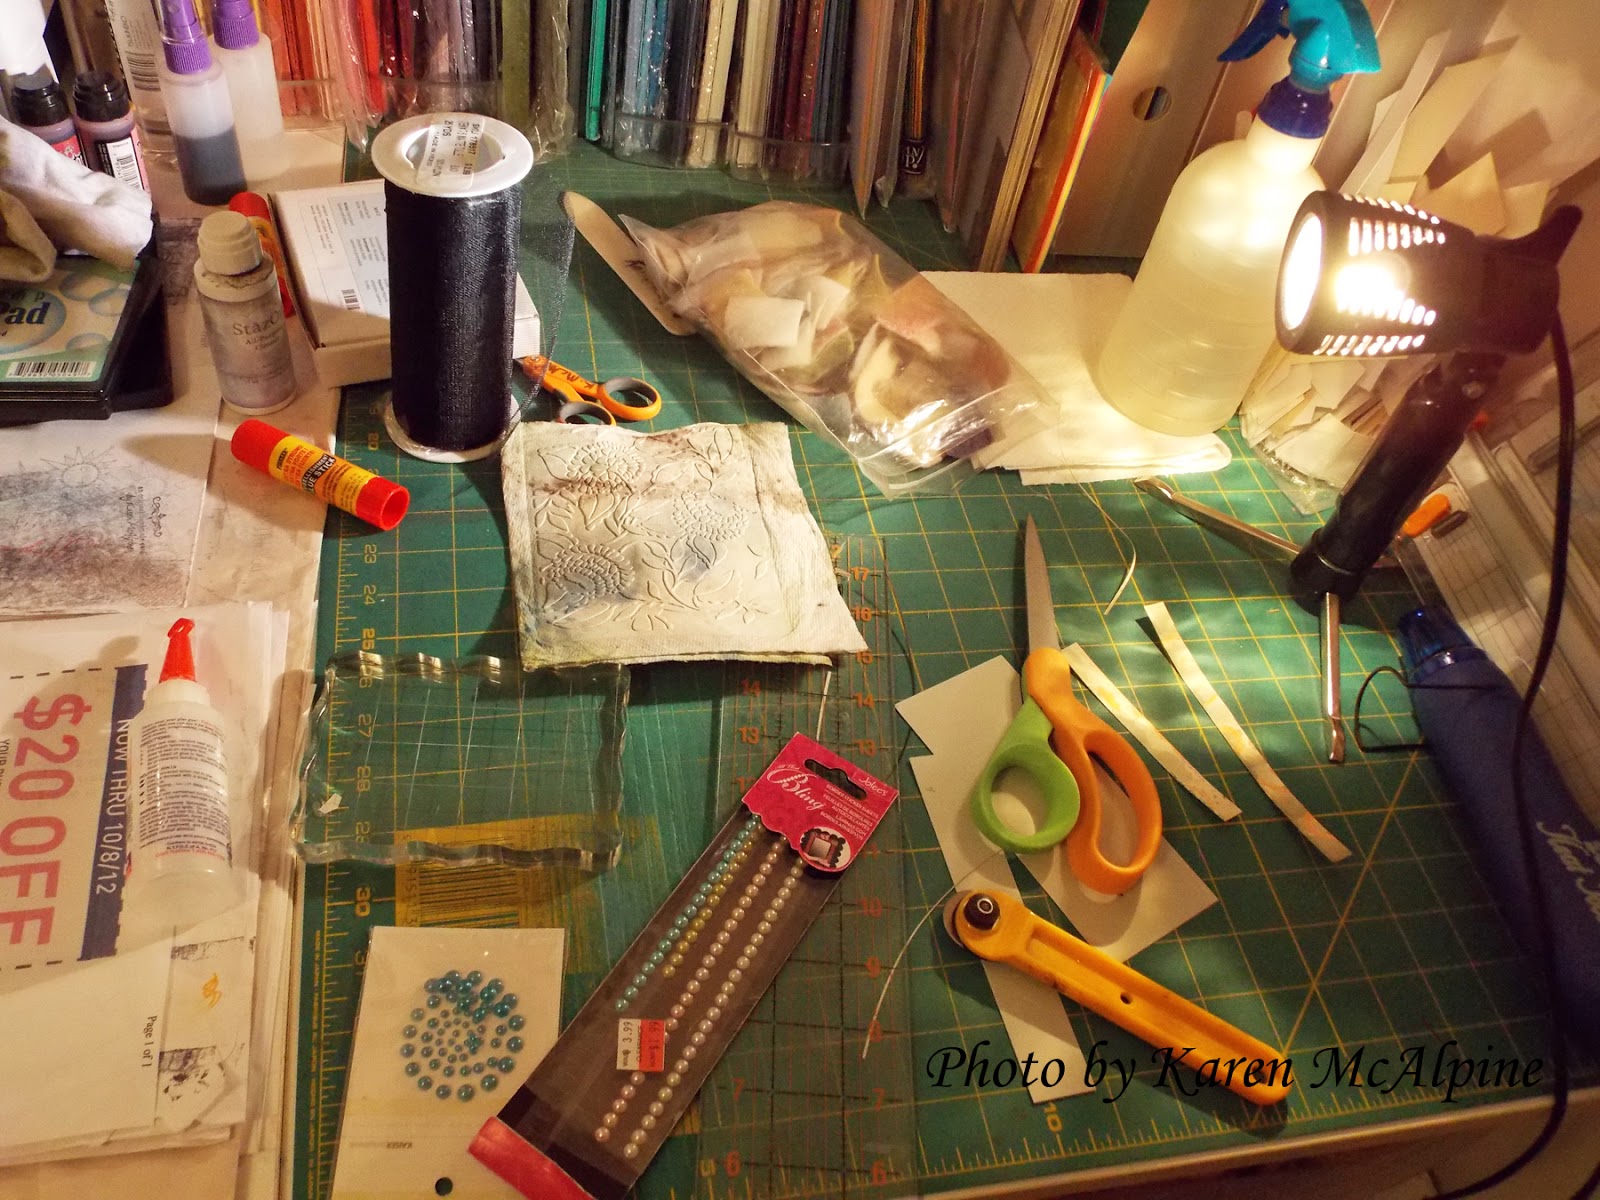
Welcome to my world.  It is What's on Your Workdesk Wednesday!!  Thanks to Julie at The Stamping Ground we get to take a look at work spaces all over the world.  "What's fun about that", you ask?  Well, I', not exactly sure, but trust me, this is fun.  I always seem to pick up a few great ideas every week.  Not to mention see some cool artwork.  So, here we go with my table.

Made a few more backgrounds for some submissions.  I have been working on those all week.  There are two cards there that I don't know what they are for.  Oh, I need a birthday card!  I can use one of them for that.


This is the cutting area...Yeah right.  Well, if I move all that stuff, I can cut here.  LOL


The Last Roses of Summer ( in my garden) for you nature lovers.  See more of my Garden here.


Picture with funny story: On Sunday afternoon, I watched a squirrel jam this mini pumpkin down between two branches.  He took a couple bits of it and then scampered off.  I guess he left it there for safe keeping.   


Happy WOYWW.   Have fun peeking at everyone's work spaces!  I know I do.  It is cold and rainy here today in Michigan.  I hope it warms up a bit for the Trick or Treaters tonight.  Have a super day.  Love ya.
Karen

Tuesday, October 30, 2012

Summer's Last Hurrah

Hi Dreamers!
The weather is changing, and you think it should be Fall.  But, in my garden, summer seems to be hanging on tenaciously.  I snapped those photos yesterday in the late afternoon.  The contrast between the bright flowers and the decay of Fall just really hit me and I felt like I needed to capture it in film.  Take a look at Summer's last hurrah...


The amazing parsley patch.

What's coming up this week???  A new Blockheads Challenge starts.  Stampsmith Challenge opens on the First.  I will start posting some Christmas ideas.  And, lots more here in Dreamland.  I am currently working on submissions this week and that is taking up most of my time.
Have you seen the new Just Cards Special Edition Steampunk II magazine??  I have three Steampunk tags in that issue.  It is really a great issue with lots of really cool Steampunk stuff!!
Well, I hope you have a great day!! See you later!  Love ya.
Karen

Saturday, October 27, 2012

Dress Form in Fall Colors

Hi Dreamers!
How is your weekend going?  Having a nice weekend here.  I went to a local farm market and picked up lots of fresh veggies.  Starting to really feel like Fall now.  Since I am feeling really Fall-ish, I have a card today made with Fall colors.  My card is made with stamps from Character Construction--Mannequin Cafe #6 stamp set.


To make my Dress Form in Fall Colors:

  • On cream CS use spray ink with a Template
  • Distress edges with Dried Marigold Distress ink.
  • Stamp the Dress Form and No with Sienna Archival ink


  • Add to a Rust card base
  • Add the Rhinestone flourish


I love how this stamp looks with the Fall swirls in the background.  I am going to send this to someone for a "hello" card.  

A few Challenges for my Dress Form Card:
2 sisters Challenge: fall
Brown sugar: Anything goes
Frosted Designs: paints, mists, ink
Stampin for the weekend: Anything goes
Artful Times: orange, brown, white

I sent out eight Halloween cards today!  Eight people will be getting some frightfully happy mail.  LOL  Enjoy your weekend!  Love ya.
Karen

Thursday, October 25, 2012

Spooky Halloween Card with The Stampsmith

Hi Dreamers!
Halloween is getting closer.  I ended up making another Halloween card today!  I used stamps from The Stampsmith's Halloween Full Sheet.  Click over and check it out.  Lots of spooky images on this sheet!!  Here is my super spooky card.  This is a long narrow card that measures 4 1/4 x 9 1/4 inches.


  • I stamped the Jack-o-lanterns on velum with Black Stazon ink. 
  • I attached the velum to the DP (K & Company) with brads.


  • Feathers and polka dot ribbon were used as accents.


  • Stamp Boo (on The Halloween Stampsmith Sheet) on Yellow CS, layer with Orange CS (Stampin' Up) and add to the inside.


Inside

Challenges for my Spooky Jack-o-lantern card:

Charisma cards: don't be square
Inky Impressions: Halloween
My Mum's craft shop:spooky
Sisterhood of  Crafters: Halloween
365 Cards: spooky
Loves Rubber stamps: Halloween
Party time Tuesdays: Halloween

Well, I guess that's enough for me tonight.  The Stampsmith October Gratitude Challenge has one week to run. Still lots of time to enter the challenge.  (You must use a Stampsmith Stamp)   Have a great evening!  Love ya.
Karen

Wednesday, October 24, 2012

WOYWW 177- An Owl Card in the Making

Hi Dreamers!
Here I am back as promised with my messy desk/work space.  Why am I posting my messy desk???  Well, it is the brain child of  the lovely Julia at her blog The Stamping Ground .  Doesn't it sound like fun to check out the creative work spaces of other artists around the world??!!  Legalized snooping!  LOL.   I haven't been up to a lot this last week as my husband had the week off.  But, anyway, here is my messy work space.


I still have a few of the Fall cards to finish up (upper left).

The Santa tag is done and I posted that yesterday for my weekly Blockheads Design Team project.

I am working on the Owl card which I finished later and posted  today here.  I am coloring this digi from Meljens Designs with Copics and Marvy Le Plume markers.


Thanks for stopping by to see my messy work space   I edited out some of the really messy spots to the right.  You can't help getting messy with all the inks and things, as I am sure you all know.  Happy WOYWW!!!  Love ya.
Karen

Missing You Wintry Owl

Hi Dreamers!
I have some new digis and the images are so cute I just had to print some out.  I combined two images from Meljens Designs.  I find it easy to combine images in Word.  I just "Insert" them and then I can change the size and move them around.  That is what I did for this card.  Here is my Missing You Owl.


To Make this card:
  • "Insert" the sentiment into a blank Word Document, and then the main image under the sentiment.  
  • I fussed with the re-sizing a bit and centered the sentiment.  
  • Print out on Neenah CS. 


This could be an all occasion card to send in the winter months,or would make a nice Christmas card with an appropriate sentiment inside.  Isn't this image just so sweet!?  I am a bit of an owl fan.

A few fun Challenges for my "Missing You Owl" card:
Meljens Digital Stamps: missing you
Through the craft room door: anything goes #41
Jingle Belles rock: use a creature
ABC Christmas: U is up to you
ABC Challenge: z is for zoo-use an animal
Fab and Funky: animals

I will be posting my messy desk top as soon as I am finished with this post!  ---You know WOYWW with the Stamping Ground.  So be right back with that!!  I hope you are having a great day.  Today is my health and beauty day---I am going to get an one hour massage---Oh, heaven.  So I should be all relaxed and happy for the rest of the week.    LOL  Love ya.
Karen

Tuesday, October 23, 2012

Glitzy Santa Tag

Hi Dreamers,
I have been working on a few Christmas items.  Mostly cards that I will sell. But, today I have a Santa Tag that will dress up any plain gift bag.  This fun tag was made with the Blockhead Stamps set An Illustrated Christmas.  I have attached it to a plain brown paper gift bag.  The tag would look equally nice on a fancier gift bag.  But, what a great way to make a plain bag snazzy in just a few minutes.


Materials List:
Stamps: An Illustrated Christmas from Blockheads Stamps
Ink: Black Pigment
Black Embossing Powder
Tarnished Bronze Metallic Stains - Ranger
Cream Cardstock
Holly 3-D sticker
Ribbon

 To make the tag:

  • Cover a tag cut from Cream Cardstock with Tarnished Bronze Metallic Stain
  • Let Dry
  • Stamp Santa with black pigment ink
  • Heat Emboss with black powder


  • Add ribbon through the hole of the tag and tie another piece of ribbon in a bow around.
  • Add the Holly 3-D sticker
  • Attach to the gift bag.  (I used a red paper clip so that the tag can be easily removed.)


A few fun Challenges for my Santa Tag:
Holly Jolly Christmas: Santa
Craft door magazine: Anything goes
Christmas stamping: traditional colors
Jingle bells: a living creature
Winter Wonderland: anything but a card

Well, I still have a very long way to go with my Christmas cards.  I will get started in earnest soon.   Yes, I know, I have been saying that for a few weeks!   Well, anyways, I wish you a great day!!  Love ya.
Karen

Monday, October 22, 2012

Domino Art Halloween Treat Box

Hi Dreamers!
A little something different for you today!  My buddy, Leigh, encouraged me to take part in the 31 Days of Halloween on her Domino Art blog.  I am actually day 24 and my project will appear on the Domino Art blog on Wednesday.  Be sure to click over and see all the amazing projects made with dominoes.  This is my  first attempt at stamping on a domino.  And, of course, I got carried away stamping and ended up with about  ten decorated dominoes.  Here  is what I decided to make with the dominoes.


Materials List:

Stamps:
  1. Fall Scene - Memory Box
  2. Bat, Pumpkin, Sentiment, Tree - Stampin’ Up
  3. Candy Corn, Frankenstein - Studio G
  4. Clothes Line - Recollections
Ink: Jet Black Stazon
Decorative Paper: K & Company
Ribbon: Michael's Craft Store
Glossy Accents
Copic Markers
Hot glue gun and glue sticks
Small box: 4 ¼ x 5 inches


Instructions: 
  • Stamp on dominoes with Stazon ink.  Let dry.  
  • Color with markers.  
  • Add a layer of  Glossy Accents when marker ink is dry.  
  • Cover box with decorative paper and ribbon.  
  • Glue dominoes to box top with hot glue gun.  
  • Tie two bows and attach with hot glue.
  • Fill with treats.


A bunch of fun Challenges for my Domino Halloween Treat box:
Art with no Boundaries: Halloween week 3
Frilly and Funky: anything but a card with a hiding place
Simon Says Stamp: inspiration photo
Crafting for all Seasons: Spooky
bloggers Challenge: alter it blog hop
Decorate to Celebrate: Halloween party
Card Making Mamas: spooky
Fussy and Fancy: Anything goes
Stampin for the Weekend: spooky
Aud Sentiments: spooky sentiment


Trying out something new is always fun.  Thanks to Leigh for twisting my arm to try Dominoes!!  Love ya.
Karen

Sunday, October 21, 2012

Spooky Wicked Halloween Card with Character Construction

Hi Dreamers,
Let's get wicked today with a spooky Halloween card!!  I put together some stamps from Character  Construction to make this fun Halloween card.  The set is called Mad Tea Party #4.


To make this card:

  • Start with white cardstock and Mini Capricious Crafters Workshop Template.  
  • Lay the template on the CS and spray with spry inks.  Dry
  • Stamp the Character Construction images and a sentiment onto the background.


  • Layer with black CS onto an orange card base.
  • Add a few orange Rhinestones and a piece of lace
  • On the inside add a scrap of the background and a fun sentiment


This card is going out to a family member.  I am sticking to my plan of sending out more cards.  I send out something every week.  I have a whole bunch of Halloween cards ready to go out.  You have seen them all on my blog.  LOL

I would also like to enter my Wicked Halloween card in the following Challenges:
Simon Says Stamp Challenge: photo inspiration
Simon Says Stamp and show: your favorite technique---creating backgrounds with templates and spray inks.
365 Cards: the letter B--Broom,black CS, Black lace, bling, blackbird
Amusing Challenges: fall colors
Come and Get it: Halloween
Fashionable Stampers: Halloween

Hope you are having a great weekend.  It seems so Fall-like here this weekend.  Lots of sunshine and golden colors.  So pretty.  Love ya.
Karen

Saturday, October 20, 2012

Fall Quilt and Craft Show Card

Hi Dreamers!
Felling the Fall vibe yet?  The leaves are starting to change here in Michigan and have put me in the mood  to make Fall themed cards.  My project today is made with a Stampsmith Stamp Set called Country Landscape full sheet.  The quilt themed stamps on this set really made me think---Fall Quilt and craft show.  I made this card thinking that it was a poster to advertise a show in the country in Autumn.  Think rustling leaves, crisp air, and changing leaves.  Are you feeling it??!!  Here is the card.


I stamped the images with Sienna Archival ink on glossy white CS. Then cut them into squares and rectangles; and glued to a base.
I cut narrow ( 1/8") from decorative paper and used them to created a patchwork like border around the stamped images.  I let some of the borders hang off the edge of the base.


On the inside, I stamped a nice fall themed sentiment from Sweet N' Sassy stamps.  I will send this card out to a friend just to say Hi!


Just a reminder that The Stampsmith Grateful Challenge is still open and you have plenty of time to enter.  You could take home a $21 gift certificate to The Stampsmith store.
Hope you are having a lovely fall day!  Love ya.
Karen

Friday, October 19, 2012

Crown Border with Gold Leafing

Hi Dreamers!
Spent the day yesterday at the Toledo Art Museum.  A special exhibit of Manet's portrait works is currently on show.    Beautiful!!!  I could have sat there all day just looking at the gorgeous paintings.   To me, beautiful works of art are so uplifting.  Came home all relaxed and happy.

Today, I have a very small work of art of my own to share with you.....great sag-way wasn't it?  LOL.  This project was made for the Blockheads Technique Challenge ----Gold Leafing.

The Challenge is open until October 21.  Still time to enter for a chance to win a $25 gift certificate to Blockheads Paper Arts.

See the step by step instructions for the Gold Leaf Techniques written by Leigh.  Here is my Crown Border with Gold Card.


Materials list:
 Feeling Regal Stamp Set from Blockheads Paper Arts
La D'ore Gold Leaf
Tuxedo Black dye ink-Memento
Two Way Glue Pen
Cardstock: Cream, peach, pale blue,and light blue
Crafters Workshop Template - Mini Damask
Spray inks.


  • I started off with a background I made with a template and spray inks.  
  • Stamp the Small Crown Border onto the background with Tuxedo Black ink.
  • Use a glue pen to draw two line of glue onto the CS.  
  • Apply the gold leaf.


  • Tear the piece to desired size.
  • Layer with peach and pale blue CS onto a light blue base.
  • Add two gold pearls.


Look how vintagey and glittery the gold leaf is.  Love it!!

I hope you have enjoyed all my glittery Gold Leafing cards.   I also hope you will give this technique a try.  It looks difficult at first, but once you get started, you will find it quite easy. Well, dear friends, have a great day and keep stamping!!  Love ya.
Karen

Wednesday, October 17, 2012

Crowns with Gold Leaf

Hi Dreamers!
I have another project using Gold Leafing for the Blockheads Technique Challenge to share with you today.  The Technique I used on this card is: Solid Stamping using a glue pad.  


Materials list:
 Victorian Eccentricities and Japanese Musicians from Blockheads Paper Arts
Script stamp (retired Blockheads stamp)
Inks:
Peach Bellini - Adirondack Ranger 
Dried Marigold Distress Ink -Ranger
Royal Satin Kaleidacolor Pad  - Tsukineko
La D'ore Gold Leaf
Tuxedo Black dye ink-Memento
The Essential Glue Pad- Tsukineko
Cardstock: Cream, Peach, Orange, light blue
Crafters Workshop Template - Mini Damask
Spray inks.


  • I started off with a background I made with a template and spray inks.  
  • "Ink" up the Border stamp with the Glue Pad.  
  • Stamp onto the background.  
  • Apply the gold leaf.  


  • Stamp the Script with Peach Bellini ink.
  • Stamp the Crown with the Kaleidacolor Pad favoring the green end.
  • Layer with peach and orange CS onto a light blue base.

I would like to enter my Golden Crown Card in the following Challenges:

Simon Says Stamp and Show: favorite ---My favorite is making backgrounds with templates and spray inks.  
Crafty Bloggers Network: anything goes
Creative Craft Challenge 2: Three---I used three different stamps
Through the Craft room door: Anything goes #40

I have one more Gold Leafing project that I will post on Friday.  So, stayed tuned for that.  Hope you are having a great day!!  Love ya.
Karen

WOYWW 176 - Fall Themed

Hello Everyone!
Is it really Wednesday again?  My, the days just seem to fly by!  As it is Wednesday, it is time to fly around the world checking out all the work spaces.  How is this possible you ask.  Well, through the magic of Julia at The Stamping Ground and  Mr linky of course.   I have been quite busy lately.  I have finished making the cards that I will sell at a small show in December.  I ended up with about 200 cards.  They have to all be packaged yet.  So, I thought I would make a few cards for charities and for friends and family.  Hence these fall themed cards.  Half are going to two charities and half to family.  I used a stamp from Memory Box.  There is a bag of twine that I may use on some of the cards.


close up


Well, I am off to visit some other work desks!!  Hope you are having a great day!! Love ya.
Karen

Tuesday, October 16, 2012

All That Glitters is Gold Leaf

Hi Dreamers!
It's technique time!!!  Are you ready for the Blockheads Technique Challenge ?!!  This month the lovely Leigh has challenged us to create a project using


Gold Leafing

I have to say this is something I have not tried.    Once you get going it is easier than it looks.   Leigh outlines several ways to use gold leafing.

I choose three of the techniques to complete my projects---


  1. Faux patina using a glue pad,
  2. Solid stamping,
  3. Using a glue pen.  

I made three projects and will do a separate post for each here on my blog through out the week.  Here is how the challenge works.  Check out the tutorial and make your project.  Link it up on the Blockheads Blog here.  The challenge will run until October 21.  For my first project, I created a faux patina using a glue pad.

 Size: 4 1/4 x 5 1/4"

Materials list:
 Feeling Regal Stamp Set from Blockheads Paper Arts
La D'ore Gold Leaf
Tuxedo Black dye ink-Memento
The Essential Glue Pad- Tsukineko
Cardstock: Cream, black, light blue
Crafters Workshop Template - Mini Damask
Spray inks.

Instructions:

  1. I started with a piece of background created with the Mini Damask template and spray inks.  
  2. Trim the CS to size.  
  3. Stamp the large Damask image with Tuxedo Black ink.
  4. Pat the glue pad around the edges of the CS.
  5. Press the gold leafing into the glue.

Karen's Tip: trying to pick up a sheet of gold leafing is difficult (understatement).  I left the sheet in it's folder and slipped the CS under the sheet of gold leafing and gently pressed it into the glue.


You can really see the gold in this photo.  Isn't that just lovely?  The leafing really adds a great shimmer and lots of texture.


To finish the card, layer onto a piece of black CS and a light blue card base.  Really great tech.  Imagine the gold or silver leaf on a Christmas card!  I can't wait to see what you come up with!!  Oh, and did I mention, you could take home a $25 gift Certificate to Blockheads Paper Arts!!!  Yes, you can.  I hope you are having a great day!!  Love ya.
Karen